EasyManua.ls Logo

General 854

General 854
2 pages
To Next Page IconTo Next Page
Loading...
1
Safety InStructIonS
1. Always use eye protection when using power tools. Wear
safety goggles that comply with ANSI 287.1.
2. Always unplug your power drill before changing bits and
attaching drill stops.
WHat’S IncLuDeD
(see figure above)
CALLOUT # DESCRIPTION QUANTITY
1 Wood thickness adjustment thumbwheel 1
2 Step drill bit, 3/8" 1
3 Stop collar 1
4 Hex wrench 1
5 #2 x 6" square drive bit 1
6 1" long coarse thread wood screws
with #2 washer head 24
7 1" long fine thread wood screws
with #2 washer head 24
8 Spare hex head screws 2
9 Work piece clamp with
plastic thumbnut 1
10 Jig mounting holes 2
11 Hex head screws (hidden)
securing jig base to vertical piece 2
SetuP InStructIonS
To familiarize yourself with the jig and
avoid ruining good stock, practice making
a few pocket holes on scrap pieces of
wood before starting your project.
Secure the jig to your workbench or fixed
work surface using the two mounting
holes on the bottom of the jig (Callout 10).
oPeratInG InStructIonS
1. Adjust the height of the drilling platform
for the nominal work piece thickness by
aligning the top of the platform with the
correct line on the scale marked on the
jig body. Secure the platform by hand-
tightening the metal thumbwheel
(Callout 1).
2. To set the drill bit to the correct drilling
length, ensure that the stop collar
(Callout 3) on the step drill bit (Callout 2)
is positioned at the correct height to
prevent drilling into the jig. The tip of the
bit should be close to the platform—but
not touch it. Use the included hex
wrench to loosen/tighten the set screw
on the stop collar.
ADJUSTABLE
POCKET HOLE
JIG KIT
#854
INSTRUCTIONS
P
lease read these instructions carefully
and thoroughly before using this product.
Question and Answer IconNeed help?

Do you have a question about the General 854 and is the answer not in the manual?

General 854 Specifications

General IconGeneral
BrandGeneral
Model854
CategoryTools
LanguageEnglish

Summary

Safety Instructions

Eye Protection

Always use eye protection compliant with ANSI 287.1 when using power tools.

Power Tool Safety

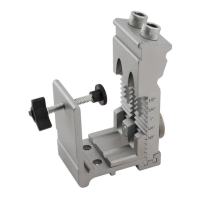
Unplug drill before changing bits or attaching drill stops for user safety.

Setup Instructions

Practice and Bench Mounting

Practice on scrap wood and secure jig to workbench using bottom mounting holes.

Operating Instructions

Adjusting Drilling Platform Height

Align platform top with scale on jig body and hand-tighten thumbwheel.

Setting Drill Bit Depth

Position stop collar correctly to prevent drilling into jig, using hex wrench.

Drilling Pocket Holes

Center and clamp workpiece, drill until stop collar hits jig ring, using short strokes.

Assembling Joints

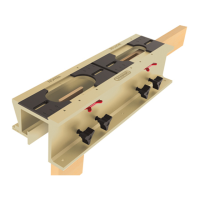
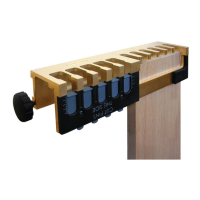
Clamp mate pieces, drive screws using square drive bit, add glue if desired.

Separating Jig Sections

Detach vertical piece from base using hex wrench for horizontal or corner drilling.

Warranty and Repair

Warranty Information

General warrants products against defects for one year or limited lifetime.

Return for Repair Policy

Contact Customer Service for RGA number before sending unit for repair.

Related product manuals