EasyManua.ls Logo

Generic BHT-1000 User Manual

Generic BHT-1000
2 pages
To Next Page IconTo Next Page
Page #1 background imageLoading...
Page #1 background image
ModelBHT-1000
Heating Room Thermostat
User Guide
Welcome
Thank you for your purchase.
Thermostat
Screws
Installation/programming manual
Wall plate
Your thermostat carries an 18 month warranty from
date of purchase. Service outwith the warranty
period may incur a charge.
Contents
Warranty
Your thermostat
Features
Simple installation
Acrylic face plate
Large, backlit display
Sleek, contemporary design
Elegant chrome frame
Feather touch control panel
5+2 six period per day programming
Simple, one-touch temperature control over-ride.
Pre-set temperatures maintained within +/- 1°C
Internal and external sensors allow control of
both air and/or floor temperatures
Suitable for installation in a standard single pattress
box or European 60mm round box
RS485/MODBUS communication optional
Home screen quick reference
Operation/programming
1. Power on/off
Press to turn on/off.
2. Adjusting/setting the temperature
Press to set the desired temperature.
3. Adjusting/Setting the clock
5.Adjusting/setting the program schedules
The BHT-1000 range has been developed to
control electric underfloor or water heating systems.
These units are designed for use in commercial,
industrial, civil and domestic properties.
Power Up DownClock
Mode
Time
Timing on/off
AM/PM
Room Temp.
Set Temp.
Manual
Lock
Period
Floor Temp.
Heating On
Programmable
Temp.Week
Technical Data
SensorNTC
Accuracy±1
Power Consumption< 1.5W
Timing Error<1
Power Supply95 ~ 240VAC, 50 ~60Hz
Current Load3Awater heating),
16Aelectric heating)
Shell materialPC+ABS (flame retardant)
Dimension86x86x13.3mm
Ambient Temp.0-45℃,5-95RH
Non-condensing
Storage Temp.-5-55
Installation Hole distance: 60mm
Set Temp. Range5-35
Room Temp. Range5-99
Your new thermostat will provide uniform and
comfortable temperature control throughout
every room in your property. We bring together
technology, craftsmanship and the highest quality
materials to provide you with a safe, reliable
product combined with sleek, contemporary design.
Please read this installation/programming manual
for comprehensive instructions on installing and
operating your thermostat. Please ensure a
suitably qualified person installs your thermostat
and complies with all local regulations.
2.5m External (Floor) Sensor
1pc
1pc
1pc
1pc
1pc
Touch the icon to set minute, hour and weekday
(1 = Monday, 2 = Tuesday etc.) by using the
arrows. Press once more to confirm and exit.
4.Locking your thermostat
Press and hold the and arrows for 5 seconds
to lock/unlock your thermostat.
Your thermostat provides six scheduled heating
periods each day – three Comfort periods - 1, 3 & 5
(the temperature required when room is occupied)
and three Economy periods – 2, 4 & 6 (the
temperature required when room is unoccupied).
You can set both the time and temperature for each
of these six daily periods. Adjusting/setting the
schedules can only be carried out when in program
mode;
Touch M (mode) to change between manual mode
and programme mode. In manual mode,
Eco-Term sp. z o.o. ul. Mały Płaszów 10 30-720 Kraków www.eco-term.eu
Eco-Term Group s.r.o Orgovánová 2 917 02 Trnava www.eco-term.net
Question and Answer IconNeed help?

Do you have a question about the Generic BHT-1000 and is the answer not in the manual?

Generic BHT-1000 Specifications

General IconGeneral
Protection ClassIP20
Current Load (Water Heating/Water Boiler/Gas Boiler)3A
Current Load (Electric Heating)16A
SensorNTC
Accuracy±0.5°C
Set Temp. Range5°C to 35°C
Shell MaterialFlame retardant ABS
DisplayLCD
Programmable7 days programmable
Dimensions86mm x 86mm x 25mm
Ambient Temp.0°C to 40°C

Summary

Your thermostat

Features

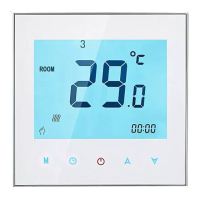
Lists key features like simple installation, backlit display, feather touch control, and programming options.

Technical Data

Details technical specifications including sensor type, accuracy, power, and dimensions.

Home Screen Quick Reference

Operation and Programming

Power On/Off

Explains how to turn the thermostat on and off using the power button.

Adjusting Temperature

Describes how to set the desired temperature using the up/down arrows.

Setting the Clock

Details the process for setting the clock, including minutes, hours, and weekdays.

Locking Your Thermostat

Explains how to lock or unlock the thermostat by pressing specific buttons.

Setting Program Schedules

Guides on setting daily heating periods (comfort and economy) with time and temperature.

System Function Settings

Covers system settings like air temp calibration, switching differential, and button locking.

Installing Your Thermostat

Step 1: Keep Power Off

Instructs to ensure power is disconnected before starting installation.

Step 2: Remove Mounting Plate

Details how to detach the mounting plate from the thermostat body.

Step 3: Connect Power Supply

Guides connecting power, load, and external sensors to the correct terminals.

Step 4: Fix Mounting Plate

Explains how to secure the mounting plate to the wall using screws.

Step 5: Fasten Thermostat Body

Describes attaching the thermostat body to the mounting plate via the groove.

Step 6: Installation Complete

Confirms the final step of installation, referring to a diagram.

Wiring Your Thermostat

Important Notes

Contains crucial notes regarding sensor error display and temporary floor temperature viewing.