Do you have a question about the Genmitsu PROVerXL 6050 Plus and is the answer not in the manual?
Lists all mechanical components included in the unboxing.
Lists all electrical components included in the unboxing.
Details all screws and other hardware for assembly.
Information on optional accessories to enhance the CNC experience.
Step-by-step guide for installing the Y-axis lead screw.
Instructions for mounting the Y-axis stepper motor.
Guide to attaching the left and right gantry supports.
Steps to install the X-axis assembly onto the gantry.
Instructions for mounting the X-axis stepper motor.
Guide for installing the Z-axis stepper motor.
Steps to mount the spindle holder and spindle motor.
How to attach the X-axis limit switch plates.
Instructions for mounting the Y-axis limit switches.
Guide to install Y-axis limit switch plates and drag chain mounts.
Steps for attaching the rubber feet to the machine base.
Instructions for attaching the Y-axis drag chain.
Instructions for attaching the X-axis drag chain.
Guide for mounting dust baffles and spoilboard.
Guide to install the necessary USB driver for the machine.
Steps to identify the machine's COM port in Device Manager.
How to connect the Grblcontrol software to the CNC controller.
Introduction to using the Grblcontrol software interface.
Steps to load and run G-code for CNC operations.
Information on pre-configured firmware parameters for the machine.
Overview of the Z probe function and its purpose.
Instructions for operating the Z probe using Grblcontrol.
Guide on editing probe commands within the software.
How to input probe commands into the software interface.
Steps to connect the physical probe tool.
How to perform automatic Z-axis zeroing using the probe.
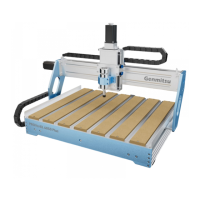
| Model Name | PROVerXL 6050 Plus |
|---|---|
| Drive System | Dual linear rail with single Y-axis system |
| Control Board Compatibility | GRBL 1.1h |
| Stepper Driver | TB6560 |
| Stepper Motors | NEMA 23, 3.1N-100mm |
| Spindle | 300W 6A, 12000RPM |
| Extra Mount | 65mm (the standard one is 52mm) |
| Homing Switches | X, Y, Z Limit Switches + ESTOP |
| Leadscrew Size & Type | T10 2mm pitch, 5mm lead 5 start acme lead screw |
| Linear Rails Size & Type | EG-15 Linear Rails & HG-20 Linear Rails |
| Max speed | 2000mm/min |
| Running Accuracy | ±0.05MM |
| Repositioning Accuracy | ±0.05MM |
| Power Supply | 600W, 7A, 0-48V |
| CAM Software | Candle, Carveco Maker, Easel |
| Work Area | 600 x 500 x 115mm (23.62" x 19.69" x 4.53") |
|---|---|
| Body Material | Metal Frame & T-Slot Hybrid Spoilboard |
| Overall machine size | 991 x 782 x 641mm (39.02" x 30.79" x 25.24") |
| Controller box size | 267 x 190 x 312mm (10.51" x 7.48" x 12.28") |