Chapter 3 Appendix
3-1 ConguringaRAIDSet
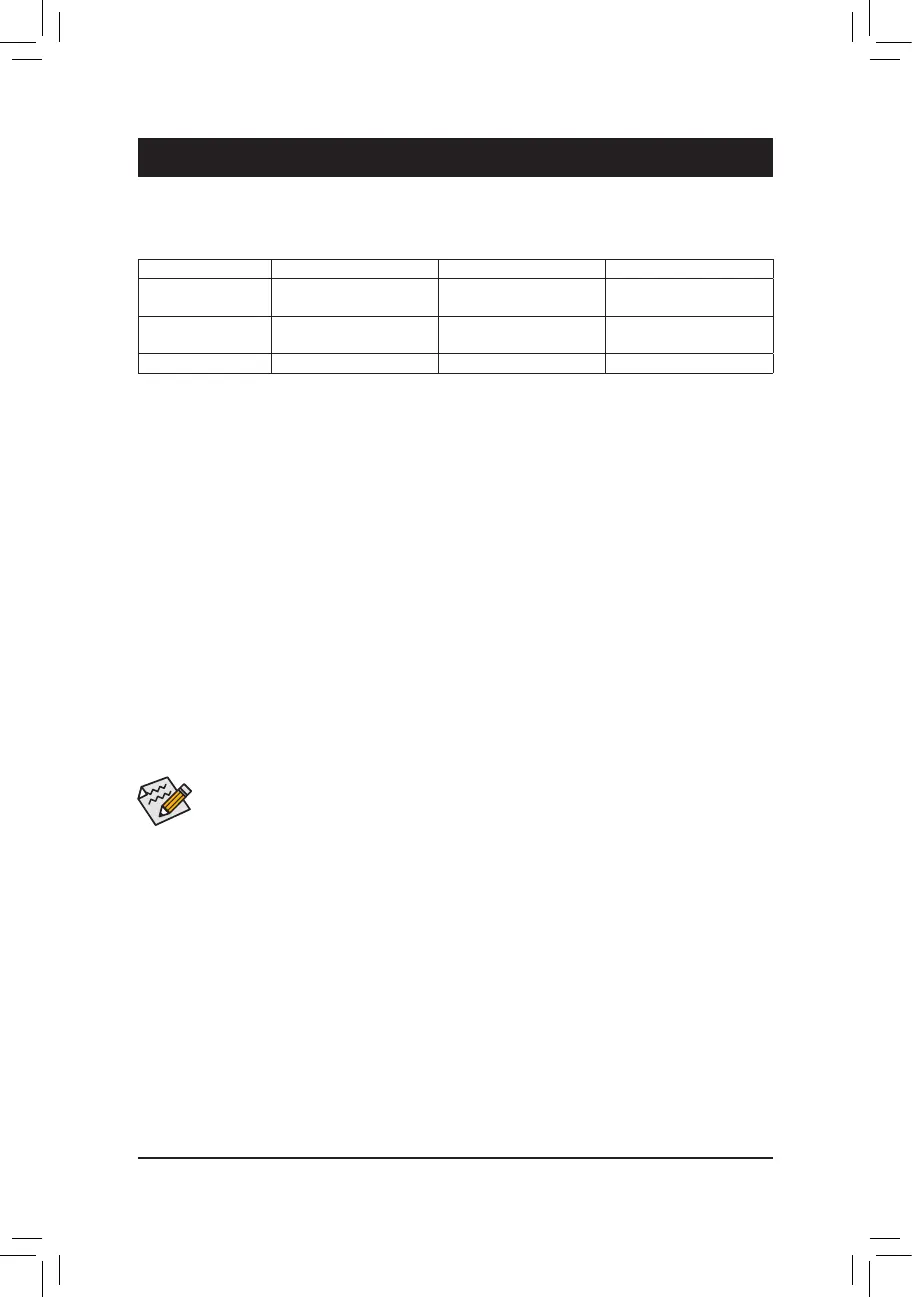
RAID Levels
RAID 0 RAID 1 RAID 10
Minimum Number of
Hard Drives
≥2 2 4
Array Capacity Number of hard drives *
Size of the smallest drive
Size of the smallest drive (Number of hard drives/2) *
Size of the smallest drive
Fault Tolerance No Yes Yes
Before you begin, please prepare the following items:
• At least two SATA hard drives or M.2 SATA SSDs (to ensure optimal performance, it is recommended that
you use two hard drives with identical model and capacity).
(Note)
• A Windows setup disk.
• Motherboard driver disk.
• A USB thumb drive.
ConguringSATAControllers
A. Installing hard drives
Install the hard drives/SSDs in the SATA/M.2 connectors on the motherboard. Then connect the power connectors
from your power supply to the hard drives.
B.ConguringSATAcontrollermodeinBIOSSetup
MakesuretoconguretheSATAcontrollermodecorrectlyinsystemBIOSSetup.
Steps:
1. Turn on your computer and press <Delete> to enter BIOS Setup during the POST (Power-On Self-Test).
Under Chipset, ensure APU SATA Port Enable and Chipset SATA Port Enable are enabled. Set SATA
Mode to RAID. Then save the settings and restart your computer.
2. IfyouwanttocongureUEFIRAID,followthestepsin"C-1."ToenterthelegacyRAIDROM,savethe
settingsandexitBIOSSetup.Referto"C-2"formoreinformation.
The BIOS Setup menus described in this section may differ from the exact settings for your motherboard.
The actual BIOS Setup menu options you will see shall depend on the motherboard you have and
the BIOS version.
(Note) Referto"1-7InternalConnectors,"fortheinstallationnoticesfortheM.2andSATAconnectors.
C-1.UEFIRAIDConguration
OnlyWindows1064-bitsupportsUEFIRAIDconguration.
Step:
1. In BIOS Setup, go to BIOS and set Windows 10 Features to Windows 10 and CSM Support to Disabled.
Save the changes and exit BIOS Setup.
2. After the system reboot, enter BIOS Setup again. Then enter the Peripherals\RAIDXpert2Conguration
Utility sub-menu.
3. On the RAIDXpert2CongurationUtility screen, press <Enter> on Array Management to enter the Create
Arrayscreen.Then,selectaRAIDlevel.RAIDlevelssupportedincludeRAID0,RAID1,andRAID10(the
selections available depend on the number of the hard drives being installed). Next, press <Enter> on Select
Physical Disks to enter the Select Physical Disks screen.
- 34 -
 Loading...