Made in Germany
May 2017 - 2 - © Gigahertz Solutions GmbH
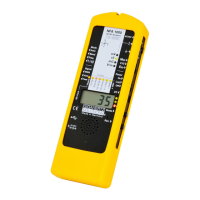
1 Quick Start Guide
The instructions below refer to the factory default settings.
These settings can easily be customized with the help of the
supplied software „NFAsoft“.
When switching on the instrument the LCD will briefly show
“batt” and the remaining operation time with the current ca-
pacity of the batteries (you may need to switch off the NFA
after a couple of minutes and on again in order to update the
information (see page 2)).
Set all switches to their top position! (Auto,
tRMS, M3D and On)
With these settings and the mode button, one can easily
start the conventional measurement process, without de-
tailed knowledge of the instrument´s features.
The LCD display will now indicate the isotropic (3D) AC
magnetic field strength as the primary measurement. The
coloured frequency LEDs above the LCD display show the
active frequencies, the red LED indicating the dominant one.
The dominant axis x, y or z is indicated by a red LED on the
right of the LCD display. That’s it – no further switches or
steps needed.
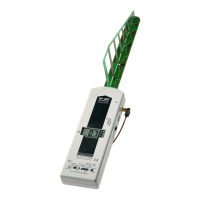
NFA 1000:
To measure the E-field with ground-reference (1D) simply
connect the grounding cable. The NFA detects the attached
cable and automatically shows the corresponding AC elec-
tric field strengths and frequencies. The E-field measure-
ment will now be displayed as the primary measurement and
the 3D magnetic field as the secondary. By depressing the
‘mode’ button you can easily switch from this to the 3D
magnetic field on the display.
To measure the three dimensional potential-free AC elec-
tric field, switch to E3D and fix the instrument onto a poten-
tial-free rod or onto a support. By pressing the ‘mode’ but-
ton you can easily switch from this to the Z-axis of the AC
magnetic field on the display.
>
 Loading...