10
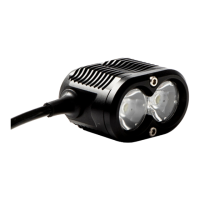
Changing the Optics
The X2 is supplied with 2 installed optic lenses. Additional optics can be purchased
from your supplier. To change optics follow to the process below:
1. Remove the X2 from the battery.
2. Remove the two front screws using the supplied 2mm hex tool.
3. Now remove the front plate, the protective lens and the o-ring.
4. Carefully remove the optic; you will now see the LED – TAKE CARE: Do not touch
the LED or the electronic board/connections, doing so will leave body oils on the
surfaces and potentially damage the X1.
5. Place the new optic/s into the X2 so the top of the optic is flush with the front of
the housing.
6. Replace the o-ring, the protective lens and the front plate.
7. Tighten the front screws until the front plate is flush with the housing. Do not
over tighten.
ANY OTHER DISASSEMBLY OR MODIFICATION OF THE LIGHTHEAD/BATTERY/
CHARGER WILL RESULT IN VOIDING THE MANUFACTURER’S WARRANTY.
 Loading...