EasyManua.ls Logo

GMC RT200 - User Manual

GMC RT200
15 pages
Print Icon
To Next Page IconTo Next Page
Loading...
INSTRUCTION MANUAL
Router
Table
• Melbourne • Perth • Auckland • Hong Kong • Shanghai
• Taipei • New York • Verona • London • Paris
RT200
031209 ED8 DR
Question and Answer IconNeed help?

Do you have a question about the GMC RT200 and is the answer not in the manual?

Summary

Introduction and Specifications

Product Symbols Explained

Details the meaning of symbols used on the tool and in the manual for important safety information.

Technical Specifications

Lists key measurements and dimensions of the router table for operational understanding.

General Safety Instructions

Router Table Specific Safety

Assembly and Setup

Unpacking and Parts Check

Guide to carefully removing all parts from the carton and verifying contents against the provided list.

Component Identification

Familiarizes users with all operating features and safety requirements of the router table.

Attaching Table Components

Instructions for attaching the legs, switch box, and securing the table to a workbench.

Fence and Guard Assembly

Steps for attaching the rear fence, infeed/outfeed panels, and the safety guard.

Mitre Gauge and Router Mounting

Guidance on assembling the mitre gauge and mounting specific router models to the table.

Alternative Router Mounting and Inserts

Instructions for mounting routers without pre-drilled holes and fitting table inserts.

Operation and Adjustment

Router Table Operation

Procedure for safely turning the router on and off using the table's switch.

Depth of Cut Adjustment

Explains how the plunge lock lever affects the router's height and depth of cut.

Using the Starting Pin

Details the function and use of the starting pin for pivoting small work pieces.

Fence Adjustment Guide

Instructions on adjusting the fence for different work piece sizes and shapes.

Direction of Material Feed

Specifies the correct direction to feed material against the router bit's rotation.

Maintenance Procedures

Cleaning and Lubrication

Guidelines for keeping the tool clean, removing dust, and re-lubricating moving parts.

General Inspection

Advice on regularly checking that all fixing screws remain tight to prevent vibration issues.

Power Cord Care

Information on power cord replacement, requiring manufacturer or authorized service.

Overview

This document is an instruction manual for the GMC RT200 Router Table, a tool designed to facilitate precise routing and shaping of wood. It provides comprehensive information on assembly, operation, maintenance, and safety guidelines for both the router table itself and compatible routers.

Function Description

The GMC RT200 Router Table serves as a stable and adjustable platform for mounting a router, transforming it into a stationary woodworking machine. This setup allows users to perform various routing operations with greater control, accuracy, and safety compared to handheld routing. It is primarily used for cutting and shaping wood, enabling tasks such as edge profiling, dado cuts, rabbets, and decorative work. The table's design incorporates features like an adjustable fence, a mitre gauge, and multiple table inserts to accommodate different bit sizes and workpieces, enhancing versatility and precision.

Important Technical Specifications

  • Table size: 360mm x 610mm x 30mm
  • Table height: 350mm
  • Fence width: 360mm
  • Maximum cutter diameter: 52mm

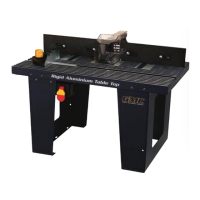
The router table is constructed with a rigid aluminum table top, providing a durable and flat work surface. It includes two table legs for support, which can be secured to a workbench for added stability. The switch box, featuring an on/off switch with a disabling insert for safety, is integrated into the left leg.

Usage Features

The RT200 Router Table is designed for ease of use and precision.

  • Assembly: The table is shipped disassembled and requires assembly before use. Instructions cover attaching the legs, switch box, fence components (rear fence, infeed/outfeed fence panels, adjustable fence bracket), guard, and mitre gauge.
  • Router Mounting: The router plate is specifically designed for GMC R1200, R1250, and R2050 routers. For other router models, instructions are provided for drilling custom mounting holes in the router plate to ensure compatibility. It is crucial to ensure the router is securely attached to the table before operation.
  • Table Inserts: Three different sized table inserts (32mm, 47mm, 55mm) are supplied to accommodate various router bit diameters, preventing contact between the bit and the table insert.
  • Operation Control: The router table features a dedicated on/off switch with a safety disabling insert. The router's power cord plugs into an outlet on the switch box, allowing the table's switch to control the router's power.
  • Depth of Cut Adjustment: The depth of cut is adjusted using the plunge lock lever on the router itself, as detailed in the router's instruction manual.
  • Starting Pin: A starting pin is provided for pivoting small workpieces, fitting into a threaded opening on the table near the insert.
  • Adjustable Fence System: The fence system is highly adjustable. The rear fence slides along channels on the table, secured by locking knobs. Infeed and outfeed fence panels attach to the rear fence and can be slid left and right. The outfeed fence can also be moved forward or backward to support the workpiece after cutting, compensating for removed material. This adjustability allows for precise alignment with the router bit and support for various workpiece sizes and shapes.
  • Mitre Gauge: The mitre gauge pivots on a mitre bar and can be locked at desired angles, facilitating accurate angled cuts.
  • Safety Features: The table includes a guard to protect the operator from the cutting edge of the router bit. The on/off switch has a disabling insert to prevent unintentional starting. Users are reminded to always use safety accessories like hearing protection, eye protection, and a dust mask.
  • Dust Extraction: The rear fence incorporates a large dust extraction port, which should be connected to dust extraction equipment to maintain a clean work area.
  • Workpiece Feeding: Material should be fed from right to left, against the rotation of the router bit, and kept tight against the fence. Push sticks, feather boards, and jigs are recommended for holding workpieces and maintaining control, especially near the spinning bit.

Maintenance Features

Regular maintenance is essential for the longevity and safe operation of the router table.

  • Cleaning: Keep the tool's air vents unclogged and clean. Regularly remove dust and dirt, preferably with a rag. Avoid using caustic agents to clean plastic parts; a mild detergent on a damp cloth is recommended, ensuring water does not contact the router table.
  • Lubrication: Re-lubricate all moving parts at regular intervals.
  • General Inspection: Regularly check that all fixing screws are tight, as they may vibrate loose over time.
  • Power Cord Maintenance: If the supply cord needs replacement, this task must be carried out by the manufacturer, their agent, or an authorized service center to avoid safety hazards.

The manual emphasizes the importance of reading and understanding all safety instructions before use, including general power tool safety and specific rules for router tables, such as ensuring the router is securely mounted, using the guard, and avoiding dull or damaged bits. It also highlights the 2-year replacement warranty for home use and a 30-day satisfaction guarantee, with contact information for customer support in Australia and New Zealand.

GMC RT200 Specifications

General IconGeneral
BrandGMC
ModelRT200
CategoryWood Router
LanguageEnglish

Related product manuals