EasyManua.ls Logo

Go Rhino Road Defender Push Bumper 5000 Series User Manual

Go Rhino Road Defender Push Bumper 5000 Series
11 pages
To Next Page IconTo Next Page
Page #1 background imageLoading...
Page #1 background image
1
REV.01
INSTALLATION INSTRUCTIONS
PRODUCT SAFETY & LEGAL DISCLAIMER
© 2016 Go Rhino Products. All rights reserved
www.gorhino.com 589 W. Apollo St., Brea, CA 92821 P: 888 427 4466
IMPORTANT READ ALL INSTRUCTIONS CAREFULLY BEFORE INSTALLING, FAILURE TO DO SO
MAY CAUSE PERSONAL INJURY OR DAMAGE TO PRODUCT AND/OR PROPERTY.
Review the product package and contents prior to beginning the installation. Take care when
opening the packaging and removing items. If a return is needed you will want to return the product in
its original packaging if possible.
This instruction guide is provided as a GENERAL installation guide, some vehicles vary dimensionally
and may require additional steps.
Test fit the product on the vehicle prior to any third party modifications and or finishing. The
manufacturer and/or distributors do not accept responsibility for third party charges, labor and or
third part replacement modifications. Some modifications may void the factory warranty.
Exercise due-diligence when installing this product. The manufacturer and distributors of this product
do not accept any responsibility for vehicle damage or personal injury resulting from the installation of
this product. Careless installation and operation can result in serious injury or equipment damage.
This product is for general off-road use. All liability for installation and use rests with the
owner/operator.
INSTALLER: Once installation is complete, please return this guide along with other documentation
included in this product back to the consumer for future reference. The manufacturer/distributors of
this product do not guarantee this particular version will be available at a later date.
REV 3 05/13/2016
PART NO.
5344
PRODUCT DESCRIPTION:
5000 SERIES ROAD DEFENDER PUSH
BUMPER
APPLICATION:
FORD INTERCEPTOR UTILITY
Question and Answer IconNeed help?

Do you have a question about the Go Rhino Road Defender Push Bumper 5000 Series and is the answer not in the manual?

Go Rhino Road Defender Push Bumper 5000 Series Specifications

General IconGeneral
BrandGo Rhino
ModelRoad Defender Push Bumper 5000 Series
CategoryAutomobile Accessories
LanguageEnglish

Summary

Product Safety & Legal Disclaimer

General Installation Guidance

This guide provides general installation advice; dimensional variations may require additional steps.

Third-Party Modification Liability

Manufacturer accepts no responsibility for third-party charges or modifications that may void warranty.

Installation Due Diligence

User assumes all responsibility for vehicle damage or injury during installation.

Injury Hazard Precautions

Personal Safety Measures

Remove jewelry, wear protective clothing, gloves, and eye protection during installation.

Vehicle Lifting Safety

Use extreme caution when jacking; employ emergency brake, wheel blocks, and jack stands.

Safe Drilling Practices

Exercise caution when drilling, inspect area thoroughly, and protect surrounding objects.

Maintenance and Care Guidelines

Product Warning - Sensor Systems

Parts and Tools List

Installation Steps

Step 1: Bumper Cover Removal

Remove the front bumper cover by detaching all securing fasteners from the top, bottom, and sides.

Step 2: Remove Upper Air Deflector

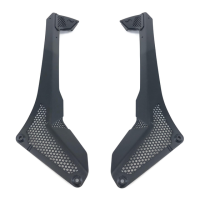
Unsnap clips securing the upper air deflector and remove it from the radiator support bracket.

Step 3: Remove Lower Air Deflector

Unsnap clips securing the lower air deflector and remove it from the radiator support bracket.

Step 4: Remove Impact Beam Bolts

Use a 13mm socket to remove the eight bolts securing the impact beam to the vehicle.

Step 5: Remove Impact Beam Clips

Unsnap the six clips securing the impact beam and remove the impact beam from the vehicle.

Step 6: Attach Brackets to Impact Beam

Assemble and attach main and clamp brackets to the impact beam using provided hardware.

Step 7: Position Brackets on Impact Beam

Position brackets so clamp bracket's outer edge is 18 5/8" from impact beam end; tighten fasteners.

Step 8: Reinstall Impact Beam

Reinstall the impact beam using OEM bolts and tighten them securely.

Step 9: Modify Lower Air Deflector

Measure and cut a section from the lower air deflector between clips and 1 ½" from the edge.

Step 10: Modify Upper Air Deflector

Measure and cut a section from the upper air deflector from the clip and 3" from the edge.

Step 11: Reinstall Air Deflectors

Reinstall the lower and upper air deflectors back onto the vehicle.

Step 12: Reinstall Bumper Cover

Reinstall the front bumper cover onto the vehicle.

Step 13: Attach Extension Brackets

Attach driver and passenger side extension brackets to the main bracket using specified hardware.

Step 14: Attach Push Bumper

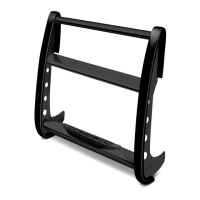
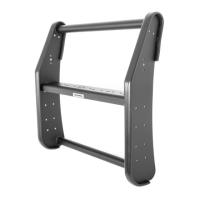
Attach the push bumper to each extension bracket using specified hardware; leave loose for adjustment.

Step 15: Final Alignment and Tightening

Align the push bumper with the vehicle and tighten all nuts and bolts.

Limited Warranty Information

Warranty Coverage Details

Details five-year warranty for black/chrome finishes and lifetime for stainless steel products.

Warranty Claim Procedure

Claims require original invoice, photos; contact customer service for assistance and RGA number.

Product Registration

Related product manuals