EasyManua.ls Logo

Godox Lux Junior - User Manual

Godox Lux Junior
6 pages
Print Icon
To Next Page IconTo Next Page
Loading...

( ¾
   CA  
6od


'









,


Lux Junior


PIXAPRO Ltd.
UNIT 5 Sterling Park, Pedmore Road, Brierley Hill, Wes Midlands, DY5 1TB
el: +44 (0)121 552 113 E-mail: info@essentialphoto.co.uk
Question and Answer IconNeed help?

Do you have a question about the Godox Lux Junior and is the answer not in the manual?

Summary

General Safety Warnings

Product Handling and Environment

Precautions for keeping the flash dry, avoiding high temperatures, and handling potential damage or malfunction.

Eye Safety and Usage

Warning against firing the flash directly into eyes, especially for babies, to prevent visual impairment.

Material and Battery Safety

Advice on avoiding flammable materials, using specified batteries, and handling battery issues safely.

Power Adjusting Instruction

Power Adjust Dial and Meter Panel Settings

Operation Instructions

M Manual Flash Mode

Guide on setting and using manual flash mode with power and distance adjustments.

Auto Flash Mode Operation

Practical Flash Modes

Optical Control Modes

Technical Data

Product Specifications

Detailed specifications including model, GN, flash power, CCT, focal length, compatible cameras, and dimensions.

Overview

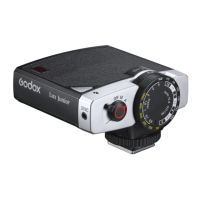
The Lux Junior is a compact and retro-styled camera flash designed to provide versatile lighting solutions for photographers. It offers a guide number of GN12 at ISO100, making it suitable for various shooting conditions. The flash supports both manual flash mode and an auto flash mode, providing flexibility for different photographic needs. Power is supplied by two AAA batteries, ensuring portability and ease of replacement. The Lux Junior is compatible with a wide range of cameras, including popular brands like Canon, Nikon, Fujifilm, Olympus, and Sony, making it a versatile accessory for many photographers.

Function Description

The Lux Junior features a light-emitting area, an auto light receptor, and a hotshoe for camera mounting. A test button also functions as a recycle indicator, providing visual feedback on the flash's status. The OFF/M/A dial serves as the main control for power, allowing users to switch between power off, manual flash mode, and auto flash mode. An OFF/S1/S2 button enables optical control modes, while a battery compartment houses the AAA batteries. A SYNC hole is also present for wired synchronization. The power adjust dial and meter panel work in conjunction to precisely set and adjust the flash power, with the meter panel displaying relevant data. An optical control sensor and a meter panel complete the functional overview of the device.

Usage Features

Power On/Off: To power on the Lux Junior, simply turn the OFF/M/A dial to either M (manual flash mode) or A (auto flash mode). To power off, turn the dial to the OFF position. It is recommended to install the flash onto the camera before powering on both the camera and the flash.

M Manual Flash Mode: In manual flash mode, users have precise control over the flash output.

  1. Turn the OFF/M/A dial to M.
  2. Based on the camera's ISO value (e.g., ISO 100), locate the corresponding ISO value on the power adjust dial.
  3. Adjust the meter panel to align the desired shooting distance (e.g., 4m) with the selected ISO value.
  4. The flash power is indicated by the aperture value (e.g., f2.8) that aligns with the dial. For instance, if the flash power should be Full (1), turn the power adjust dial until the power value (1) points to the OUTPUT arrow, indicating the flash is ready for use. The device provides a practical form for M Manual Flash Mode, detailing GN values across various apertures and distances, as well as flash power levels corresponding to different ISOs and GNs.

A Auto Flash Mode: For simpler operation, the Lux Junior offers an auto flash mode.

  1. Turn the OFF/M/A dial to A. In this mode, the flash automatically adjusts its output based on the ambient light and the camera's settings. The default ISO and aperture are 100 and f2.8 respectively. A practical form for A Auto Flash Mode shows aperture and distance values for different ISOs, with a maximum distance of 4 meters. It's important to note that using improper extra-long lenses may affect the output in A auto flash mode.

Recycle Indicator: The recycle indicator provides crucial feedback on the flash's status:

  • Constant Red: Indicates the flash is recycling.
  • Constant Green: Signifies that recycling is complete and the flash is ready.
  • Stably Flashing Red: Warns of a low battery state, prompting users to replace batteries.
  • Rapidly Flashing Red: Indicates a high temperature state.
  • Off: Means the battery is dead.

Optical Control Mode: The Lux Junior supports two optical control modes for advanced lighting setups. These modes are only available in M manual flash mode.

  • S1 Optical Control: Push the OFF/S1/S2 button to S1. In this mode, the flash functions as an optical S1 secondary flash, firing synchronously with the main flash. This feature is useful for creating multiple lighting effects, similar to using radio triggers.
  • S2 Optical Control: Push the OFF/S1/S2 button to S2. The flash acts as an optical S2 secondary flash, suitable for TTL flash systems, especially when cameras have a pre-flash function. In S2 mode, the Lux Junior ignores the main flash's single "preflash" and fires only in response to the second, actual flash from the main unit. This ensures accurate synchronization with TTL systems that use pre-flashes for exposure metering.

Battery Installation:

  1. Open the battery compartment.
  2. Insert two AAA batteries, ensuring the plumped end marked with '+' is the positive pole and the sunk end marked with '-' is the negative pole.
  3. Close the cover and push it upwards to secure.

Maintenance Features

General Care: Always keep the product dry and avoid using it in rain or damp conditions to prevent damage. Do not disassemble the unit; any necessary repairs should be performed by an authorized maintenance center. Keep the flash out of reach of children.

Battery Safety:

  • Do not use deformed or modified batteries.
  • Do not disassemble or modify the product or battery.
  • Avoid heating or soldering the battery.
  • Keep the battery away from fire or water.
  • Do not subject the battery to strong external impact.
  • Do not connect metal objects to the positive and negative ends of the battery.
  • Ensure batteries are inserted correctly, observing polarity. Do not mix old and new batteries, or batteries of different types.
  • If a battery leaks, discolors, deforms, emits smoke, or has an abnormal odor, remove it immediately, taking care to avoid burns. Continued use in such conditions could lead to fire, electric shock, or burns.

Operational Safety:

  • Stop using the product immediately if it breaks open due to extrusion, falling, or strong impact, as touching internal electronic parts could cause electric shock.
  • Avoid storing the flash unit in ambient temperatures exceeding 50°C.
  • Do not fire the flash directly into the eyes (especially those of babies) at short distances, as this can cause visual impairment.
  • Do not use the flash unit in the presence of flammable gases, chemicals, or similar materials, as the strong light emitted could cause fire or electromagnetic interference.
  • Turn off devices immediately in case of malfunction.
  • Only use batteries, power sources, or accessories specified in the instruction manual.

Warranty and Service Support: The product comes with a warranty period, calculated from the purchase date registered on the warranty card. The warranty covers specific parts like the circuit board and electrical components for 12 months, and the battery for 3 months. Other items like the flash tube, modeling lamp, lamp body, and packaging are not covered under warranty.

To obtain maintenance service, users can contact the product distributor, authorized service institutions, or Godox after-sale service. A valid warranty card is required for service. If a valid card cannot be provided, service may still be offered if the product is confirmed to be within the maintenance scope, though this is not an obligation.

The warranty does not cover:

  • Products or accessories beyond their warranty period.
  • Damage caused by inappropriate usage, maintenance, or preservation (e.g., improper packing, plugging/unplugging, external force, exposure to extreme temperatures, solvents, acids, bases, flooding, damp environments).
  • Damage caused by non-authorized installation, maintenance, alteration, addition, or detachment.
  • Modified, altered, or removed original identifying information.
  • Lack of a valid warranty card.
  • Damage from illegally authorized, nonstandard, or non-public software.
  • Damage caused by force majeure or accident.
  • Damage not attributable to the product itself. Normal discoloration, abrasion, and consumption are not considered breakage within the maintenance scope.

Godox Lux Junior Specifications

General IconGeneral
Flash ModesManual, Multi
Flash Duration1/300s to 1/20000s
CompatibilityUniversal
TypeOn-Camera
Color Temperature6000K

Related product manuals