EasyManua.ls Logo

golmar SHINER-90 User Manual

golmar SHINER-90
6 pages
To Next Page IconTo Next Page
Page #1 background imageLoading...
Page #1 background image
Golmar se reserva el derecho a cualquier modificación sin previo aviso.
Golmar reserves the right to make any modifications without prior notice.
Codificación SH-90. / SH-90 coding.
Pin 1: Activar Autoencendido
Pin 2: Monitor secundario
Pin 3: Valor 128
Pin 4: Valor 64
Pin 5: Valor 32
Pin 6: Valor 16
Pin 7: Valor 8
Pin 8: Valor 4
Pin 9: Valor 2
Pin10: Valor 1
La suma de los valores de los
pines activados (ON)
determinan el codigo del
monitor.
Pin 1: Activate auto switch-on.
Pin 2: Secondary monitor.
Pin 3: Value 128.
Pin 4: Value 64.
Pin 5: Value 32.
Pin 6: Value 16.
Pin 7: Value 8.
Pin 8: Value 4.
Pin 9: Value 2.
Pin10: Value 1.
The sum of the value of the
pins activated (ON) determines
the monitor code.
1
11
MONITOR PRINCIPAL
CON AUTOENCENDIDO
MONITOR Nº 0
MONITOR SECUNDARIO
CON AUTOENCENDIDO
MONITOR Nº0
MONITOR SECUNDARIO
SIN AUTOENCENDIDO
MONITOR Nº 0
COMUNICACIÓN
MONTANTE DE
75
+
+
SA2C 2C 2CA1 A1 A1
OUT
IN
-
-
V
V
+
-
75
SA
OUT IN
V
V
75
SA
OUT
IN
SHINER-90SHINER-90SHINER-90
V
V
Cortar la resistencia de 75ohms en
todos los monitores montados en
paralelo, excepto en el ultimo.
Cut the 75 ohm resistance in all the
monitors connected in parallel,
except the last one.
1 1 11
MONITOR PRINCIPAL
SIN AUTOENCENDIDO
MONITOR SECUNDARIO
SIN AUTOENCENDIDO
MONITOR SECUNDARIO
CON AUTOENCENDIDO
MONITOR PRINCIPAL
CON AUTOENCENDIDO
1
1 1
1 1
1 1
1
MONITOR Nº00
MONITOR Nº01 MONITOR Nº04 MONITOR Nº31 MONITOR Nº50
MONITOR Nº03 MONITOR Nº16 MONITOR Nº36
0+0+0+0+0+0+0+0 = 0
0+0+0+0+0+0+0+1 = 1
0+0+0+0+0+4+0+0 = 4 0+0+0+16+8+4+2+1 = 31 0+0+32+16+0+0+2+0 = 50
0+0+0+0+0+0+2+1 = 3 0+0+0+16+0+0+0+0 = 16
0+0+32+0+0+4+0+0 = 36
Monitor de
Vídeo
SHINER-90 TV
La comunicación por sistema
T68
Resistencia final de línea
Vout
75
Vin
8
Vout
75
Vin
12345
6
7
8
SA
2C
A1
RCSH-DOMO
Question and Answer IconNeed help?

Do you have a question about the golmar SHINER-90 and is the answer not in the manual?

golmar SHINER-90 Specifications

General IconGeneral
Brandgolmar
ModelSHINER-90
CategoryIntercom System
LanguageEnglish

Summary

SHINER-90 TV Monitor Wiring and Configuration

SHINER-90 Monitor Wiring Configurations

Diagrams show wiring for principal and secondary monitors with and without auto-on.

75-ohm Line Termination Resistance

Explanation on cutting the 75-ohm resistance in parallel-connected monitors, except the last one.

SHINER-90 Coding System Overview

Details the dip switch coding for different monitor types (principal, secondary, auto-on).

SHINER-90 Pin Configuration Details

Explains the function and value of each pin (3-10) for determining the monitor code.

SHINER-90 TV Monitor Physical Description and Installation

Monitor Front Panel Controls

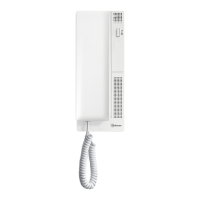
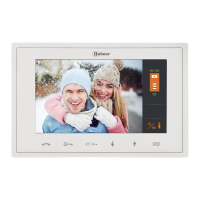
Identifies front panel controls including contrast, brightness, and indicator LEDs.

Internal Configuration Switches

Explains the function of internal DIP switches for coding and other settings.

Wall Mounting Installation Steps

Provides a step-by-step guide for the physical wall installation of the monitor unit.

Auxiliary Ringer Connection

Details the process and connections required for installing an additional ringer.

SHINER-90 TV Monitor Connectivity and Operation

Monitor Connection to TV and Receptor

Illustrates the wiring diagram for connecting the SHINER-90 TV monitor to a television and receptor.

SHINER-90 TV Button Functions

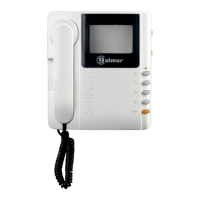
Comprehensive description of each button's function, including ON/OFF, second camera, and video spy.

Advanced SHINER-90 TV Features and RF Integration

Wiring for Second Door Release

Diagram showing the wiring setup for activating a second door release mechanism.

RF Receiver Programming and Validation

Instructions on how to validate the RF emitter with the receiver for system setup.

RF System Usage: Door Entry and TV Output

Explains how to use the RF emitter to view the door entry image on a TV screen.

RF System Operational Notes

Key notes and tips regarding the operation of the RF system, including video spy and volume.

Specialized SHINER-90 TV Installation Scenarios

Installing One Camera Per Floor

Wiring diagram illustrating the installation of one camera for each floor in the system.

Activating Equipment with 220Vac

Wiring diagram showing how to connect and activate equipment using a 220Vac power supply.

Related product manuals