EasyManua.ls Logo

Gorenje K 7708 E - User Manual

Gorenje K 7708 E
18 pages
Print Icon
To Next Page IconTo Next Page
Loading...
179732
Instructions for use, installation and connection
2
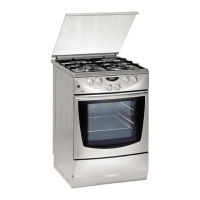
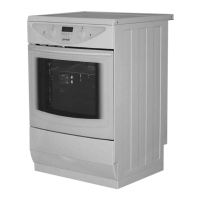
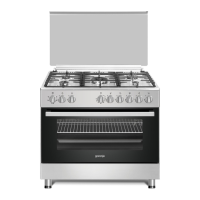
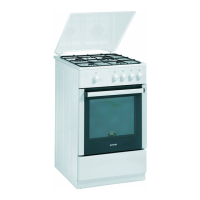
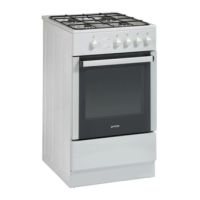
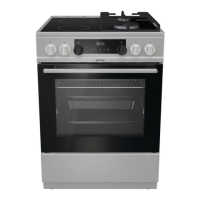
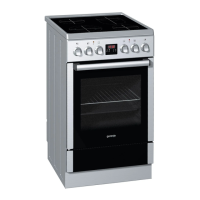
Freestanding combined cooker EN
Dear Customer!
Congratulations on your purchase. See for yourself: our
products read reliability.
These ample instructions have been compiled in order to help
you learn how to handle the appliance. They will show you step
by step what your appliance is capable of, so please read them
carefully before you attempt to use your cooker for the first
time.
Safety warnings are listed on page 3.
The first thing to do is to check if your appliance has arrived
undamaged. In case you find any transport damages, please
report it immediately to your local dealer, or to the regional
warehouse which supplied the appliance. You will find their
phone numbers on the invoice or on the delivery note.
We hope your cooker will successfully serve its purpose for
many years.
Contents
Safety precautions .......................................................... 2
Intended use
Cooker cover
If you notice any malfunction in the gas installation, or if you
smell gas in the room:
Description of the appliance .......................................... 3
Electric ignition
Prior first use .................................................................. 4
Oven
Program timer
Gas cooking zones
Electric hotplates
Gas burner control ......................................................... 4
Safety cautions in regard to the cooking zones
Ignition and operation of burners
Cookware
Electric hotplates ............................................................ 5
Tips for purchasing crockery
Tips for effective use of crockery
Energy saving tips
Important warnings!
Special warning for hotplates
Operation of hotplates
Oven................................................................................. 6
Important warnings!
Operation
Modes of operation
Oven guide levels
Oven accessories
Telescopic slide guides
Grease filter
Baking pastry
Roasting
Grilling and browning (barbecue)
Preserving of fruit and vegetables
Defrosting
Cleaning and maintenance ...........................................12
Gas cooking zones
Cooktop
Oven
Oven drawer
Troubleshooting guide ..................................................13
Note!
Important!
Replacement of parts ....................................................14
Other accessories
Oven light bulb
Instructions for installation and connection ...............14
Safety precautions for the technician
Safety precautions
Leveling the appliance and extra support
Manufacturer's adjustments
Gas connections .............................................................15
Flexible hose connection
Beginning of operation
Nozzle chart
Conversion to another type of gas
Setting elements
Electrical connections ...................................................17
Technical specifications ................................................18
Electronic timer.............................................................18
Setting the current time
Setting the conventional (manual) operation
Semi-automatic operation with the defined period
Semi-automatic operation with the end of operation
Automatic operation with the preset period and the end of
operation
Alarm timer
Button (1) in the position of current time
Using the clock in combination with oven
Safety precautions
To avoid any possible hazard, the appliance may be
installed by qualified personnel only, authorized by the
gas distributing company and by the authorized service.
Installation should be carried out in accordance with the
legal regulations and technical requirements of the local
gas supplier. Important instructions in this regard may
be found in the Section "Instructions for installation".
Any repairs by unqualified persons may result in explosion,
electric shock or short circuit. In order to avoid possible
injuries to your body or to the appliance, do not attempt any
repairs by yourself. Such work should be carried out by
qualified service personnel.
Before installing and connecting the appliance check
whether the specifications of the local gas supplier (type of
gas and pressure) correspond to the specifications of the
appliance.
Technical specifications of the appliance are indicated on
the rating plate.
This appliance is not connected to a chimney or vent
opening. The appliance must be installed and connected in
accordance with the standing regulations. Special attention
should be taken in regard to adequate ventilation.
During the operation of gas burners the room may be filled
with extra heat and humidity, so it is necessary to assure
adequate ventilation. Occasional opening of the window or
door should provide enough exchange of air. During the
prolonged use of the appliance, or during a very intense use,
more ventilation will be required, and it will probably be
necessary to engage the extractor hood.
Hot grease is highly inflammable, so pay extra attention
when preparing food with grease or oil. Frying may be
carried out only under constant surveillance.
Never clean the oven or the cooktop with hot steam devices
or high-pressure jet cleaning device, as they may provoke
short circuit.
Before opening the control panel and before any attempted
repairs disconnect the appliance from the mains.

Table of Contents

Questions and Answers

Overview

This document provides comprehensive instructions for the use, installation, and maintenance of a freestanding combined cooker. The cooker is designed for traditional household use and features both electric and gas cooking elements, along with an electric oven.

Function Description

The cooker is a freestanding combined unit, available in models such as K44E2-234VD, K44D2-244VD, K44D1-234ND, and K44D2-234VD. It typically includes a cooktop with gas burners and/or electric hotplates, and an electric oven.

Cooktop: The cooktop can be equipped with various combinations of gas burners and electric hotplates. Gas burners are controlled by knobs, with heating power indicated by flame symbols. Electric hotplates are regulated in steps, with express hotplates heating up quicker and marked by a red dot. Gas burners feature electric ignition, which operates when the mains lead is plugged in. In case of power failure or a damp ignition device, burners can be ignited with a match or lighter. Some models include a wire grid for small diameter dishes, placed over the auxiliary burner crown.

Oven: The electric oven offers multiple modes of operation, controlled by a function knob and a temperature selection knob.

  • Oven Illumination: Can be switched on independently for cleaning or using residual heat. It's automatically on during other oven functions.
  • Upper and Lower Heater: Heats food uniformly from both sides, suitable for single-level baking and roasting.
  • Lower Heater and Ventilator: Useful for baking low pastry and preserving fruit and vegetables, using the first guide level from the bottom.
  • Lower Heater/Aqua Clean: Applies heat only from the bottom, suitable for browning the bottom of food or for oven cleaning.
  • Grill: Uses an infrared heater from the oven ceiling, ideal for steaks, sausages, T-bones, pork chops, and browning.
  • Grill with Ventilator: Infrared heater and ventilator operate simultaneously, suitable for roasting and grilling larger meat chunks or poultry at one level, and for crisping roast skin.
  • Ventilator with Hot Air: Fan at the rear circulates hot air, suitable for roasting and baking at multiple levels.
  • Defrosting: Circulates air without heaters, for slow defrosting of food.

Electronic Timer: The electronic timer allows for precise control of oven operations.

  • Setting Current Time: Essential for the appliance's proper functioning.
  • Conventional (Manual) Operation: Oven operates without programmed settings.
  • Semi-automatic Operation with Defined Period: Oven operates for a set duration, then switches off.
  • Semi-automatic Operation with End of Operation: Oven operates until a specified end time, then switches off.
  • Automatic Operation with Preset Period and End of Operation: Oven starts and stops automatically based on programmed duration and end time.
  • Alarm Timer: Functions as a warning signal only, does not switch off the oven. Volume settings are adjustable.

Important Technical Specifications

  • Dimensions: Height/width/depth typically 85/60/60 cm or 90/85-60/60 cm.
  • Cooking Zone Hotplates (kW):
    • Rear left: 1.9/A (Normal hotplate)
    • Front left: 1.9/A (Normal hotplate)
    • Front right: 3.5/D (Triple-ring burner) or 3.0/B (Large burner)
    • Rear right: 1.0/H (Auxiliary burner)
  • Oven:
    • Temperature selector / Oven function mode selector: 1/1
    • Baking levels: 5 (some models with telescopic guides at 3 levels)
    • Upper/lower heater (kW): 0.9/1.1
    • Infrared heater/Infrared heater with fan (kW): 2.0/2.2
    • Oven illumination top/side (W): 25/-
    • Max. temperature: 275°C
    • Mains voltage: AC 230 V, 50 Hz
    • Total mains power (kW): 3.4
    • Oven total (kW): 3.4
    • Burners total (kW): 8.3 (K44E2-234VD) or 7.8 (K44D2-244VD, K44D1-234ND, K44D2-234VD)
    • Total mains power (g/h): 603 (K44E2-234VD) or 567 (K44D2-244VD, K44D1-234ND, K44D2-234VD)
  • Gas Specifications: Indicated on the rating plate, with gas mains connection ISO 7-R1/2.
  • Nozzle Chart: Provides specific nozzle sizes and heat inputs for various gas types (Natural gas H, Natural gas E, Liquid gas 3+) and burner types (Auxiliary, Normal, Large, Triple burner). Conversion to another gas type requires nozzle exchange and adjustment of minimum heat input.

Usage Features

Prior First Use:

  • Oven: Remove and clean all accessories. Ventilate thoroughly during initial heating to dissipate new product smell.
  • Electric Hotplates: Turn on at maximum power for 3-5 minutes without dishes to reinforce the protective film.

Cookware:

  • Use good quality dishes with thick, flat bottoms for efficient energy transfer.
  • Match dish bottom diameter to hotplate diameter.
  • Use pot lids to cover cookware.
  • For gas burners, ensure adequate oxygen supply for burning; excessively large dishes can impede this.
  • For electric hotplates, reduce power towards the end of cooking to utilize residual heat.

Oven Accessories:

  • Oven grid shelf: For pans, trays, or grilling.
  • Flat biscuit tray: For cakes and biscuits.
  • Dripping grease receptacle (deep tray): For moist cakes, roasting, or collecting oil/grease.
  • Telescopic slide guides (certain models only): Allow easy insertion and retraction of trays.
  • Grease filter (depending on model): Protects fan and heater from grease during roasting. Must be removed when baking pastry.
  • Broaching set (certain models only): Includes a revolving spike with handle and forks for roasting.

Baking and Roasting:

  • Follow guide levels, temperatures, and times specified in the baking and roasting tables.
  • Preheating shortens baking time.
  • For baking with hot air, lower temperatures are typically used, and multiple levels can be utilized.
  • When roasting, add liquid as necessary and turn the roast halfway through the cooking time.
  • Grilling requires extra precautions due to intensive heat; use protective gloves and barbecue tongs. Grill with the oven door closed.

Preserving:

  • Use the bottom heater mode with the fan.
  • Use conventional jars with glass covers and rubber gaskets.
  • Add water to the deep roasting pan for humidity.
  • Place jars into the oven without touching the walls.

Defrosting:

  • Use the "Defrost" mode with circulating air.
  • Stir or turn food for uniform defrosting.
  • Do not defrost meat and poultry in the oven for hygiene reasons.

Maintenance Features

General Cleaning:

  • Always switch off the cooker and let it cool down completely before cleaning.
  • Do not use pressurized hot steam or high-pressure jet cleaning devices.
  • Use mild detergents and soft sponges; avoid aggressive cleaners, polishing agents, or sharp objects that can cause scratches or damage.

Specific Areas:

  • Front Side of Casing: Clean with usual cleaning agents.
  • Stainless Steel Front (certain models only): Clean with mild detergent and soft sponge.
  • Enamel Coated and Plastic Surfaces (certain models only): Clean knobs and handles with soft cloth and liquid cleaners.
  • Gas Cooking Zones: Clean gas grid, cooking area, and burner components with warm water and mild detergent. Thermal element and ignition device should be cleaned with a soft brush. Keep crown and crown cap clean, ensuring gas outlet nozzles are free of dirt. Ensure components are dry and correctly replaced after cleaning.
  • Cooktop (certain models only): Clean hotplates and surrounding area with warm water and mild detergent. Soak dried stains with a wet sponge. Wipe hotplates dry after cleaning to prevent damage from salt or moisture. Use sewing machine oil or specialized agents to maintain appearance.
  • Oven: Can be cleaned traditionally with oven cleaners and sprays. For regular cleaning, set oven to 50°C, pour 0.4L of water into a baking pan, and insert it into the bottom grid. After 30 minutes, wipe off softened residues.
  • Catalytic Coating (certain models only): Catalytic enamel speeds up grease disintegration. Smaller stains usually disappear during subsequent oven use. Avoid abrasive cleaners or sharp objects. Catalytic parts' self-cleaning power fades over time; replacement of old coatings is suggested after a few years.
  • Oven Accessories: Clean with hot water and usual detergent.
  • Grease Filter: Clean after each use with a soft brush in hot water and detergent, or wash in a dishwasher after softening grease.
  • Oven Drawer: Can be removed for cleaning.

Component Removal for Cleaning/Maintenance:

  • Oven Ceiling (certain models only): Foldable infrared heater can be lowered for cleaning. Disconnect appliance from mains and ensure heater is cooled.
  • Oven Door (certain models only): Can be removed by positioning hinges or locks as described in the manual.
  • Wire and Telescopic Guide Grids: Can be removed to facilitate oven cleaning. Clean with conventional detergents. Telescopic guides are not dishwasher safe and should not be lubricated.

Replacement of Parts:

  • Oven Light Bulb: Replace with E 14, 230 V, 25 W, 300°C bulb. Disconnect appliance from mains before replacement. Bulb is a consumption material and not covered by warranty.
  • Other Accessories: Oven grid, biscuit tray, etc., can be ordered from the service center. Hotplate control knobs can be removed and replaced by pulling/pushing.

Installation and Connection:

  • Installation must be carried out by qualified personnel authorized by the gas distribution company, following legal regulations and technical requirements.
  • Ensure adequate air circulation in the room.
  • Check that local gas pressure and type match appliance specifications.
  • Electrical connections must be done by authorized service personnel, ensuring correct voltage and earthing. Connector bridges must be positioned according to the installation connection.
  • Level the appliance using adjustable screws. Some models have extra support that can be removed.

Gorenje K 7708 E Specifications

General IconGeneral
BrandGorenje
ModelK 7708 E
CategoryCookers
LanguageEnglish

Related product manuals