Do you have a question about the Gorilla Playsets See Saw and is the answer not in the manual?
Procedure for claiming warranty for product integrity issues via the company website.
Contact Gorilla Playsets directly for missing or damaged parts and assembly help.
Provides Gorilla Playsets' contact information including phone, fax, and email.
Information on how to find updated assembly instructions online.
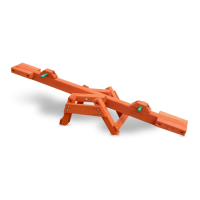
Highlights the See Saw's design for children ages 3-11, emphasizing quality, safety, and durability.
Details the kit contents: 3D manual, coated components, hardware, and pre-milled lumber.
Explains the use of fine, hand-selected lumber conforming to national standards for play equipment.
One-year warranty for structural wood components and other parts under normal use.
Excludes cosmetic defects, damage from climate/installation, and wear and tear.
Emphasizes proper product maintenance as per company website instructions.
Disclaims implied warranties and liability for incidental/consequential damages.
Product for residential use only; requires safety surface and 6-foot safety zone.
Recommends tool safety, eye protection, gloves, and adult supervision during assembly.
Specifies the maximum weight limit for the See Saw.
Assembly can take between 1 to 2 hours depending on experience.
Instructions for identifying parts and sorting hardware for efficient assembly.
Details natural wood defects and advises inspecting/sanding parts for splinters.
Guidance on reading instructions, tightening hardware, and checking connections seasonally.
Recommends placing the See Saw on level ground, 6ft from obstructions.
Provides contact information for missing parts or installation questions.
Lists all necessary tools for assembling the See Saw, including drills, sockets, and tape measure.
Details various hardware components like lag screws, bolts, washers, and caps with quantities.
Lists and describes all wooden parts, such as main beams, seats, legs, and supports.
Defines counter-sunk holes and lag screws essential for understanding assembly steps.
Reiterates contact information for assembly assistance or missing parts.
Instructions for attaching the Seat pieces to the Main Beam using lag screws and washers.
Instructions for attaching Frame Blocks to the Main Beam using carriage bolts and nuts.
Instructions for attaching Legs and Leg Supports to the Frame Blocks.
Instructions for attaching the Lower Leg Supports to the Legs.
Instructions for assembling the Handle Bars and Handle Blocks.
Instructions for attaching the assembled Handle Block units to the Main Beam.
Details three easy ways to register the warranty: fax, mail, or online via QR code.
Fields to record the date and place of product purchase.
Fields for customer's name, age, address, and children's ages.
Asks users to rate product quality and recommend it to others.
This document is an assembly manual for a Gorilla Playsets See Saw, providing comprehensive instructions and important information for its construction, safe use, and maintenance. The manual emphasizes the quality of materials and the ease of assembly, aiming to deliver a durable and safe play experience for children aged 3 to 11.
The Gorilla Playsets See Saw is a residential outdoor play equipment designed for children. Its primary function is to provide a classic seesaw experience, allowing two children to balance and move up and down by shifting their weight. The design focuses on safety and durability, ensuring a stable and enjoyable play environment. The seesaw is built with hand-selected lumber and powder-coated components, engineered to withstand outdoor elements and frequent use. The assembly process is designed to be straightforward, guided by a step-by-step 3D illustrated manual.
The seesaw is intended for residential use only and is not suitable for public or commercial settings. A critical usage feature is the requirement for a safety surface, such as mulch or recycled tires, underneath the seesaw to prevent injuries from falls. Additionally, a 6-foot safety zone must be maintained around the entire seesaw to ensure adequate space for play and prevent collisions with other structures or obstructions. Adult supervision is strongly recommended whenever the seesaw is in use to ensure children's safety. The total weight limit for the seesaw is 300 lbs, which should be adhered to to prevent damage and ensure safe operation.
The assembly process itself is a key usage feature, as it allows owners to construct the seesaw from a kit. The manual provides detailed instructions for each step, from laying out the main beam and attaching seats to installing the main beam pivot, legs, leg supports, and handles. The design incorporates specific features like counter-sunk holes for bolts and lag screws, which contribute to a flush and secure finish. The main beam is designed to pivot smoothly, allowing for the seesaw's characteristic motion. Handle pipes are included for children to grip securely during play, enhancing safety and control.
Proper maintenance is crucial for the longevity and safety of the Gorilla Playsets See Saw. The manual highlights several maintenance features and recommendations. Owners are responsible for regularly checking bolts and screw heads for tightness, as wood can expand and contract with seasonal changes, potentially loosening fasteners. This seasonal check is essential to maintain the structural integrity of the seesaw.
The lumber used in the seesaw is hand-selected for quality, but natural defects such as knots, surface cracks, and splinters can occur. Owners are advised to inspect each part for splinters or rough spots and sand them smooth to prevent injury. While cosmetic defects like warping or checking are generally not covered by the warranty if they do not affect structural integrity, proper maintenance can help mitigate some issues.
The manual also provides contact information for Gorilla Playsets' manufacturing direct line for missing or damaged parts and assembly assistance, emphasizing that retailers do not stock components. This direct support system is a key maintenance feature, ensuring that owners can easily obtain necessary replacements or guidance. The warranty covers defects in workmanship and materials for one year for structural wood components and all other components, provided the product is properly maintained and used for its intended residential purpose. The warranty explicitly states that defects resulting from a failure to properly maintain the product are not covered, underscoring the importance of owner vigilance in maintenance. Checking for revised instructions online is also recommended, ensuring access to the latest maintenance and assembly guidelines.
| Product Type | See Saw |
|---|---|
| Brand | Gorilla Playsets |
| Number of Seats | 2 |
| Recommended Age | 3-8 years |
| Material | Metal |