Do you have a question about the Gorilla Playsets Wedgewood and is the answer not in the manual?
Verify all parts upon delivery and use the Quick Response Center for missing items.
Details the 10-year structural wood warranty and 1-year component warranty, excluding cosmetic defects.
Outlines steps for submitting a warranty claim, including proof of purchase and contact information.
Age recommendations, safety surfaces, tool safety, and adult supervision requirements.
Lists maximum weight capacities for various playset components like swings and platforms.
Covers proper tightening, leveling, and placement of the playset for safety and stability.
Provides guidance on pre-drilling pilot holes for lag screws of different diameters to ensure proper installation.
Details the weight limits for swing belts and trapeze bars, and the total swing beam load capacity.
Instructions for assembling the ladder sides, steps, and center support using screws and T-nuts.
Guidance on measuring and attaching the rock wall boards to the assembled rock wall sides using wood screws.
Attaching the outer fort supports to the ladder and rock wall assemblies using hex bolts and washers.
Attaching the inner fort supports to the ladder and rock wall assemblies using hex bolts and washers.
Mounting the corner posts to the fort frame using hex bolts and washers, ensuring proper orientation.
Attaching the swing beam mount to the corner posts using carriage bolts, torque washers, and nuts.
Installing lag screws to secure the base of the fort and the upper part to the corner posts for overall stability.
Laying and securing the rock wall boards onto the rock wall sides using wood screws.
Laying and securing deck boards and spacers across the fort supports to create the main deck area.
Mounting the assembled roof supports to the fort's corner posts using hex bolts and washers.
Attaching roof boards, roof finishers, chimney, and dormer to the roof structure using wood screws.
Attaching the swing beam to the fort structure using carriage bolts and lag screws, requiring an extra person.
Adjusting the swing beam legs to ensure the swing beam is perfectly level using a level tool.
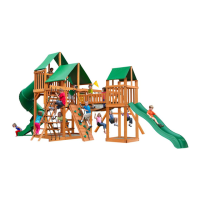
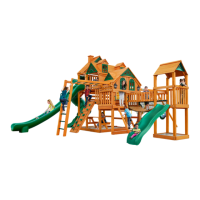
| Product Type | Swing Set |
|---|---|
| Material | Wood |
| Recommended Age | 3-11 years |
| Weight Capacity per Swing | 115 lbs |
| Number of Swings | 2 |
| Includes Slide | Yes |
| Slide Material | Plastic |
| Assembly Required | Yes |