Do you have a question about the Graco Crib and is the answer not in the manual?
Product requires adult assembly and continuous supervision for child safety.
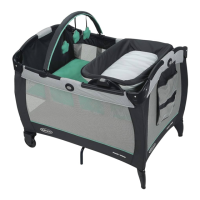
Use only Graco mattress/sheet. Prevent infant suffocation from gaps or soft bedding.
Stop use when infant pushes up or reaches 15 lbs. Do not carry with child.
Keep strings/cords away from child. Do not hang items with cords on bassinet.
Never use in vehicle. Place on floor. Place infant on back for sleep.
Verify all parts are present before assembling the product. Contact Customer Service if parts are missing.
List of tools needed for assembly, including screwdriver and included wrench.
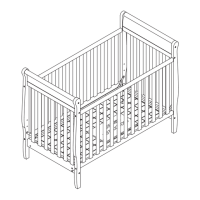
Snap U-tubes into the leg braces as illustrated in the diagram.
Verify that the basket tubes are correctly in place after insertion.
Insert the basket tubes into the U-tubes and repeat for the other side.
Insert screws to hold the cross tube in place during assembly.
Tighten screws and nuts, then check all connections for security and tightness.
Snap the mesh sides of the basket around the tubes and repeat on the other side.
Connect the bassinet frame components as shown in the diagram.
Check that the base legs are properly snapped and secured into place.
Attach the tube to the bassinet frame by screwing it in as illustrated.
Snap the removable rod into the bassinet frame as depicted.
Place covering over frame, pull strap through hole in bottom.
Turn unit over and attach elastic loops to the plastic hooks on the bassinet base.
Fasten the bassinet covering around the handles using the VELCRO® straps.
Secure the flap using the VELCRO® fasteners.
Confirm the strap is correctly threaded through the button hole in the bassinet bottom.
Cover the mattress pad with the sheet and place it inside the bassinet.
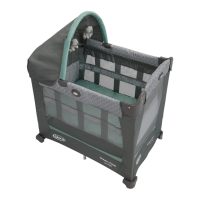
Insert the canopy mounts into the designated slots on the bassinet frame.
Attach the canopy to the bassinet frame as shown in the illustration.
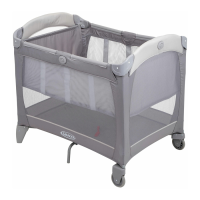
The bassinet can be used on the floor as a rocker.
Attach bassinet to frame using corner straps and VELCRO®.
Instructions on how to lower the casters for stability.
Instructions on how to raise the casters.
Ensure casters are down and locked when using the bedside sleeper mode.
Remove canopy for bedside mode or when using the drop-down side.
Pull back the flap along the VELCRO® seams.
Remove the bar and store it in the bassinet's basket.
Drape flap over side. Never use ruffle as a blanket.
Never adjust height with child in bassinet. Always adjust all legs to the same height.
Push buttons, slide tubes to desired height position, and repeat on opposite end.
Do not use incline to raise feet. Always place baby with head at the raised end.
Lift on bottom board to raise head; pull strap to lower head.
Remove two screws from the back of the electronic module's battery compartment.
Insert three AA-LR6 (1.5V) batteries, then replace the door and screws.
Press and hold the button for 2 seconds to turn off any active function.
Press button to cycle through music functions; fifth press turns music off.
Use '+' to increase volume and '-' to decrease volume.
Press button to cycle through top light, both lights, bottom light, and off.
Press button to set timer for 5, 10, or 15 minutes.
Press button to cycle through nature sounds; fifth press turns sound off.
Keep batteries from children. Avoid mixing types, incorrect insertion, and leakage.
Discard leaky batteries properly. Remove batteries if unused for a month. Use recommended types.
Check for no batteries, dead batteries, incorrect installation, corrosion, or low charge.
Unauthorized modifications can void user authority to operate the equipment.
Equipment complies with FCC Part 15. User should correct interference if it occurs.
Check for worn parts, torn material, or stitching. Use Graco replacement parts.
Machine wash cold on delicate, drip dry. No bleach or detergent.
Use mild soap and warm water. No bleach or detergent.
Avoid excessive sun or heat exposure to prevent fading or warping.
One-year warranty against defects in material and workmanship from purchase date.
Excludes misuse, accidents, alteration, normal wear and tear, and failure to follow instructions.
Contact Consumer Services for warranty service or replacement parts.
Complete form with model number. Payment required. Contact Customer Service.
Provides phone number and address for USA replacement parts orders.
Visual catalog of available replacement parts with corresponding numbers and prices.
Form to fill out for model number, serial number, shipping, and payment for replacement parts.
| Material | Wood |
|---|---|
| Adjustable Mattress Height | Yes |
| Brand | Graco |
| Convertible | Yes |
| Mattress Included | No |
| Assembly Required | Yes |
| Converts to | Toddler Bed, Daybed, Full-size Bed |
| Weight Limit | 50 lbs |
| Wheels | No |
| Type | Convertible Crib |
| Product Type | Convertible Crib |