EasyManua.ls Logo

Graco Hadley 04586-70 MB Series User Manual

Graco Hadley 04586-70 MB Series
29 pages
To Next Page IconTo Next Page
Page #1 background imageLoading...
Page #1 background image
1
Made in China/
Fabriqué en Chine/
Hecho en China
ID7291
May. 2020
© 2020 Graco Children’ s Products
GRACO
®
is a registered trademark of Graco
Children's Products Inc., used with permission.
GRACO
®
est une marque déposée de Graco
Children Products Inc., utilisé avec permission.
GRACO
®
es una Marca Registrada de Graco
Children´s Products Inc., usada con autorización.
Model /
Modele No /
Numéro de modèle
04586- 70 -MB
COLOR / COULEUR / COLOR
Hadley Crib And Changer
Hadley crèche et changeur
Hadley cuna y cambiador
Adult assembly required. Small parts may
present choking hazard prior to assembly.
Enclosed please find the simple step-by-step instructions
to help you quickly assemble your product. Before you
begin we recommend that you follow the steps below:
1. Please read the instructions thoroughly
2. Identify all parts and hardware
3. You may need to provide the following tools: Philips
Head screw driver, Flat head screw driver, Hammer.
Do Not Use Power Drills or Drivers
Keep these instructions for future use.
To protect your parts during assembly please place them on a soft
surface. To clean surface use only water on a damp cloth. Do not
use window cleaners or cleaning abrasives as it will scratch the
surface and could damage the protective coating.
To register your product for important safety alerts and updates
to your product please visit www.storkcraft.com and click on
Product Registration.
Doit être assemblé par un adulte.
Les petites pièces peuvent présenter un
risque d’étouffement avant l’assembla ge.
Veuillez trouver ci-joint les simples instructions, étape par étape,
pour vous aider à rapidement assembler votre produit. Avant de
commencer, nous vous recommandons de suivre les étapes
ci-dessous:
1. Veuillez lire les instructions attentivement
2. Identifier toutes les pièces et le matérie
3. Vous devrez peut-être fournir les outils suivants:
Philips tournevis, tournevis à tête plate, marteau.
Ne pas utiliser de perceuse out outils électrique
Conservez ces instructions pour
une utilisation ultérieure.
Pour protéger vos pièces lors de l’assemblage veuillez placezles
sur une surface souple. Pour nettoyer la surface souple.
Pour nettoyer la surface de l’eau sur un chiffon humide. Ne pas
utiliser de nettoyants ou de nettoyage abrasifs comme il ne fera
qu’égratigner la surface et pourrait endommager le revêtement
de protection.
Pour enregistrer votre produit afin de recevoir des alertes de
sécurité et des mises à jour importantes relatives à
votre produit, veuillez visiter le site www.storkcraft.com, puis
cliquer sur Enregistrement de produits.
Se requiere ensamblaje por un adulto.
Las pieza pequeñas pueden presentar
un peligro de asfixia antes de instalarlas
Adjunto encontrará instrucciones sencillas paso a paso para
ayudarle a ensamblar rápidamente su producto. Antes de
empezar le recomendamos que siga los siguientes pasos:
1. Por favor leer detenidamente las instrucciones
2. Identificar todas las piezas y herrajes
3. Necesitará las siguientes herramientas (no incluidas):
Destornillador de cruz, Destornillador plano Martillo
No utilice destornilladores eléctricos
Guarde estas instrucciones para uso futuro.
Para proteger las piezas durante el montaje por favor,
colóquelos sobre una superficie blanda. Para limpiar l
superficie, usar sólo agua sobre un paño húmedo
Para registrar su producto a fin de recibir importantes alertas
actualizaciones de seguridad, visite www.storkcraft.com y haga
clic en Registro de Productos (Product Registration).
!
WARNING
:
I
N
F
A
N
T
S C
A
N
SUF
F
O
C
A
TE
ON
S
O
F
T
BE
D
D
I
N
G.
N
E
V
ER
AD
D
A
P
ILLOW
O
R
CO
MFORTER
.
N
E
VE
R
PLA
C
E
AD
D
I
TI
O
N
A
L
PA
D
D
ING U
N
D
E
R
AN
INF
ANT.
SEE
M
A
T
T
R
E
S
S
SU
PP
O
RT
F
O
R
A
D
D
I
T
I
ON
A
L
WA
R
N
I
N
GS
.
ID
200B
!
LES B
EBES PE
U
VE
N
T S
ETO
U
FFER
AV
E
C
LA
L
ITE
R
IE
.
VE
U
ILLEZ N
E
J
A
M
A
I
S
AJO
U
T
E
R
UN
O
R
E
I
L
L
E
R, E
D
R
E
D
ON
O
U
BO
R
D
U
R
E
D
E
P
R
O
TE
C
T
I
ON
S.
N
E JA
M
AI
S A
J
O
U
T
E
R
D
E
R
E
M
BO
U
R
R
A
G
E E
N
D
ESSO
U
S
D
’U
N
BE
B
E.
V
E
U
ILLEZ
VO
U
S
R
EF
E
R
E
Z A
L
A
BASE
D
U
M
A
TE
LAS
PO
U
R
L
E
S
M
I
SES E
N
GA
R
D
E
A
D
DI
T
I
O
N
N
EL
LES
ID
20
3
B
M
I
SE
EN
GAR
DE
:
!
WARNING
!
Ma
ximum we
i
ght i
s
30lb
s
(
13.6
k
g).
I
D
3
40
D
FALL
HAZARD
-
Child
r
en
ha
ve
s
uf
fered
se
rious inju
r
ies afte
r
falling f
r
om
c
han
ging tables. Fal
l
s
can
happen quickly.
S
TAY
in a
r
m'
s
r
each of you
r
c
hi
l
d.
!
I
D
459
B
Peligro de caída
-
L
os niñ
os han sufrid
o
g
r
a
v
e
s
h
e
ri
d
as tra
s
ca
e
r
d
esd
e
e
l
c
a
m
b
i
o
d
e
ta
bl
a
s
.
F
all
s
p
u
e
d
e
n
o
cu
r
rir
r
á
pida
m
e
n
t
e
.
Estanc
ia en braz
os
del
alcance
de su
n
o
.
!
ADVERTENCIA
Esta
n
cia
e
n
b
ra
z
o
s
de
l
a
l
c
a
n
c
e
d
e
s
u
n
i
ñ
o
.
El p
e
s
o
m
á
x
im
o
e
s d
e
3
0 li
b
r
a
s.
!
Question and Answer IconNeed help?

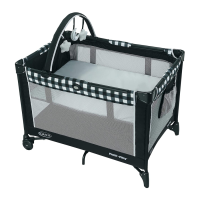
Do you have a question about the Graco Hadley 04586-70 MB Series and is the answer not in the manual?

Graco Hadley 04586-70 MB Series Specifications

General IconGeneral
BrandGraco
ModelHadley 04586-70 MB Series
CategoryBaby & Toddler Furniture
LanguageEnglish

Summary

Need Product Support

General Safety Warnings and Hazards

Strangulation Hazard

Specific warnings about hazards from cords and strings.

Fall Hazard

Warnings regarding child's ability to climb and fall.

Mattress Size Caution

Specific requirements for mattress dimensions and thickness.

Identifying Crib Frame Parts

Part 1: Left Front Post

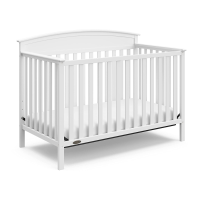
Identifies the left front post component of the crib.

Part 2: Right Front Post

Identifies the right front post component of the crib.

Part 3: Left Crib End

Identifies the left end panel of the crib.

Part 4: Right Crib End

Identifies the right end panel of the crib.

Part 5: Changer End

Identifies the changer end panel for the crib.

Part 6: Right Back Post

Identifies the right back post component of the crib.

Part 7: Left Back Post

Identifies the left back post component of the crib.

Part 8: Back Rail

Identifies the lower back rail component of the crib.

Identifying Changer and Rail Parts

Part 9: Front Rail

Identifies the front rail component of the crib.

Part 10: Changer Front Top Rail

Identifies the top rail for the changer.

Part 11: Top Shelf Support Rail (Front)

Identifies the front support rail for the top shelf.

Part 12: Changer Supports Rail

Identifies the support rails for the changer.

Part 13: Changer Bottom Front Rail

Identifies the bottom front rail for the changer.

Part 14: Changer Back Top Rail

Identifies the top back rail for the changer.

Part 15: Top Shelf Support Rail (Back)

Identifies the back support rail for the top shelf.

Part 16: Changer Bottom Back Rail

Identifies the bottom back rail for the changer.

Identifying Drawer and Panel Parts

Part 17: Changer Back Mounting Rail

Identifies the back mounting rail for the changer.

Part 18: Top Shelf

Identifies the top shelf component.

Part 19: Bottom Shelf

Identifies the bottom shelf component.

Part 20: Changer Center Panel

Identifies the center panel for the changer.

Part 21: Changer Shelf

Identifies the shelf component for the changer.

Part 22: Drawer Front

Identifies the front panel of the drawer.

Part 23: Drawer Left

Identifies the left side panel of the drawer.

Part 24: Drawer Right

Identifies the right side panel of the drawer.

Part 25: Drawer Division

Identifies the divider panel for the drawer.

Identifying Drawer, Bed Conversion & Support Components

Part 26: Drawer Bottom

Identifies the bottom panel of the drawer.

Part 27: Drawer Back

Identifies the back panel of the drawer.

Part 28: Drawer Left

Identifies the left side panel for drawers.

Part 29: Drawer Right

Identifies the right side panel for drawers.

Part 30: Drawer Back

Identifies the back panel for drawers.

Part 31: Drawer Front

Identifies the front panel for drawers.

Part 32: Drawer Bottom

Identifies the bottom panel for drawers.

Part 33: Crib Left Side Top

Identifies the top left side panel of the crib.

Part 34: Crib Right Side Top

Identifies the top right side panel of the crib.

Part 35: Stretcher Bar

Identifies the stretcher bar component.

Part 36: Mattress Support

Identifies the mattress support component.

Part 37: Toddler Bed Post Top Left

Identifies the top left post for toddler bed conversion.

Part 38: Toddler Bed Post Top Right

Identifies the top right post for toddler bed conversion.

Hardware and Tool Diagram

Hardware Identification (A-R)

Lists and identifies all hardware and tool components for assembly.

Tool Identification (O, Q)

Identifies specific tools required for assembly.

Convert Crib To A Full Size Bed

Storkcraft Limited Warranty

Storage and Care

Instructions for storing and cleaning the product.

Limited One Year Warranty

Details of the one-year manufacturer's warranty.

Warranty Limitations and Time Period

Defines the terms and duration of the warranty.

Warranty Service

Procedures for obtaining warranty service and part replacement.

Limitations on Liability

Outlines limitations on Storkcraft's liability.

General Terms

General legal terms and conditions of the warranty.

Procedure for Obtaining Warranty Service

Steps to follow for requesting warranty service.

Related product manuals