EasyManua.ls Logo

Grand PATIO GAZEBO User Manual

Grand PATIO GAZEBO
13 pages
To Next Page IconTo Next Page
Page #1 background imageLoading...
Page #1 background image
10x10 Feet GAZEBO / 3x3m PAVILLON
1-13
x3
90MIN
Before beginning assembly of product, make sure all parts are present. Compare parts with package
contents list and hardware contents list. If any part is missing or damaged, do not attempt to assemble
the product.
Assemble the items on a stable, non-abrasive surface such as carpeting to avoid damage.
This item is heavy. Use care when handling. May require three or four adults for safe assembly.
!
READ & SAVE BELOW INSTRUCTIONS
Vergewissern Sie sich vor Beginn der Montage des Produkts, dass alle Teile vorhanden sind. Vergle-
ichen Sie die Teile mit der Packungsinhaltsliste und der Hardware-Inhaltsliste. Wenn ein Teil fehlt oder
beschädigt ist, versuchen Sie nicht, das Produkt zusammenzubauen.
Montieren Sie die Artikel auf einer stabilen, nicht scheuernden Oberfläche wie Teppichboden, um
Beschädigungen zu vermeiden.
Dieses Produkt ist schwer,Seien Sie bei der Handhabung vorsichtig. Für eine sichere Montage sind
möglicherweise zwei Erwachsene erforderlich.
!
GEBRAUCHSANLEITUNG
Question and Answer IconNeed help?

Do you have a question about the Grand PATIO GAZEBO and is the answer not in the manual?

Grand PATIO GAZEBO Specifications

General IconGeneral
BrandGrand PATIO
ModelGAZEBO
CategoryPatio Furniture
LanguageEnglish

Summary

General Assembly Instructions

Read & Save Below Instructions

Important safety and assembly guidelines to follow before starting product setup.

Care and Maintenance

Package Contents

Hardware Contents

Assembly Instructions

Step 1

Attaching initial frame parts, ensuring correct orientation and partial tightening.

Step 2

Connecting multiple frame sections to form larger structural units.

Step 3

Connecting horizontal beams (C) using hardware (I and N).

Step 4

Connecting horizontal beams (C) using hardware (I and N), continuing assembly.

Step 5

Securing frame sections with hardware (N and P), ensuring correct alignment.

Step 6

Assembling the upper frame structure by connecting horizontal beams (C) with hardware (O).

Step 7

Attaching vertical corner supports (H) using hardware (O) to the main frame.

Step 8

Assembling the roof structure by connecting radial poles (E) to the center hub (G) and frame.

Step 9

Connecting roof rafters (E) to the main frame structure, ensuring stability.

Step 10

Securing roof elements using hardware (M, P, D) to the frame.

Step 11

Completing the roof frame and structure connections.

Step 12

Installing a central roof component (J) into the assembled roof structure.

Step 13

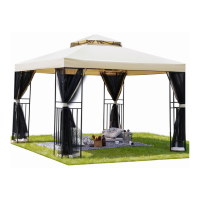
Attaching the main canopy roof cover (K) to the frame.

Step 14

Securing side panel frames or supports (Q) to the main structure.

Step 15

Attaching side support elements (F) to the frame.

Step 16

Installing side wall covers or netting (L) onto the frame.

Related product manuals