IndexContents
Cutting Plotter Controller
OPS664
2.2 Setting the Various Parameters
The functions of the Cutting Plotter Controller are explained according to each parameter.
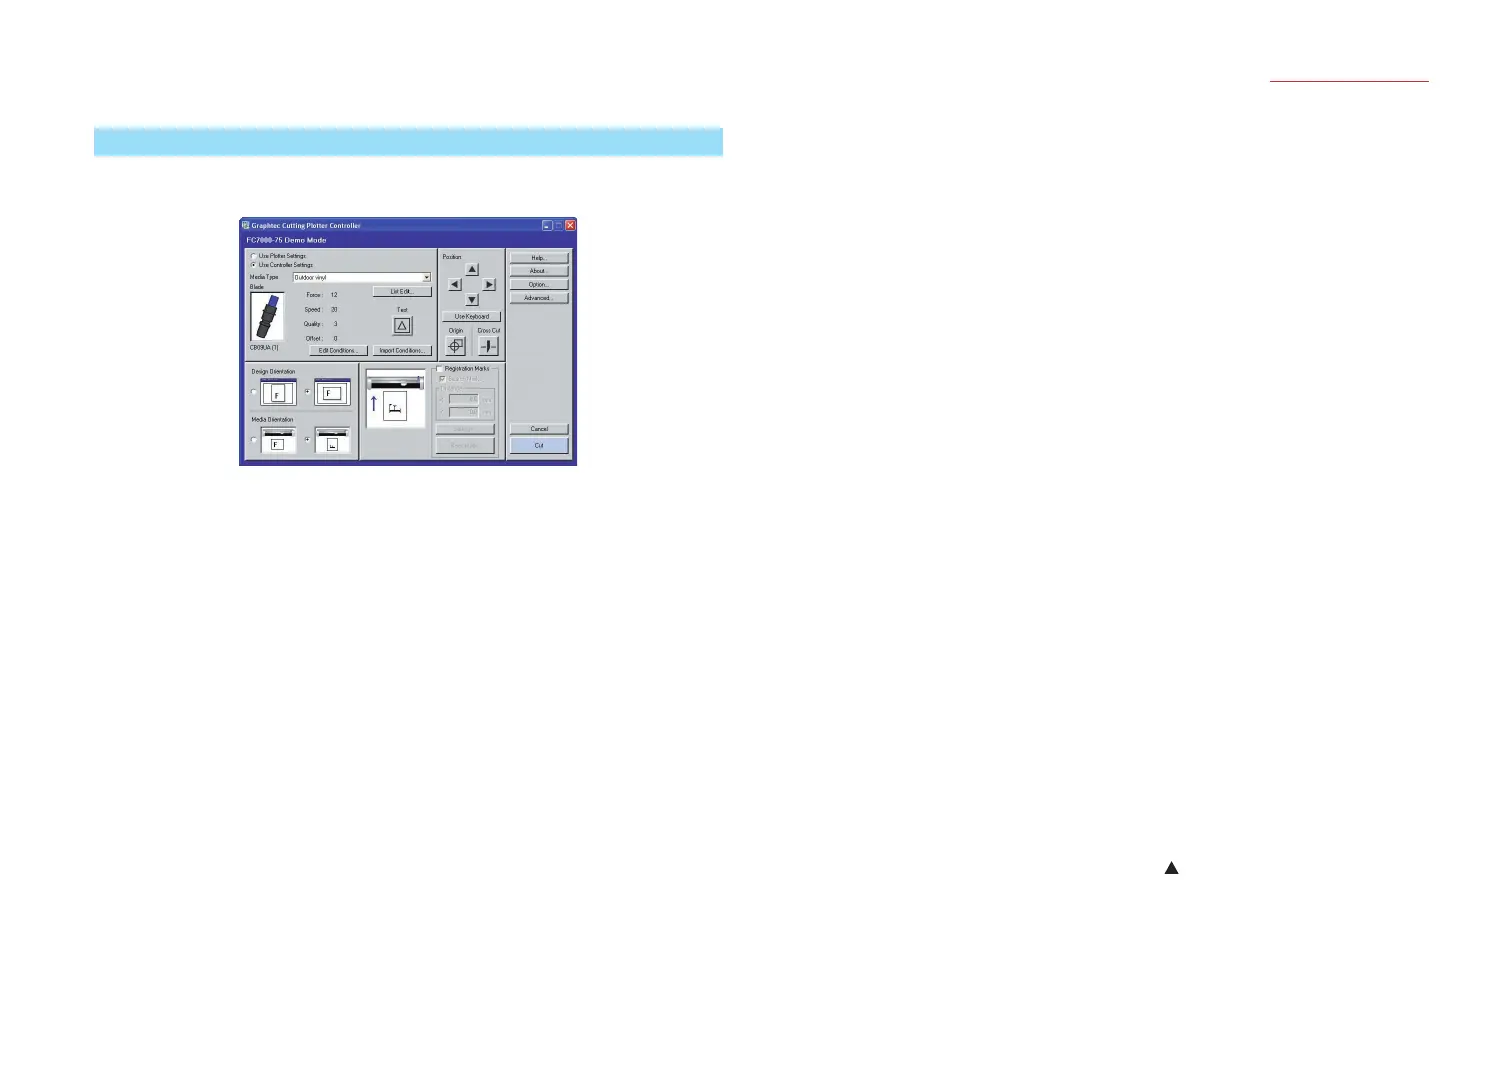
When the Controller is launched, the following screen appears.
Note: The screen above is the screen that is displayed when an FC7000 Series cutting
plotter has been connected.
Use Plotter Settings/Use Controller Settings
............ Selects whether to use the settings made at the plotter or to use the
Controller settings for the cutting conditions (Blade (Pen Type), Force,
Speed, Quality, Offset).
If "Use Controller Settings" is selected
COND. No. [9] is displayed on the plotter's LCD. The Controller settings
will be made according to the conditions specied for COND. No. [9].
If "Use Plotter Settings" is selected
The Controller's cutting condition settings will become invalid.
Note: If ROBO Master-Pro was used to launch the Controller, the setting is xed
to "Use Controller Settings" and cannot be changed.
Media Type ...... To enable easy specication of cutting conditions, the most suitable
cutting conditions for each media type are stored in the Cutting Plotter
Controller as separate les, with the media type used as the le name.
• File name: Fluorescent lm A (The following settings are stored
under the le name [Fluorescent lm A] )
• Blade Selection (Pen Type) : CB09UA
• Force : 20 • Speed : 10 • Quality : 1 • Offset : 0
Files with the most standard settings are installed together with the
Cutting Plotter Controller. The settings le name selected from the pull-
down list is displayed for "Media Type", and the contents of that le
are displayed underneath the selected le name. If you change your
selection, the displayed settings will also change. The plotter settings
will also be changed at the same time.
List Edit............ Click this button to display the [Edit Condition List] window that enables
you to edit and manage settings les.
In this window you can create new les, change le contents, and use
the delete and copy functions.
Note: For further details on the [Edit Condition List] window, refer to Section 2.3,
"Edit Condition List".
Test .................. Performs test cutting using the currently displayed cutting conditions in
order to check the cutting quality.
Move the cutter pen to the position where you wish to perform test
cutting, and then click the [Test] button to cut a 1 cm x 1 cm test pattern.
Note: Check the cutting results. If the lm is cut cleanly, and there are faint
traces on the backing sheet, the cutting conditions are correct. If cutting
has not been performed correctly (the backing sheet has been cut through
or uncut areas of lm remain), adjust the blade length, or change the force,
speed and other parameters.
Note: The quality of the cutting results will vary, depending on the type of media
to be cut and on other factors. If you plan to cut media that you have never
used before, always be sure to perform test cutting rst.
Note: The F8 function key on your keyboard can also be used to perform this
operation.
Edit Conditions
............ Enables the currently selected cutting conditions to be edited directly.
An [Edit cutting conditions] window for the selected le is displayed,
and, after the parameters have been changed, test cutting and cutting
force tests can be performed. The corrected parameters are saved as
a settings le, and the plotter settings are also updated accordingly.
Note: For further details, refer to Section 2.4, "Cutting Conditions".
Import Conditions
............ Imports the cutting condition settings made at the plotter into the
Controller.
Click the [Import Conditions] button to display the cutting conditions
displayed on the plotter's LCD in the Controller's [Edit cutting
conditions] window. If [OK] is clicked, these parameters are saved as
the cutting conditions for the currently displayed [Media Type].
Position............ These keys move the cutter pen in the direction printed on the
selected key.
If a Position key is used together with the keyboard's [Shift] key, the
cutter pen moves slowly. If a Position key is used together with the
keyboard's [Ctrl] key, the cutter pen moves quickly.
Note: This function can only be used when the plotter is in the Ready status.
4
 Loading...