Do you have a question about the GRAUPNER MULTILADER 7E and is the answer not in the manual?
This product is not for children under 14 and requires supervision for individuals with reduced physical or mental capabilities.
Protect the charger from dust, damp, and heat. Ensure adequate ventilation and placement on a heat-resistant surface.
Avoid modifying outputs and connections. Never leave the charger unsupervised or connect multiple batteries to one output.
Do not connect incompatible batteries like >10 cell Ni-Cd/NiMH, >12V lead-acid, Li-Ion, or faulty/non-rechargeable batteries.
Understand charge quantity (current x time) and standard charge current (1/10 capacity). Follow manufacturer guidelines.
Perform test charges to verify termination. Ensure firm connections and correct output selection for safe charging.
Use adequate conductor cross-section charge leads, not exceeding 30 cm, with good quality connectors for optimal performance.
Charge transmitter batteries via integral socket on outputs 2 or 4-7. Remove battery from compartment and set transmitter to 'OFF'.
Use genuine Graupner or GM-Racing charge leads with matching connectors and correct polarity for various battery types.
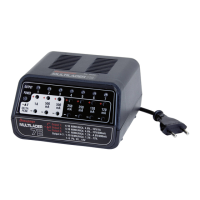
Features include Euro power plug, POWER LED, 7 output ports with 4mm banana plugs, and charge function LEDs.
The charger is maintenance-free. Clean with a dry cloth, avoiding dust, dirt, damp, and cleaning agents.
Automatic termination may be unreliable for 1-4 cell packs. Perform monitored test charges to verify reliable termination.
Warm batteries perform better. Avoid overcharging/deep-discharging. Store batteries charged and check charge state periodically.
Purchase quality batteries. Charge new packs at low rates initially and gradually increase current.
Overcharging reduces capacity. High current charging/discharging shortens pack life. Respect manufacturer limits.
Protect batteries from vibration and shock. Ensure good ventilation as batteries can generate explosive gas.
Dispose of exhausted batteries at designated recycling points, not domestic waste. Retail outlets should accept them.
Automatic termination uses Delta Peak (Delta-V) detection. Peak sensitivity is shown as delta V in the graph.
Charger for Ni-Cd, Ni-MH, and lead-acid batteries. Protected against overload/short-circuit. Features 7 outputs with indicator LEDs.
Details charge current and battery type compatibility for each of the 7 output ports.
Outputs 1-3 use Delta-V detection for charging control. A voltage drop triggers a trickle current for maximum charge effect.
Power LED (RED) indicates power. Charging LED (RED/ORANGE) signals use; GREEN means fully charged. OFF indicates error.
Outputs 4-7 lack automatic termination. Charge process must be terminated manually after the appropriate charge period.
Charge time in hours = (battery capacity (AH) x 1.4) / Charge current (A). Example provided for 7.2V/1.5Ah battery.
Details Ni-Cd (memory effect), Ni-MH (no memory effect), and Lead-Acid batteries, including capacity and charging rates.
Read instructions, connect battery to correct port, connect charger to mains, observe LEDs, disconnect when fully charged.
If LEDs don't light up, check mains voltage, charger, outputs for shorts, or battery for deep discharge/defects.
Details charge current (120mA-1A) and max power (38W) for the unit, with 110-240VAC input.
Lists charge current, cell count, and capacity for NiCd/NiMH and Lead-acid batteries for each output (1-7).
Operating voltage range (110-240V AC), weight (530g), and dimensions (142x130x84mm) are provided.
Dispose of the product and batteries responsibly at designated collection points for recycling electrical equipment.
Declaration of conformity with essential protective requirements for electromagnetic interference and LVD.
| Brand | GRAUPNER |
|---|---|
| Model | MULTILADER 7E |
| Category | Battery Charger |
| Language | English |