is connected, but before the voltage regulator. is able to
Equipment:
DVM
or
DMM
compensate for this change in load resistance.
It
takes much longer to describe the operation of a voltage
1
.
regulator than it takes for the regulator to
operate.There
is
some time delay from the instant that a load change or
input voltage change takes place and causes the output
voltage to change until the voltage regulator is able to
-
2
.
compensate and restore the correct output voltage. This
time delay occurs mostly in the op amp and Darlington
3
.
transistor circuitry. Figure 82 is from the
LM309
specification sheets, and illustrates the time required for
the
LM309
regulator to respond to a load change. Notice
that it is a very short time, about 1 micro second.
The output filter capacitor for the fixed supply, C6, reduces
4
.
the amplitude of these voltage spikes. C6 has a
capacitance of 10
mF
It does not need to have a large
-
5
.
capacitance like C3, the input filter capacitor, because of
the short periods of time it must provide or absorb electrical
energy to keep the output voltage constant. Look again at
Fig.
63.The
time that the input filter capacitor must provide
electrical energy is about 6 milliseconds, which is 6000
times as long as 1 microsecond.
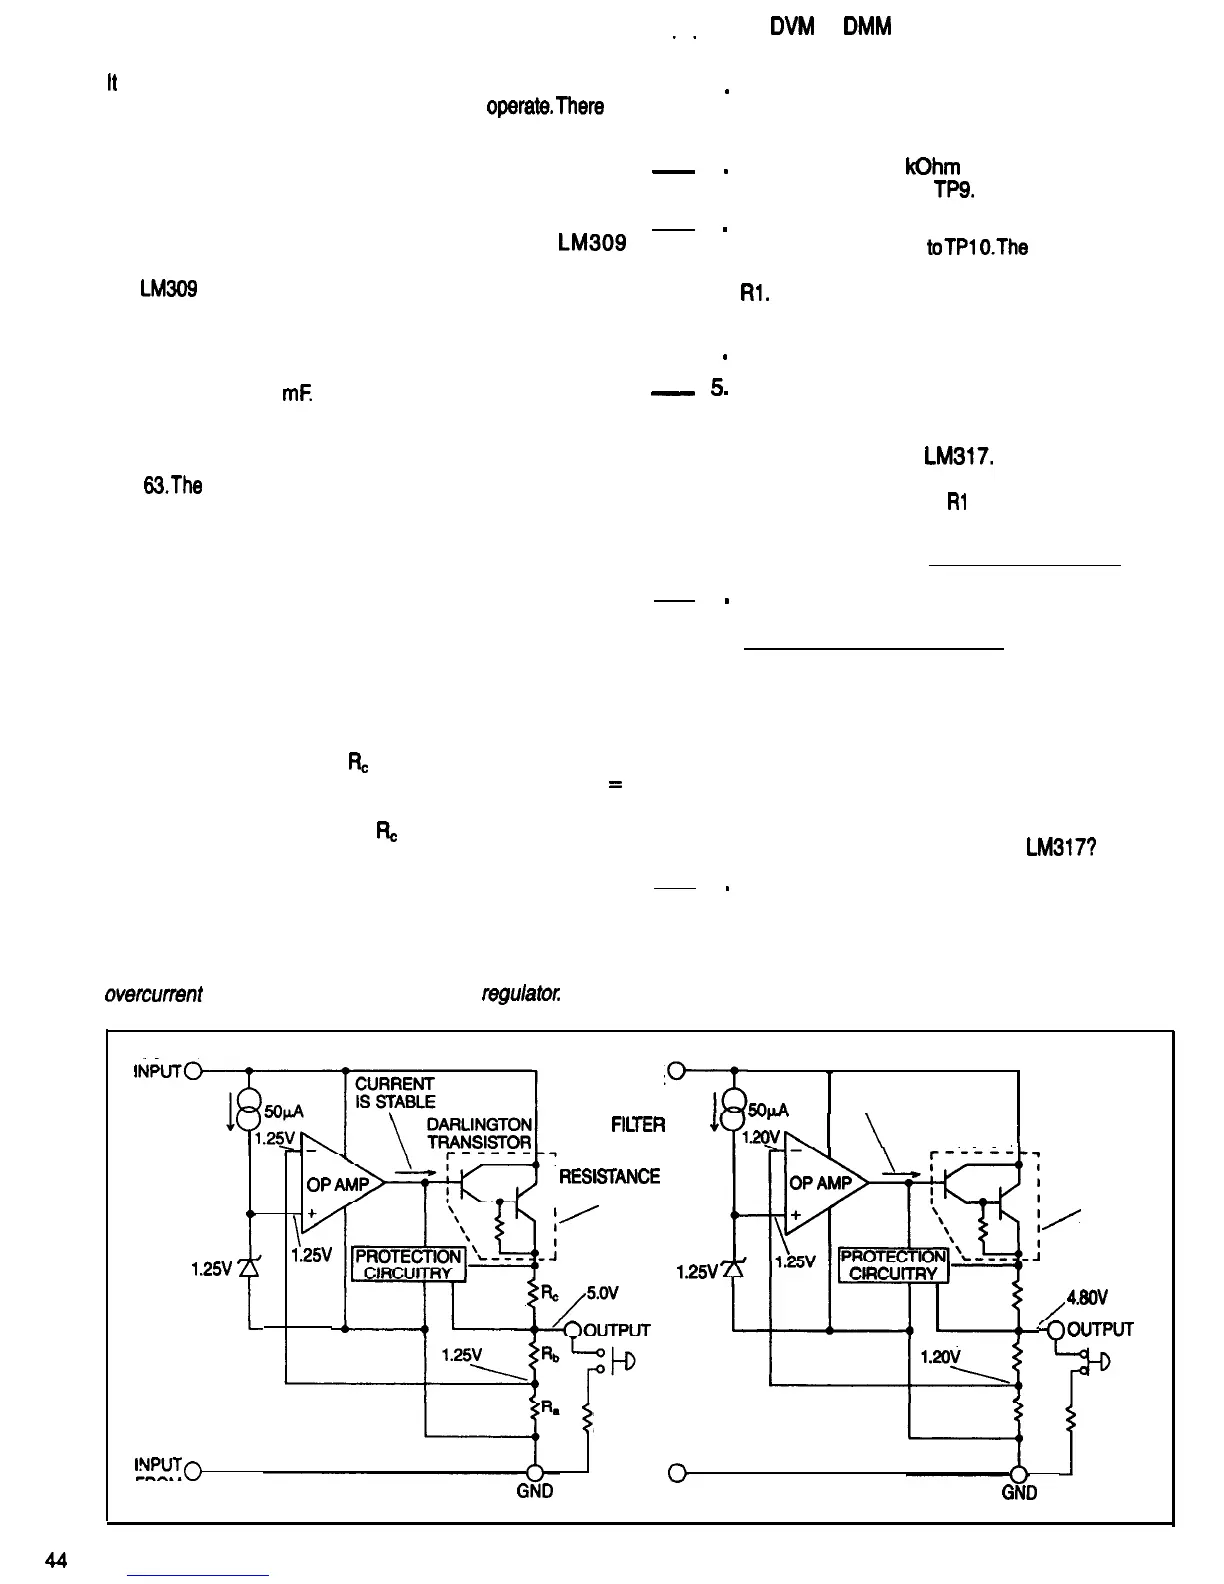
The circuitry symbolized by the rectangle labeled
PROTECTION CIRCUITRY can divert the op amp output
current away from the base of the Darlington transistor.
Normally, when the op amp output moves in the positive
direction, we want to increase the current flowing through
the voltage regulator and load resistor. But when this
current reaches the maximum value the regulator can
safely handle, we don’t want it to increase any more.
The voltage across resistor
Rc
is directly proportional to the
current flowing through it. (Ohm’s law again, voltage
=
current x resistance. As the output current of the regulator
increases, the voltage across
R=
increases as well. When
this voltage reaches a level that indicates the maximum
safe current is flowing, the protection circuitry begins to
divert current away from the Darlington transistor base.
OVERCURRENT PROTECTION EXPERIENCE
6
.
7
.
Clip Lead
Be sure that the 808 power plug is NOT
connected to a power outlet. Refer to Fig. 83 for
the following steps.
Remove the 1.5
kOhm
test resistor which is
soldered toTP7 and
TP9.
Connect the positive meter lead toTP8 and the
negative meter lead
toTP1
O.The
meter will read
the voltage across the current sensing resistor
Rl.
Set the meter range selector to read a DC
voltage of 2.5 Volts.
Connect the 808 power plug to a power outlet.
Turn the 808 power switch ON. While observing
the meter, connect the clip lead from TP7 to
TP17. This is a short circuit across the positive
variable regulator,
LM317.
This represents a
heavy overload for the power transformer and
current sensing resistor
Rl
. Read the meter and
quickly remove the clip lead. Write down the
meter reading here.
Volts
Using Ohm’s law, calculate how much current is
flowing through the regulator.
Amps. Notice that
when using a 1 Ohm current sensing resistor,
The voltage across the resistor in Volts is the
same as the current flowing through the resistor
in Amps. The same correspondence occurs
when voltage is in millivolts, the current is then
in milliamps. How does the current you
measured compare to the value given on the
National Semiconductor Electrical Characteris-
tics specification sheet for the
LM317?
Turn OFF the 808 power switch and remove the
power plug from the power outlet. Disconnect the
clip lead and the meter test leads.
Purpose: To observe the operation of the internal
Just how hot a voltage regulator becomes when it is
overcurrent
limiting function of a voltage
regulatotz
operating depends on a number of variables. The input
POSITIVE
INI+*
FROM
FILTER
POSITIVE
INPUT
FROM
FILTEI
I
CURRENT
_WllA
WILL INCREASE
.
I
3
JU
vw’aw.
--t/h
I
\
DARLINGTON
TRANSISTOR
I
1
1
1.25V
RESISTANCE
WILL
DECREASE
/
RESIS’KANCE
IS STABLE
OP
A+
7
\’
1.25V
1.25V
I!
/
480V
-()OUTPUT
LOAD
RESISTOR
NEGATIVE
l%PUTo
FROM
FILTER
LOAD
RESISTOR
NEGATIVE INPUT
GND
FROM FILTER
GND
FIG. 81
44

 Loading...