38
3
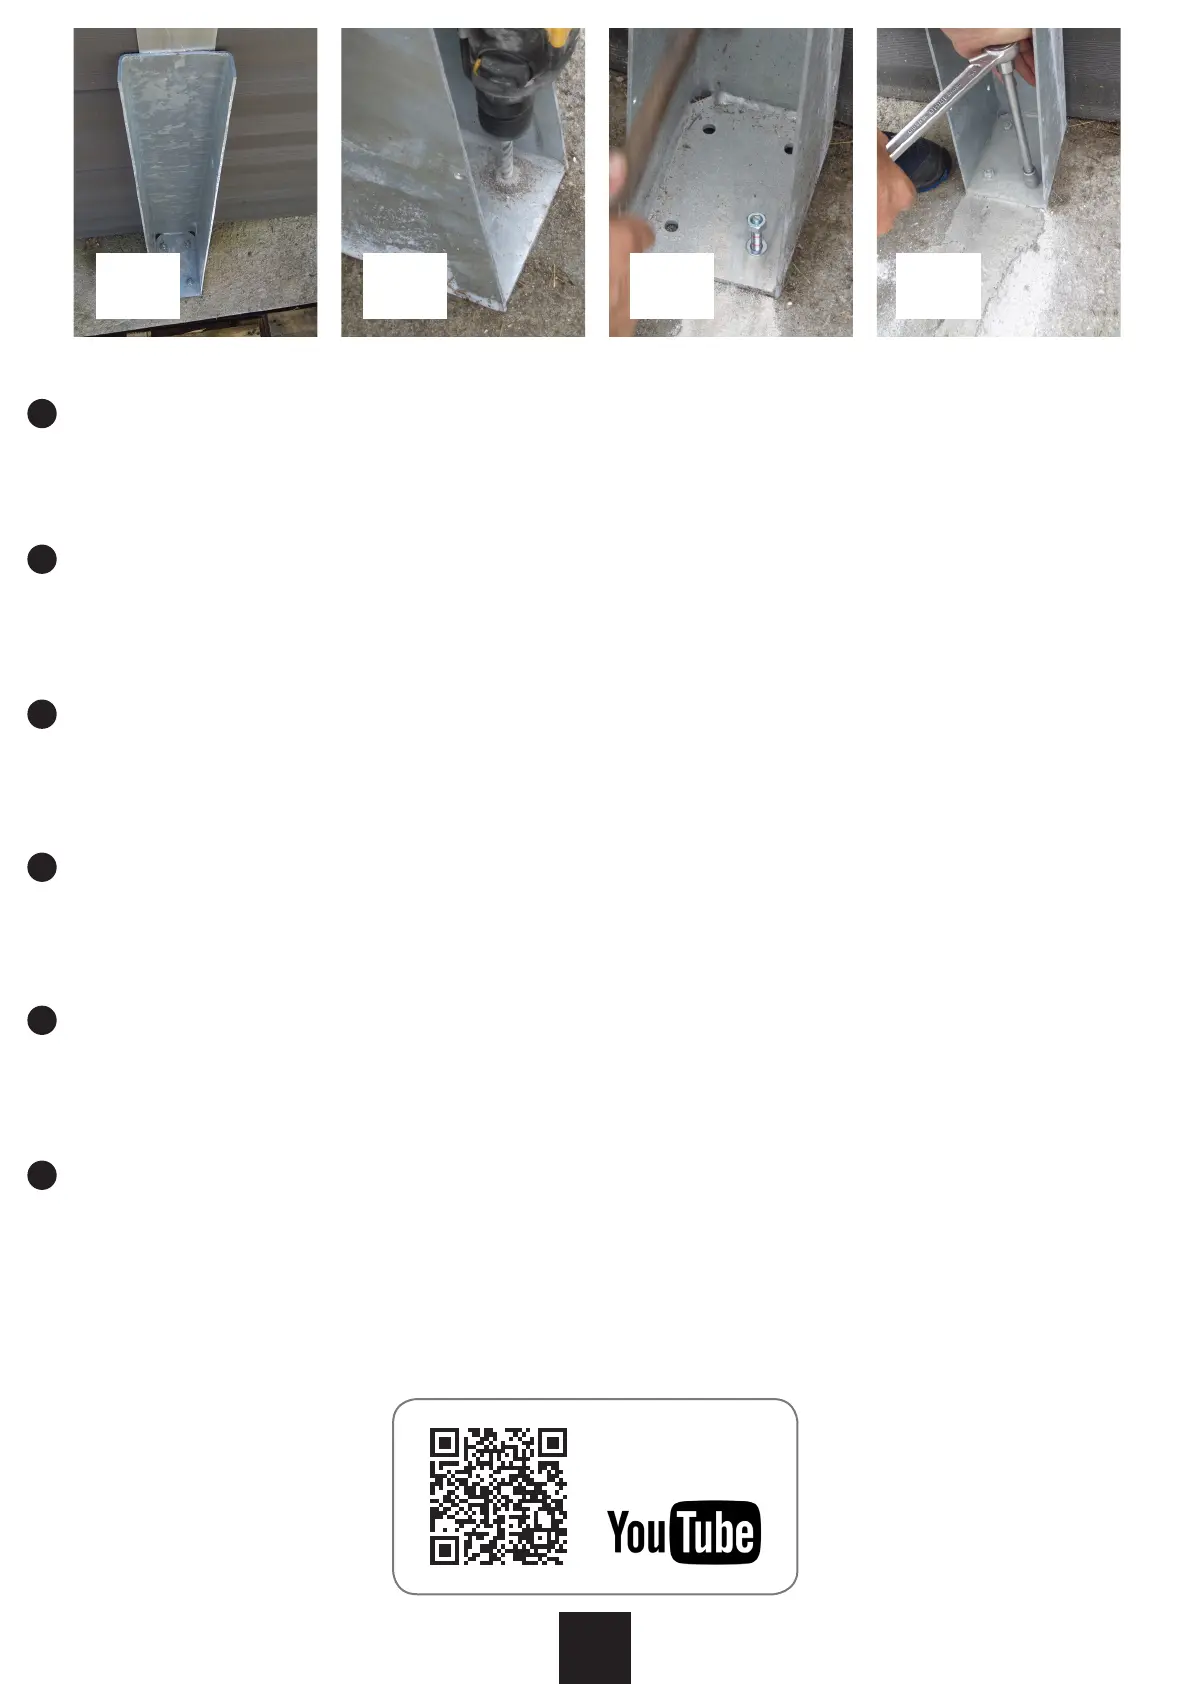
LAYOUT OF THE WEDGES:
Now is the time to remove the outer protection of the vertical aluminum proles
Revise the internal measurements of your pool. Take the metallic wedges and place them as in photo 1. The parts must be centred on the vertical proles (photo 3).
Tighten the columns well around the entire layer of boards. •Vertically drill the layer using a drill with a ø 10mm bit for concrete, and using the column as a guide (photo
4). The depth of the hole should be at least 100mm to guarantee good xing.•Place the xing bolts (with wachers and nuts) into the holes and x them with the help of a
hummer (photo 5). COMPLETELY hammer in the xing bolts (only the head should be visible).•Tighten crosswise the 4 nuts (photo 6).
ROZMIESZCZENIE WSPORNIKÓW:
W tym momencie należy usunąć zewnętrzną ochronę pionowych proli aluminiowych.
Sprawdź wewnętrzne wymiary basenu. Zamontuj metalowe wsporniki jak na zdjęciu nr 1. Elementy muszą zostać wyśrodkowane na pionowych prolach (zdjęcie nr 3).
Dobrze dokręć kolumny wokół całej warstwy płyt. •Nawierć pionowo warstwę za pomocą wiertła o średnicy ø 10 mm do betonu, używając kolumny jako prowadnicy (zdjęcie
nr 4). Głębokość otworu powinna wynosić co najmniej 100 mm, aby zagwarantować odpowiednie zamocowanie.•Włóż śruby mocujące (z uszczelkami i nakrętkami) do
otworów i zamocuj je za pomocą młotka (zdjęcie nr 5). Wbij śruby mocujące CAŁKOWICIE (powinien być widoczny tylko łeb).•Dokręć na krzyż 4 nakrętki (zdjęcie nr 6).
LAYOUT OF THE WEDGES:
Now is the time to remove the outer protection of the vertical aluminum proles
Revise the internal measurements of your pool. Take the metallic wedges and place them as in photo 1. The parts must be centred on the vertical proles (photo 3).
Tighten the columns well around the entire layer of boards. •Vertically drill the layer using a drill with a ø 10mm bit for concrete, and using the column as a guide (photo
4). The depth of the hole should be at least 100mm to guarantee good xing.•Place the xing bolts (with wachers and nuts) into the holes and x them with the help of a
hummer (photo 5). COMPLETELY hammer in the xing bolts (only the head should be visible).•Tighten crosswise the 4 nuts (photo 6).
DISPUNEREA PENELOR:
Acum este momentul pentru a elimina protecia exterioară a prolurilor verticale din aluminiu
Vericai măsurătorile interne ale piscinei. Luai penele metalice și așezai-le ca în fotograa 1. Piesele trebuie să e centrate pe prolurile verticale (foto 3).
Strângei bine coloanele în jurul întregului strat de plăci. •Perforai vertical stratul folosind o bormașină cu un burghiu de ø 10 mm pentru beton și folosind coloana ca element
de ghidare (foto 4). Adâncimea găurii trebuie să e de cel puin 100 mm pentru a garanta o xare bună. •Punei bolurile de xare (cu șuruburi și piulie) în găuri și xai-le cu
ajutorul unui ciocan (foto 5). Introduceți complet șuruburile de xare cu ciocanul (trebuie să rămână vizibil doar capul).•Strângei în cruce cele 4 piulie (foto 6).
UTLÄGGNING AV KILAR:
Nu är det dags att ta bort det yttre skyddet av de vertikala aluminiumprolerna
Revidera de interna mätningarna i din pool. Ta metallkilarna och placera dem som på bild 1. Delarna måste vara centrerade på de vertikala prolerna (foto 3). Dra åt
kolumnerna väl runt hela skivskiktet. • Borra lagret vertikalt med en borr med en ø 10 mm bit för betong och använd kolonnen som vägledning (foto 4). Hålets djup bör vara
minst 100 mm för att garantera en god fästning. • Placera fästbultarna (med brickor och muttrar) i hålen och fäst dem med hjälp av en hummer (foto 5).
HAMRA helt i fästbultarna (endast huvudet ska vara synligt)• Dra åt de fyra muttrarna tvärs (foto 6).
4 5 6
Look for us in our YouTube
channel to help you with the
assembly.
PL
EN
CS
SK
RO
SV
 Loading...