50
33 34 35 36
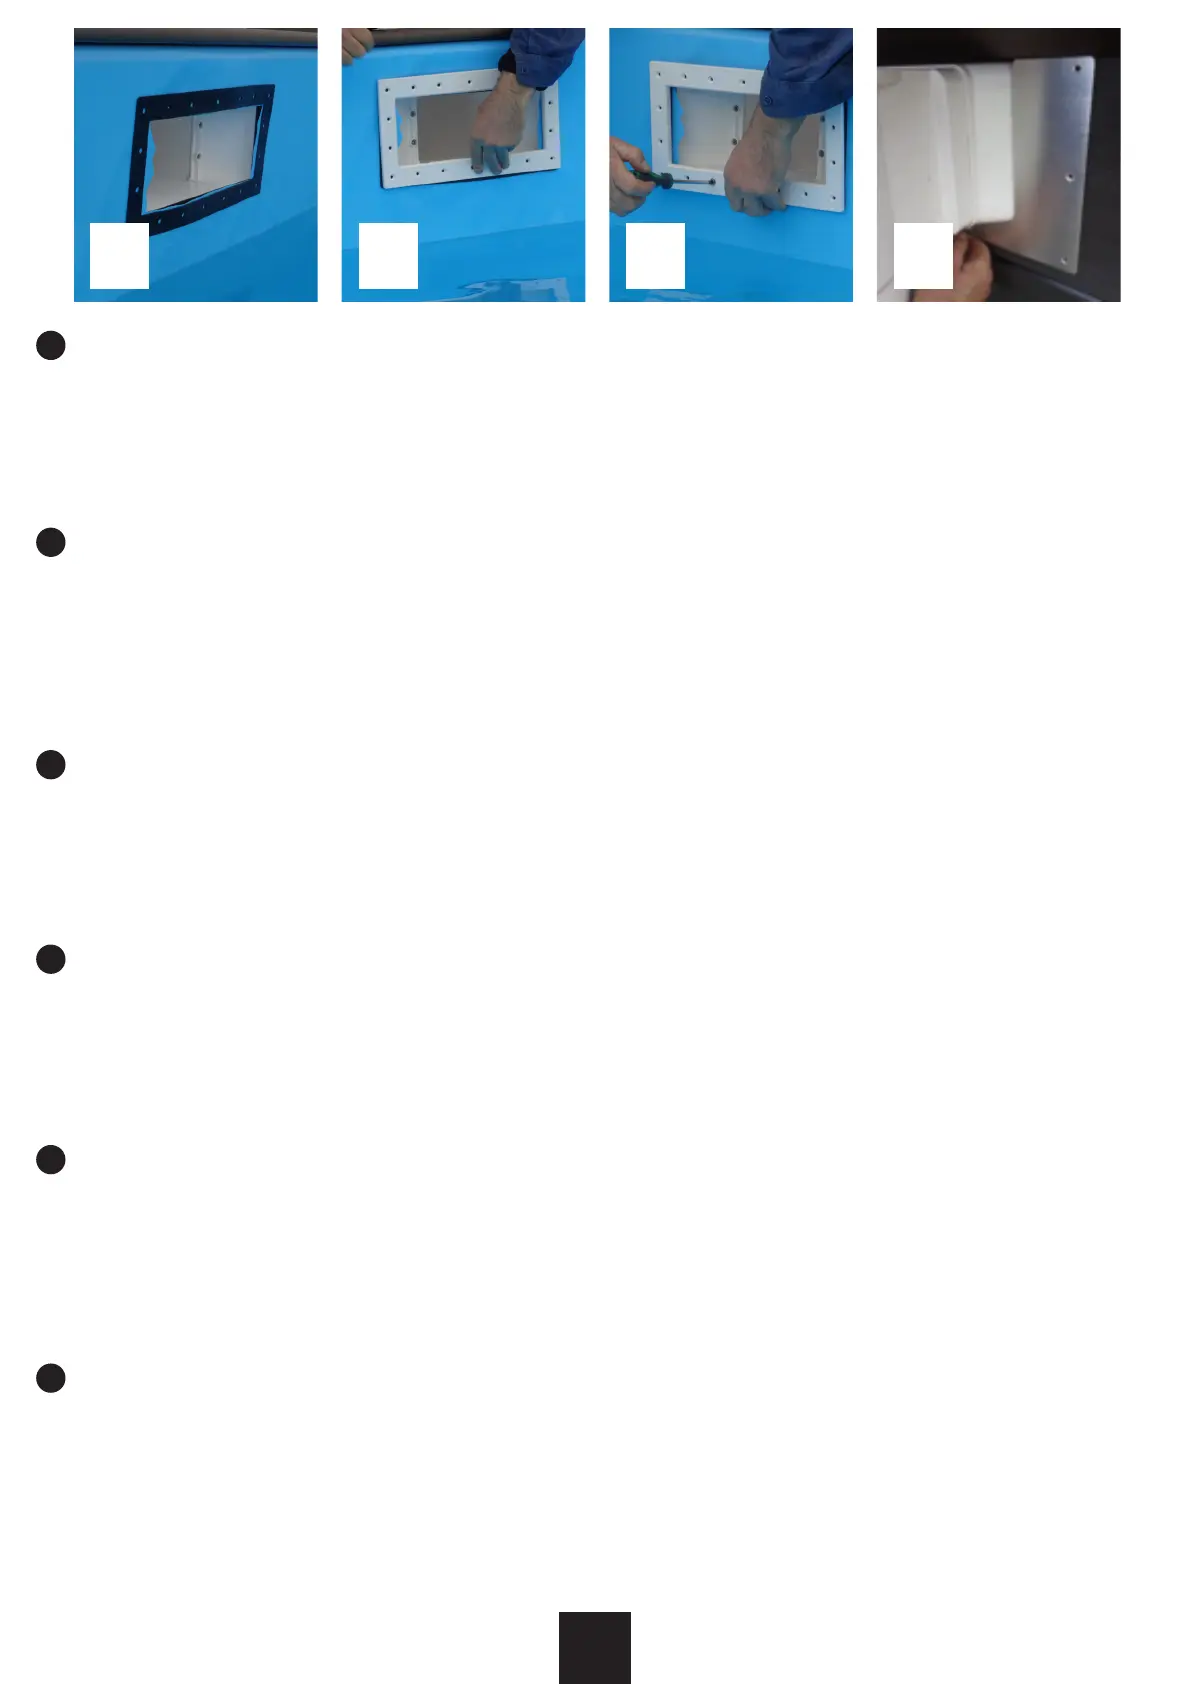
ATTACHING THE SKIMMER BODY (S) TO THE OUTSIDE OF THE POOL:
Fill the pool with water until it reaches 4 cm from the bottom of the die of the skimmer. Ax the seal ring and position the skimmer frame. Screw it with a screwdriver. Using
a Stanley knife, cut the bit of the liner (L) that the skimmer frame covers (only the inside bit).
Finally, place the trim piece. Note that the trim has “max” and “min” markings. They indicate the maximum and the minimum level of water that your pool should have.
Cover the connecting bushing (C) and the water treatment unit with Teon. Screw the connecting bushing (C) tightly to the skimmer and connect one end of the hose to the
skimmer connecting bushing (C) using a clamp (A). Then t the other end to the treatment unit and clamp it.
Important: Use Teon on all water hose connection threads to ensure leak-tightness.
Locate the aluminium trim for the skimmer. To secure it to the panel, take 8 screws (4 x 16 mm) from the box: KITENV.....
PRZYMOCOWANIE SKIMMERA DO ZEWNĘTRZNEJ CZĘŚCI BASENU:
Napełnij basen wodą do wysokości 4 cm od dolnej krawędzi skimmera. Załóż uszczelkę i ustaw obudowę skimmera. Przykręć ją śrubokrętem. Przy pomocy noża Stanleya
wykonaj otwór w linerze (L), wytnij tylko część którą przykrywa obudowa skimmera (tylko wewnętrzną część).
Na koniec załóż listwę wykończeniową. Zauważ, że listwa wykończeniowa ma oznaczenia „max” i „min”. Wskazują one maksymalny i minimalny poziom wody, który powinien
znajdować się w basenie.
Następnie zaklej tuleję (C) i ltr za pomocą taśmy teonowej. Przykręć mocno tuleję (C) do skimmera i podłącz jeden koniec węża do tulei skimmera (C) za pomocą obejmy
zaciskowej (A). Następnie podłącz drugi koniec węża do otworu ltra i zaciśnij go.
Ważne: Zaklej taśmą teonową wszystkie połączenia węża wodnego, aby zapewnić jego szczelność.
Załóż aluminiową listwę wykończeniową skimmera. Aby przymocować ją do panelu, należy wyjąć z pudełka 8 śrub (4 x 16 mm): KITENV.....
ATTACHING THE SKIMMER BODY (S) TO THE OUTSIDE OF THE POOL:
Fill the pool with water until it reaches 4 cm from the bottom of the die of the skimmer. Ax the seal ring and position the skimmer frame. Screw it with a screwdriver. Using
a Stanley knife, cut the bit of the liner (L) that the skimmer frame covers (only the inside bit).
Finally, place the trim piece. Note that the trim has “max” and “min” markings. They indicate the maximum and the minimum level of water that your pool should have.
Cover the connecting bushing (C) and the water treatment unit with Teon. Screw the connecting bushing (C) tightly to the skimmer and connect one end of the hose to the
skimmer connecting bushing (C) using a clamp (A). Then t the other end to the treatment unit and clamp it.
Important: Use Teon on all water hose connection threads to ensure leak-tightness.
Locate the aluminium trim for the skimmer. To secure it to the panel, take 8 screws (4 x 16 mm) from the box: KITENV.....
ATAȘAREA CORPULUI (LOR) DE SKIMMER LA EXTERIUL PISCINEI:
Umplei piscina cu apă până când ajunge la 4 cm de fundul matriei skimmerului. Atașai inelul de etanșare și poziionai cadrul skimmer. Înșurubai-l cu o șurubelniă.
Folosind un cuit Stanley, tăiai bitul căptușelii (L) pe care îl acoperă cadrul skimmerului (doar bitul interior).
În cele din urmă, așezai bucata de tăiere. Reinei că ornamentul are marcaje „max” și „min”. Acestea indică nivelul maxim și minim de apă pe care ar trebui să-l aibă piscina
ta.
Acoperii bucsa de conectare (C) și unitatea de tratare a apei cu teon. Înșurubai bine bucșa de conectare (C) la skimmer și conectai un capăt al furtunului la bucșa de
conectare a skimmerului (C) folosind o clemă (A). Apoi xai celălalt capăt la unitatea de tratament și xai-l.
Important: Utilizai teon pe toate letele de conectare a furtunului de apă pentru a asigura etanșeitatea.
Localizai garnitura de aluminiu pentru skimmer. Pentru a-l xa pe panou, luai 8 șuruburi (4 x 16 mm) din cutie: KITENV .....
FÄSTA SKUMMERKROPPEN UTAN UTOM POOLEN:
Fyll poolen med vatten tills den når 4 cm från botten av skummets matris. Fäst tätningsringen och placera
skimmerramen. Skruva fast den med en skruvmejsel. Använd en Stanley-kniv och klipp av biten på linern (L) som skimmerramen täcker (endast insidan).
Slutligen placera trimstycket. Observera att trimmen har “max” och “min” markeringar. De anger den högsta och lägsta vattennivån som din pool ska ha. Täck
anslutningsbussningen (C) och vattenbehandlingsenheten med Teon. Skruva fast anslutningsbussningen (C) ordentligt på skimmern och anslut ena änden av slangen till
skummanslutningsbussningen (C) med en klämma (A). Montera sedan den andra änden på behandlingsenheten och kläm fast den.
Viktig: Använd teon på alla vattenslangens anslutningsgängor för att säkerställa täthet.
Leta upp aluminiumbeklädnaden för skimmern. För att fästa den på panelen, ta 8 skruvar (4 x 16 mm) ur lådan: KITENV .....
PL
EN
CS
SK
RO
SV
 Loading...