EasyManua.ls Logo

Green Blue GB523 - User Manual

Default Icon
14 pages
Print Icon
To Next Page IconTo Next Page
Loading...
En
Wireless Home Weather Station
01. Features • DCF Radio control time function Perpetual Calendar Up to Year 2099
Day of week in 8 languages user selectable: English, German, Italian, French, Russian,
Spanish, Netherlands and Danish Time in optional 12/24 hour format Daily Alarm
Function Automatic snooze function • Lunar phases display Barometric pressure:
Barometric pressure measurement ranges: 600 hPa/ mb~1100 hPa/mb & 17.72 inHg~
32.50 inHg & 450.0mmHg~825.0mmHg • Pressure alternatively in hPa/mb or inHg
L'icona del limite superiore dell'allarme temperatura inizia a lampeggiare. Utilizzare i "+"
e - tasti per impostare la temperatura massima richiesta "". Premere il tasto "ALERT" per
confermare l'impostazione. L'icona del limite inferiore dell'allarme temperatura inizia a
lampeggiare. Utilizzare i "+" e - tasti per impostare la temperatura minima richiesta "".
Premere il tasto "ALERT" per confermare l'impostazione e per terminare la procedura di
impostazione. Avviso relativo alla temperatura e gelo: Attivare e disattivare l'allarme di
temperatura o l'avviso gelo: Premere brevemente il tasto "ALERT" per attivare o disattivare
l'allarme di temperatura. Se l'avviso di allarme gelo è attivato, il simbolo corrispondente
appare accanto alla temperatura esterna. Il segnale di allarme suona – 1`C/3`C oppure +
30 a +37 F. Se l'allarme di temperatura viene attivato, il simbolo corrispondente appare
accanto alla temperatura esterna. Il segnale di allarme suona i valori impostati. Se la
temperatura e l'allarme gelo sono attivati, entrambi simboli appaiono sul display. Per tua
informazione: Se la lettura della temperatura è inferiore a intervalli, verrà visualizzato il
LL.L. Se la lettura della temperatura è gamme di cui sopra, sarà visualizzata la HH.H
Leggere la pressione barometrica per le ultime 12 ore: Premere il tasto "+"
ripetutamente per leggere i valori di pressione barometrica per le ultime 12 ore. 0HR =
presente pressione barometrica –1HR =pressione barometrica un'ora prima –2HR =
pressione barometrica due ore prima, etc. Per tua informazione: Dopo 20 secondi senza
premere alcun tasto l'orologio passa automaticamente dalla modalità di impostazione per
presentare la pressione barometrica.
Preparazione di utilizzare la funzione di previsioni meteo: Nota: Si prega di prendere le
previsioni del tempo dal servizio di previsione meteo locale in considerazione, così come le
previsioni dalla vostra stazione meteo. Se ci sono discrepanze tra i dati dal dispositivo e dal
servizio di previsioni meteo locali, si prega di prendere il consiglio di quest'ultimo come
autorevole.Le previsioni del tempo vengono calcolate dalla valutazione delle fluttuazioni
della pressione barometrica e può derogare alle condizioni atmosferiche attuali.
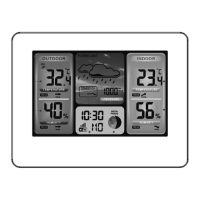
La stazione meteo visualizza i seguenti simboli meteo: Pieno di sole / leggermente
nuvoloso / nuvoloso / piovoso Molto piovoso / nevica / Nevica tanto
I simboli meteo indicano il tempo fluttuazione nel corso dei prossimi otto ore e non il
tempo corrente. La stazione meteorologica in grado di visualizzare l'andamento della
pressione barometrica. Si può visualizzare i seguenti display:La pressione barometrica
salirà. La pressione barometrica rimarrà costante. La pressione barometrica cadrà.
Retroilluminazione: Quando si utilizza l'alimentazione della batteria, premere il tasto
"SNOOZE / LIGHT", la retroilluminazione si accende per 15 secondi. Quando si utilizza
l'alimentazione DC-POWER, premere il tasto "SNOOZE / LIGHT" può scegliere ad alta
luminosità / bassa luminosità / no luminosità della retroilluminazione.
-01-
-28 -
GB523
Question and Answer IconNeed help?

Do you have a question about the Green Blue GB523 and is the answer not in the manual?

Overview

This is a wireless weather station with a DCF radio-controlled clock (RCC) and calendar up to the year 2099. It displays the day of the week in 7 user-selectable languages: English, German, Italian, French, Russian, Spanish, Dutch, and Danish. The time format is adjustable between 12/24 hours.

Function Description:

The weather station includes an alarm function with a snooze feature. It displays tidal phases and moon phases on the screen. Barometric pressure is measured in a range of 600 hPa/mb to 1100 hPa/mb (17.72 inHg to 32.50 inHg) and can be displayed in hPa/mb, inHg, or mmHg. A histogram shows the 24-hour barometric pressure trend. Humidity is measured both indoors and outdoors, with a range of 20% RH to 95% RH. Temperature measurements include indoor ranges of 0°C to 50°C (32°F to 122°F) and outdoor ranges of -20°C to 60°C (-4°F to 140°F), displayed in either °C or °F. It features an outdoor thermometer with a frost alert and displays minimum/maximum values for humidity and temperature. The wireless outdoor sensor can be wall-mounted or placed on a table and one is included. It operates on a 433.92MHz RF transmitting frequency with a 60-meter transmission range in an open area. The device also includes a weather forecasting function and a USB charger.

Important Technical Specifications:

  • Weather Station Power Supply: 2 x LR6 AA batteries or DC-POWER: DC4.5V 200mA adapter.
  • Wireless Outdoor Sensor Power Supply: 2 x LR03 AAA batteries.
  • Time: DCF radio-controlled, 12/24 hour format.
  • Calendar: Up to 2099.
  • Languages: 8 (English, German, Italian, French, Russian, Spanish, Dutch, Danish).
  • Barometric Pressure Range: 600 hPa/mb to 1100 hPa/mb (17.72 inHg to 32.50 inHg).
  • Humidity Range: 20% RH to 95% RH (indoor and outdoor).
  • Indoor Temperature Range: 0°C to 50°C (32°F to 122°F).
  • Outdoor Temperature Range: -20°C to 60°C (-4°F to 140°F).
  • RF Transmission Frequency: 433.92MHz.
  • Transmission Range: 60 meters (open area).

Usage Features:

Initial Operation:

  1. Open the battery compartment of the main unit and insert 2 x AA batteries, observing polarity.
  2. The LCD display will briefly light up for 3 seconds, a beep will sound, and indoor temperature and humidity will be detected.
  3. The receiver will then attempt to connect to the outdoor remote sensor, which takes about 3 minutes and is indicated by a flashing RF antenna symbol in the "OUTDOOR" display area.
  4. Open the battery compartment of the wireless outdoor sensor and insert 2 x AAA batteries, observing polarity.
  5. Once the receiver establishes a connection with the outdoor remote sensor, it will enter radio-controlled time receive mode.

Reception of Radio Signal (DCF):

  • The clock automatically starts searching for the DCF signal 7 minutes after any restart or battery change. The radio mast icon will flash.
  • At 1:00/2:00/3:00 am, the clock performs a synchronization procedure with the DCF signal. If unsuccessful, it will attempt synchronization again at the next full hour, up to 5 times.
  • To manually start DCF signal reception, press and hold the "+" button for two seconds. If no signal is received within 7 minutes, the search stops, and the radio mast icon disappears.
  • To stop searching during RC reception, press the "+" button once.
  • A flashing radio mast icon indicates that DCF signal reception has started. A continuously displayed icon means successful reception.
  • It is recommended to keep a minimum distance of 2.5 meters from interference sources (TVs, computers).
  • Radio reception may be weaker in rooms with concrete walls or offices. In such cases, place the system near a window.
  • During RC receive mode, only the "SNOOZE/LIGHT" and "+" buttons are functional. To access other functions, press the "-" button to exit RC receiving mode.

Manual Time Setting:

  1. Press and hold the "MODE" button for 2 seconds. The 12/24 hour mode display will flash. Use "+" and "-" to set the mode.
  2. Press "MODE" to confirm. The temperature unit (°C or °F) will flash. Use "+" and "-" to set the unit.
  3. Press "MODE" to confirm. The barometric pressure unit (mb/hPa, inHg, or mmHg) will flash. Use "+" and "-" to set the unit.
  4. Press "MODE" to confirm. The time zone (-12 to +12) will flash. Use "+" and "-" to set the time zone.
  5. Press "MODE" to confirm. The hour display will flash. Use "+" and "-" to set the hour.
  6. Press "MODE" to confirm. The minute display will flash. Use "+" and "-" to set the minute.
  7. Press "MODE" to confirm. The month and date display will flash. Use "+" and "-" to set the date format (Month/Date or Date/Month).
  8. Press "MODE" to confirm. The year display will flash. Use "+" and "-" to set the year.
  9. Press "MODE" to confirm. The month display will flash. Use "+" and "-" to set the month.
  10. Press "MODE" to confirm. The date display will flash. Use "+" and "-" to set the date.
  11. Press "MODE" to confirm. The weekday language selection will flash. Use "+" and "-" to select the language.
  12. Press "MODE" to confirm and exit settings.
  • If no button is pressed for 20 seconds, the clock automatically switches from Set Mode to Normal Time Mode.

Setting Daily Alarms:

  1. Press the "ALARM" button once; the alarm icon will appear.
  2. Press and hold the "ALARM" button for 2 seconds until the alarm time hour display flashes. Use "+" and "-" to set the hour.
  3. Press "ALARM" to confirm. The minute display will flash. Use "+" and "-" to set the minute.
  4. Press "ALARM" to confirm and exit.
  • If no button is pressed for 20 seconds, the clock automatically switches to Normal clock mode.
  • The alarm will sound for 2 minutes and will repeat automatically after 24 hours if not deactivated. The alarm sound increases in volume over 2 minutes.

Deactivating Alarm Signal:

  • Press any button except "SNOOZE/LIGHT" to stop the alarm. It will not reactivate unless manually set.

Snooze Function:

  • Press the "SNOOZE/LIGHT" button when the alarm sounds to activate snooze. The alarm will sound again after approximately 5 minutes.

Moon Phases:

  • The weather station automatically displays the current moon phase: New Moon / Waxing Half-moon / Full Moon / Waning Half-moon.

Displaying Temperature/Humidity/Barometric Pressure and Trend:

  • Current indoor temperature/humidity/barometric pressure and their trends are shown on the LCD.
  • After successful connection with the outdoor sensor, outdoor temperature/humidity and their trends are displayed.
  • Trends are indicated by symbols: rising (up arrow), constant (horizontal arrow), or falling (down arrow).

RF Transmission Procedure:

  • The weather station automatically receives transmissions from the outdoor sensor after battery insertion.
  • If the weather station fails to receive transmission (display shows "- -"), press and hold "-" for 3 seconds to manually receive transmission. The RF icon will flash on the LCD.

Displaying Minimum/Maximum Temperature/Humidity:

  • When indoor/outdoor temperature/humidity is displayed, the device records and displays the maximum (Hi) and minimum (Lo) values.
  • Daily min/max records are cleared automatically at 0:00.
  • If temperature readings are below range, "LL.L" will be displayed. If above range, "HH.H" will be displayed.
  • If barometric pressure readings are below range, "LLLL" will be displayed. If above range, "HHHH" will be displayed.

Setting Outdoor Temperature Alert:

  1. Press and hold the "ALERT" button for 2 seconds until the temperature alert icon flashes.
  2. The upper limit icon will flash. Use "+" and "-" to set the maximum temperature. Press "ALERT" to confirm.
  3. The lower limit icon will flash. Use "+" and "-" to set the minimum temperature. Press "ALERT" to confirm and exit.

Temperature and Frost Alert:

  • Briefly press "ALERT" to activate or deactivate temperature and frost alerts.
  • If frost alarm is active, the corresponding symbol appears next to the outdoor temperature. The alarm sounds at -1°C to +3°C (30°F to 37°F).
  • If temperature alarm is active, the corresponding symbol appears next to the outdoor temperature. The alarm sounds at the set values.
  • If both are active, both symbols appear.

Reading Barometric Pressure for the Last 12 Hours:

  • Press the "+" button repeatedly to view barometric pressure values for the last 12 hours (0HR = current, -1HR = one hour ago, etc.).
  • If no button is pressed for 20 seconds, the clock automatically switches to normal barometric pressure mode.

Weather Forecasting:

  • The weather station calculates the weather for the next 8 hours: Sunny / Partly Cloudy / Heavy Rain / Heavy Snow / Lightly Cloudy / Rainy / Snowy.
  • The symbols indicate climatic fluctuations over the next eight hours, not current weather.
  • The station also displays barometric pressure trend: rising, constant, or falling.
  • Note: If the weather station's forecast differs from radio/TV forecasts, trust the latter.

Display Backlight:

  • When using battery power, press "SNOOZE/LIGHT" for 15 seconds of backlight.
  • When using DC-POWER, press "SNOOZE/LIGHT" to choose high, low, or no backlight brightness.
  • During signal search, the display remains dark. Press "SNOOZE/LIGHT" to activate backlight.
  • Continuous backlight is only possible with mains power.

Maintenance Features:

Reset to Factory Settings:

  • Briefly press the "RESET" button with a paperclip. Factory settings will be restored.

Cleaning and Care:

  • Turn off the device and disconnect it from the power cable before cleaning.
  • Do not use chemical substances such as household cleaners, alcohol, or benzene for cleaning.

Safety Instructions:

  • This manual helps you understand the product's functions. Keep it safe for future reference.

Green Blue GB523 Specifications

General IconGeneral
BrandGreen Blue
ModelGB523
CategoryWeather Station
LanguageEnglish

Related product manuals