This document is the owner's manual for the Greenworks 14" 10A Electric Dethatcher, model 250060G (2517102). It provides essential information for the safe and effective operation, maintenance, and troubleshooting of the dethatcher.
Function Description:
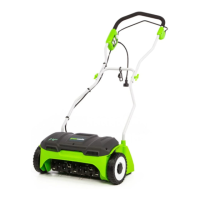
The Greenworks 14" 10A Electric Dethatcher is an electric gardening appliance designed to remove thatch from lawns. Thatch is a layer of dead grass, roots, and debris that accumulates between the soil surface and the green grass blades, preventing water, nutrients, and air from reaching the soil. By removing this thatch, the dethatcher helps improve lawn health, promoting better growth and a greener appearance. The device operates by using rotating tines to comb through the lawn and pull up the thatch.
Important Technical Specifications:
- Model: 250060G (2517102)
- Motor: 120 V, AC only, 60 Hz, 10 Amps
- Speed: 3,500 RPM
- Dethatching Path: 14" (36 cm)
- Dethatching Depth: 3/8" (1 cm)
- Wheel Size: 7" (17.8 cm)
- Unit Weight: 23 lb 12 oz (10.8 kg)
- Warranty: Limited three-year warranty against defects in materials, parts, or workmanship for personal use.
Usage Features:
The dethatcher is designed for ease of use and safety.
- Assembly: The product requires some assembly, including installing the lower and upper handles and attaching cord retainers. Detailed instructions with diagrams are provided.
- Starting and Stopping: To start, the dethatcher must be plugged into an approved outdoor extension cord. The safety lock-out button is pressed and held, and then the bail lever is pressed against the handlebar. Releasing the bail lever stops the dethatcher.
- Cord Retainer: The dethatcher is equipped with a cord retainer to prevent the extension cord from disconnecting during use. The extension cord is folded into a tight loop, pushed through a bottom hole in the retainer, and then slid over a retaining clip until secured.
- Safety Precautions: The manual emphasizes the importance of reading all safety warnings and instructions. Key safety rules include:
- Always wear eye protection (safety goggles, not just eyeglasses) and hearing protection.
- Wear a dust mask, especially when soil mixed with fertilizers may cause harmful chemicals to be inhaled.
- Do not wear loose clothing, gloves, neckties, or jewelry that can get caught in moving parts.
- Keep bystanders (people and pets) at least 100' (30 m) away from the dethatcher during operation.
- Do not use the dethatcher in rain, moist, or wet conditions.
- Avoid operating near swimming pools or garden ponds.
- Do not dethatch on slopes greater than 15°.
- Ensure the work area is free of slippery spots or excessive quantities of stones.
- Always disconnect the power cord before making adjustments, changing parts, or cleaning.
- Never leave a running tool unattended.
- Use only identical replacement parts for servicing.
- Ground Fault Circuit Interrupter (GFCI) protection is recommended for the circuit or outlet used.
- Electrical Requirements: The dethatcher is double insulated. It requires a 120 V, 15 A circuit with a time-delayed fuse or circuit breaker. The manual provides a minimum gauge chart for extension cords based on length and ampere rating, stressing the use of heavy enough gauge cords to prevent overheating. It also notes that the extension cord and outlet must still be grounded while in use, despite the tool being double insulated.
Maintenance Features:
Regular maintenance is crucial for the dethatcher's performance and longevity.
- Cleaning: The dethatcher should be cleaned after each use. Avoid using solvents on plastic parts; use clean cloths to remove dirt, dust, oil, and grease. Do not clean under running water or with hard/pointed objects.
- Tine Replacement: The manual provides detailed instructions for replacing worn or broken tines. This involves disconnecting the power, turning the dethatcher over, removing star-shaped screws, flat washers, and lock washers, and then pressing a lock on the shaft to separate the tine casing. New tines are then installed, and the casing is reassembled. The tine cartridge can also be removed, secured on a workbench, and individual tines replaced by pushing out a pin.
- Storage: For storage, the lawn dethatcher can be folded up by releasing the knobs. It should be stored in a dry, closed space out of reach of children. Care should be taken to ensure the power cable does not become trapped during folding.
- General Inspection: Regularly inspect all tines and cartridges for damage and replace as required. Inspect the appliance cord periodically for damage.
- Professional Service: For repairs beyond routine maintenance, the manual advises returning the product to an authorized service center or calling the toll-free helpline. Only identical replacement parts should be used for servicing.
Troubleshooting:
A troubleshooting guide is included to address common issues:
- Abnormal noise/Clattering: Often caused by foreign objects in the dethatcher cylinder or a slipping belt. Solutions include removing foreign objects, checking the dethatcher, or contacting an authorized service center.
- Motor will not start: Could be due to a faulty cable or an undersized extension cord. Solutions involve contacting an electrician.
- Dethatcher hard to push: May be caused by blocked foreign objects or grass that is too tall. Solutions include removing foreign objects, mowing the lawn before dethatching, or adjusting the dethatcher cylinder.
- Unsatisfactory dethatching results: Can be due to a faulty belt, worn spring tines, or grass that is too tall. Solutions include adjusting the dethatcher cylinder, mowing the lawn before dethatching, or contacting an authorized service center for belt issues.
The manual includes various symbols to convey important safety information, such as warnings about wet conditions, eye protection, ricochet hazards, rotating tines, operating on slopes, and keeping bystanders away. It also provides contact information for the Greenworks toll-free helpline for assistance.