1 DESCRIPTION
1.1 PURPOSE
You may use this product for cutting purposes:
• cutting all types of wood
• cutting plastic
• cutting metals
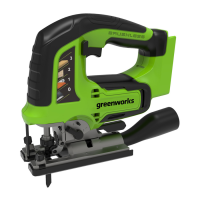
1.2 OVERVIEW
Figure 1.
1
Trigger
2
Tube
3
Angle Adjustment
Trigger
4
Footplate
5
Blade Orbit
Selector Lever
6
Blade
7
Edge Guide Knobs
8
Edge Guide
9
Finger Guard
10
Lock-off Button
2 GENERAL POWER TOOL
SAFETY WARNINGS
WARNING
Read all safety warnings, instructions, illustrations
and specifications provided with this power tool.
Failure to follow all instructions listed below may result
in electric shock, fire and/or serious injury.
Save all warnings and instructions for future
reference.
The term "power tool" in the warnings refers to your
mains-operated (corded) power tool or battery-operated
(cordless) power tool.
3 INSTALLATION
3.1 UNPACK THE MACHINE
WARNING
Make sure that you correctly assemble the machine
before use.
WARNING
• If the parts are damaged, do not use the machine.
• If you do not have all the parts, do not operate the
machine.
• If the parts are damaged or missing, speak to the
service center.
1. Open the package.
2. Read the documentation in the box.
3. Remove all the unassembled parts from the box.
4. Remove the machine from the box.
5. Discard the box and package in compliance with
local regulations.
3.2 INSTALL THE BLADE
Figure 3.
1. Remove battery pack.
2. Rotate the blade clamp lock counterclockwise. Hold
the lock in the open position.
3. Insert saw blade between blade clamp and saw bar.
4. Close blade clamp lock.
5. Reinstall the battery pack.
3.3 REMOVE THE BLADE
Figure 3.
1. Remove battery pack.
2. Rotate the blade clamp lock counterclockwise. Hold
the lock in the open position.
3. Remove the saw blade.
3.4 INSTALL THE EDGE GUIDE
Figure 4.
Put the edge guide through the two slots in the base of
the machine.
Adjust to the necessary width and lock in place with the
edge guide screw.
3.5 INSTALL THE BATTERY PACK
Figure 2.
WARNING
• If the battery pack or charger is damaged, replace
the battery pack or the charger.
• Stop the machine and wait until the motor stops
before you install or remove the battery pack.
• Read, know, and follow the instructions in the
battery and charger manual.
1. Align the lift ribs on the battery pack with the
grooves in the battery compartment.
2. Push the battery pack into the battery compartment
until the battery pack locks into place.
3. When you hear a click, the battery pack is installed.
3.6 REMOVE THE BATTERY PACK
Figure 2.
1. Push and hold the battery release button.
2. Remove the battery pack from the machine.
4
English
EN