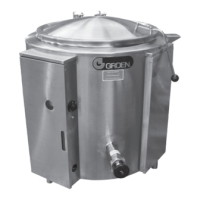
The Groen AH-30 Export Steam Jacketed Kettle with Standard Electronic Ignition is a self-contained, gas-heated, floor-mounted, and stationary cooking appliance designed for commercial use. It features a closed steam jacket that covers the lower portion of the kettle, where a gas burner boils water to produce steam under pressure for heating. The unit utilizes electronic spark ignition to ignite the burners.
Function Description:
The primary function of the AH-30 kettle is to heat and cook various food products using steam generated within its jacket. The kettle's design allows for a wide range of cooking temperatures, from 150°F (65°C) to approximately 270°F (135°C), making it suitable for warming, simmering, boiling, or braising. Liquids can be easily removed through a tangent draw-off valve, which includes a removable strainer to prevent product pieces from entering the draw-off during cooking.
Usage Features:
The kettle is constructed from stainless steel, with insulated sheathing protecting the kettle body and a housing enclosing the controls. Three tubular legs with adjustable bullet feet support and level the unit. The 30-gallon kettle is equipped with a counterbalancing spring actuator for its cover, allowing it to remain in either the fully-open or closed position.
Controls include an ON/OFF switch for electric power and a thermostat for setting the cooking temperature. Indicator lights provide visual feedback on the unit's status: a "Power On" light indicates the unit is active, a "Heat Indicator" light shows when the kettle is being heated, and a "Low Water" light signals when the jacket water needs replenishment. A water level sight glass allows operators to visually check the water level in the steam jacket, while a pressure/vacuum gauge displays steam pressure and indicates if too much air has entered the jacket.
To start the kettle, operators must first check the water level in the jacket and the pressure/vacuum gauge. The main gas supply valve is then opened, and the toggle switch is turned to ON. The electronic ignition control attempts to light the pilot for 90 seconds. Once the pilot is lit, the thermostat can be set to the desired temperature. If the pilot fails to light, the unit should be turned off for five minutes before attempting to restart.
For stopping the kettle, the thermostat dial is turned to OFF, followed by the toggle switch. For prolonged shutdowns, the unit's electrical power should also be disconnected. In case of electric power failure, operation should not be attempted until power is restored.
Optional accessories include solid disc strainers or strainers with smaller perforations, water fill faucets, basket inserts for cooking water-boiled products, a kettle brush kit, and gallon etch marks. When using basket inserts, operators should account for water displacement and load baskets on a stable surface. Lifting loaded baskets may require assistance due to weight. Product should be slowly lowered into the kettle and, when cooked, lifted straight up, ensuring the basket clears the rim and pouring lip. Protective oven mitts and aprons are recommended. Hot water should be fully drained before moving the basket, and product should be immediately transferred to another container, avoiding contact with hot surfaces.
Safety features are integrated into the kettle's operation. A gas pressure regulator protects against high pressure in the gas supply line. Automatic gas valves control gas flow to the burners. A pressure limit switch turns off the burner if jacket pressure reaches 27 PSI and relights it when pressure drops to 22 PSI. A safety valve releases steam if jacket pressure exceeds 30 PSI. A low-water cutoff turns off the burner if the jacket water level becomes too low for safe operation. The unit must be electrically grounded to prevent electrocution.
Maintenance Features:
Regular maintenance is crucial for efficient operation. A Maintenance & Service Log is provided to record all maintenance activities. Periodic inspection helps minimize downtime.
One key maintenance task is removing air from the jacket. If the pressure/vacuum gauge shows a positive pressure or a reading near zero when the kettle is cold, it indicates air in the jacket, which acts as an insulator and slows heating. To remove air, the unit is started (with water or product in the kettle), and once the pressure/vacuum gauge reaches 5 PSI, trapped air and steam are released by pulling up on the safety valve lever or ring for about one second. This step is repeated until little discharge occurs and the pressure drops to 0 PSI. After venting steam, the hot water in the kettle is replaced with cold water to condense steam in the jacket, aiming for a vacuum reading of 20 to 30 inches mercury (Hg). If the vacuum is not established or leaks, an authorized service agency should be contacted.
The pressure relief safety valve should be tested at least twice a month. With the kettle operating at 5 PSI, the test lever is pulled and allowed to snap back. If there is little discharge and the pressure drops to 0 PSI, the pressure is allowed to build back to 5 PSI, and the procedure is repeated.
Jacket filling is another daily maintenance check. The water level in the gauge glass should be in the middle. Over time, water can be lost through venting or draining. If replacing water lost as steam, distilled water should be used. If replacing treated water that ran out of the jacket, new treated water must be prepared according to the Water Treatment Procedure. This involves allowing the kettle to cool, removing the pressure gauge, positioning a funnel, and filling with properly treated water while pulling the pressure relief valve to allow water to be sucked in and air to vent. The water level is checked to ensure it's between minimum and maximum marks, and the pressure gauge is reinstalled with Teflon tape. The jacket vacuum is then reestablished.
Water treatment involves filling a mixing container with distilled water, hanging a pH test strip, and slowly adding water treatment compound while stirring until a pH of 10.5 and 11.5 is reached, as indicated by the test kit chart. The exact amount of compound used should be recorded.
Cleaning procedures emphasize safety and proper technique. Before cleaning, the kettle must be shut off by turning the thermostat dial to "OFF," the ON/OFF switch to OFF, and disconnecting all electric power at a remote switch. Food contact surfaces should be cleaned as soon as possible after use, preferably while warm, or at least every 24 hours for continuous use. Large food residues should be scraped and flushed out, avoiding metal implements that could scratch the kettle. A solution of detergent/cleaning compound is used for thorough cleaning, with a moistened cloth for controls and housing. The kettle is then rinsed with hot water and drained. The tangent draw-off valve should be disassembled, cleaned with a brush, rinsed, and reassembled by hand-tightening the nut. Soiled external and internal surfaces, including sides and control housing, should be cleaned daily. For burned-on foods, a brush, sponge, cloth, plastic or rubber scraper, or plastic wool with cleaning solution is recommended, allowing the solution to soak into the residue. Abrasive materials or metal tools should be avoided to prevent scratching, which can promote bacterial growth and corrosion. Steel wool should not be used as it can leave particles that cause corrosion and pitting. The unit's exterior can be polished with a stainless steel cleaner.
For sanitization, a solution equivalent to 200 parts per million chlorine is recommended, applied after cleaning and draining, and then thoroughly rinsed off. Sanitization is recommended just before use. Mineral deposits or hard water film can be removed with a deliming agent after thorough cleaning, followed by rinsing and draining. If cleaning problems persist, the cleaning product supplier should be contacted for assistance.