3
GB
Technical Data
Flow rate at 3 bar flow pressure spout 32 l/min
handspray 13 l/min
Installation
- Shut off the hot and cold water supplies and
open the isolating valves.
- Remove protective sleeves (A) and top plate (B),
see fold-out page I, Fig. [1].
- Install hose guide (C) on top plate (B).
- Mount shower hose (D) with shower connection
hose (D1) from rough installation, see Fig. [2].
- Slide spring (E) on shower hose (D) and push
shower hose (D) through hose guide (C).
- Screw taper nut (F) onto shower hose (D).
Place top plate (B) in position.
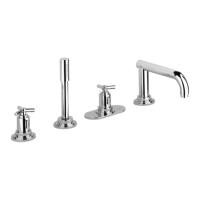
Install the spout and handspray, see Fig. [3].
1. Place seal (F1) in taper nut (F). Fit handspray (G) to
taper nut (F).
2. Fit spout (Q) with seal (Q1) to the shank (Q3).
With 4mm socket spanner, install set screw (Q2).
Aquadimmer adjustment and installing the shut-off
knob, see Figs. [4] and [5].
1. Insert screw coupling (H) through top plate and
screw to stopcock, see Fig. [4].
2. Grease the seal (H1) with the special grease
supplied.
3. Fit holder (I) with marking (I1) facing front and
secure with bush (J) with 19mm socket wrench.
4. Fit splined adapter (K).
5. Install sleeve (L).
Aquadimmer adjustment
1. Open the hot and cold water supplies.
Turn splined adapter (K) to the right (water
discharge from the bath spout) until it reaches the
end stop.
Fit splined adapter (K) so that the two arrow
marks (K1) point at front, see Fig. [5].
2. Turn splined adapter (K) 180° to the left (2nd arrow
mark (K1) is at front, water stops flowing).
3. Fit shut-off knob (M) so that the button (M1) point at
front.
4. Install snap insert (N) with screw (O).
5. Fit knob (P).
In this process, take care to ensure that the shut-off
function in effective, after closing, in both the bath
spout and shower outlet positions.
Shut-off knob knob (M) operation.
Shut-off knob in central position = closed
Shut-off knob clockwise = discharge from
spout
Shut-off knob anti-clockwise = discharge from
[Press button (M1)] shower
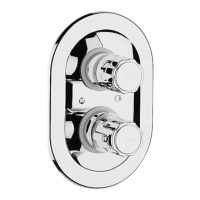
Thermostatic mixer adjustment and installing the
temperature control knob, see fold-out page III,
Figs. [6] to [8].
1. Install sleeve (T).
2. Grease the seal (R1) of the escutcheon mounting
bracket (R2) with the special grease supplied, see
fig. [6].
3. Install the escutcheon mounting bracket (R2) on the
fitting and secure with mounting assembly (S).
4. Install escutcheon (R).
Adjustment of thermostatic mixers
• Before the mixer is put into service
• After any maintenance operation on the thermostatic
cartridge.
- Open the stopcock by means of the shut-off
knob (M) and check the temperature of the water
with a thermometer, see fig. [7].
- Turn the adjusting nut (U) clockwise or anticlock-
wise until the water temperature reaches 38 °C.
- Install temperature control handle (V) in such a way
that the 38° mark point at front, see fig. [8].
- Fit snap insert (W) and install with screw (X).
- Fit knob (Y).
Temperature limitation
The safety stop limits the temperature range to 38 °C.
If a higher temperature is desired, the 38 °C limit can
be overridden by pressing the button (V1).
Frost caution
When the domestic water system is drained,
thermostatic mixers must be drained separately
because there are non-return valves at the cold and
hot water connections.
In the case of thermostatic mixers, the complete
thermostat assemblies and non-return valves must be
removed.
Grout the joint around the top plate with a perma-
nently elastic material.
In this way, the inspection chamber will be accessible
at any time.
 Loading...