This document provides comprehensive instructions for the Grundig VCC 4350 A vacuum cleaner, covering its function, usage, and maintenance. It emphasizes safety precautions, proper operation, and care to ensure optimal performance and longevity of the appliance.
Function Description
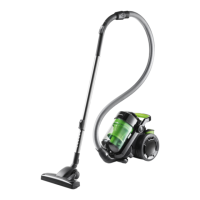
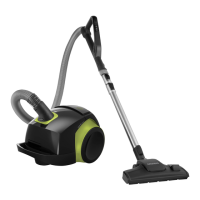
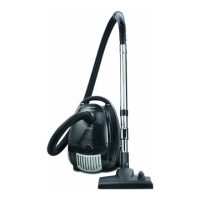
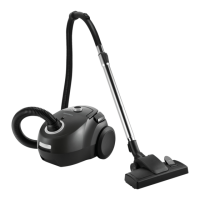
The Grundig VCC 4350 A is a vacuum cleaner designed for household use, specifically for cleaning dirt and dust particles from various surfaces. It operates by generating suction to draw in debris, which is then collected in a dust bag. The appliance features a multi-floor brush that can be adjusted for different cleaning tasks, as well as a crevice tool for accessing narrow spaces. Its design incorporates a motor protection filter and an exhaust air fan filter to ensure efficient operation and clean air output. The vacuum cleaner is equipped with a power cord rewind button for convenient storage and a dust bag full indicator to alert the user when replacement is needed.
Usage Features
Preparation for Use:
Before operating the vacuum cleaner, ensure all parts are correctly installed.
- Hose Installation: Insert the flexible hose with its flexible contact into the inlet on the main body of the appliance until it latches securely. To remove the hose, press the side release buttons on the flexible hose adapter and pull the hose out.
- Telescopic Tube Connection: Insert the end of the flexible hose into the metal telescopic tube.
- Accessory Attachment: Insert either the multi-floor brush or the crevice tool into the lower end of the metal telescopic tube.
- Telescopic Tube Adjustment: To adjust the length of the metal telescopic tube, push and hold the height setting switch (E) and slide the tube in or out as required. Release the switch and ensure the tube clicks into place.
Switching On and Off:
- Power Cord Extension: Pull the power cord out to a suitable length. The maximum cable length is indicated by a red mark; do not pull the power cord beyond this mark.
- Plug In: Plug the power cord into a wall socket.
- Power On: Switch on the appliance by pressing the On/Off button (G).
- Power Off: To turn off the appliance after use, press the On/Off button (G) and remove the power cord from the outlet.
Rewinding the Power Cord:
- Unplug: Unplug the appliance from the wall socket.
- Rewind: Hold the power cord with one hand and press the power cord rewind button (K). Be cautious during rewinding as unexpected cord movements may occur.
Suction Control:
The suction control (A) is located on the handle and can be operated with your thumb. The maximum suction power is reached when the control (A) is fully closed. Adjust the suction power as needed, especially when cleaning sensitive materials, upholstery, or shag pile carpets.
Multi-Floor Brush Usage:
The multi-floor brush can be used in two positions:
- Brush Out: For cleaning hard surfaces and parquet floors, ensure the brush part is extended.
- Brush In: For cleaning carpets and rugs, ensure the brush part is retracted.
Crevice Tool Usage:
The crevice tool is ideal for removing dust from bookcases, curtains, window frames, and upholstered furniture due to its narrow design.
Parking Feature:
The appliance can be stored in a space-saving manner using its parking positions. The hook part behind the brush elbow can be installed into the parking seat on the rear of the appliance when a break is needed during usage.
Maintenance Features
Dust Bag Replacement:
The dust bag full indicator (O) will illuminate red when the suction power is reduced due to blocked pores or a large object blocking the hose. Replace the dust bag when this indicator illuminates.
- Unplug: Unplug the appliance from the power outlet.
- Open Cover: Open the dust container cover (N) by pressing the dust container button (P) and lifting the cover.
- Remove Filter Holder: Pull out the filter holder.
- Dispose of Bag: Dispose of the old dust bag. Do not attempt to empty and reuse the dust bag.
- Insert New Bag: Insert a new dust bag into the holder. Use Swirl® Type Y 05® or Menalux® Type 1840 dust bags for VCC 4350 A.
- Close Cover: Close the dust container cover (N). The appliance is equipped with a system that prevents the front cover from closing if the dust bag is not inserted. Ensure the dust bag is properly installed if the cover cannot be closed.
Note: Even if the dust bag does not appear full, very fine dust like flour or plaster can block the pores, reducing suction power. Replace the dust bag in such cases. Replace the dust bag every 6 months to prevent foul odors, even if it appears empty.
Cleaning the Motor Protection Filter (Dust Container Filter):
The motor protection filter is located within the dust container and should be cleaned regularly.
- Open Cover: Open the dust container cover (N) by pressing the dust container button (P).
- Remove Dust Bag: Pull out the dust bag from its bracket.
- Pull Out Filter: Pull out the filter.
- Clean Filter: Shake out the filter and wash it with hot soapy water. Rinse carefully and allow it to air dry completely. Do not wash the filter in a washing machine or dry it with a hair dryer.
- Replace Filter: Place a new filter in the bracket if required.
- Replace Dust Bag: Replace or change the dust bag.
Caution: Always install the dust bag and filter before operating the appliance to prevent motor damage. The dust container filter should be replaced every six months or when required.
Cleaning the Exhaust Air Fan Filter:
The exhaust air fan filter is located at the rear of the appliance.
- Remove Bracket: Remove the filter bracket by pressing the release button on the rear of the appliance.
- Remove Filter: Remove the filter from the filter bracket.
- Clean Filter: Shake out the filter and wash it with hot soapy water. Rinse carefully and allow it to air dry completely. Do not wash the filter in a washing machine or dry it with a hair dryer.
- Replace Parts: Carefully replace all parts to their positions once the filter is completely dry.
Note: The exhaust air filter should be replaced every six or nine months or when required. Frequent washing may cause wear of the filter.
Troubleshooting:
If you experience problems such as reduced suction power, abnormal noise, or breakdown:
- Check for Blockages: Inspect the vacuuming tools for any blockages.
- Check Filters: Check the dust bag and motor protection filter for fullness or blockages.
- Contact Service: If the appliance still cannot be operated, contact your dealer or a GRUNDIG service center.
Storage:
For long-term storage:
- Ensure the appliance is unplugged, cooled down, and completely dry.
- Store the appliance in a cool and dry place.
- Keep the appliance out of the reach of children.
Safety Instructions:
- This appliance is intended for household use only. Warranty will be void if used for industrial or commercial purposes.
- Do not clean wet surfaces or vacuum wet objects.
- Do not use the appliance in wet areas or with wet hands.
- Do not vacuum large objects that could block or damage the appliance.
- Do not vacuum cigarette butts, fireplace ashes, or matchsticks, as these may cause fire.
- This appliance is not intended for cleaning persons or animals.
- Do not insert anything through the suction clearance; keep it open.
- Do not hold the appliance upright while vacuuming.
- Do not roll the appliance over its power cord.
- Do not close a door over the power cord.
- Do not pull the power cord around sharp edges or squash it.
- When moving the appliance to another room, disconnect the power cord and carry the appliance by the handle. Never carry it by pulling its power cord.
- Never operate the appliance without the dust container or filter.
- Always pull out the power cord before cleaning or carrying out any maintenance.
- Always insert the power cord plug directly into the socket. Avoid using extension cables or multipoint connectors.
- Pull out the power plug after use; do not disconnect by pulling on the cable.
- Never use the appliance if there is visible damage on the appliance or power cord. If the appliance accidentally becomes wet, contact a service center.
- The appliance is suitable for use by children aged 8 years and above, and persons with reduced physical, sensory, or mental capabilities, provided they have been given supervision or instruction concerning safe use and understand the hazards involved. Children should not play with the appliance. Cleaning and user maintenance should not be made by children without supervision.
- Do not open the appliance under any circumstances. Warranty claims are not accepted for damage resulting from improper handling.
- Always keep the appliance away from children.