EasyManua.ls Logo

GUIDESMAN EasyLift 2721935 - User Manual

GUIDESMAN EasyLift 2721935
4 pages
Print Icon
To Next Page IconTo Next Page
Loading...
SETUP & TAKEDOWN INSTRUCTIONS
GUIDESMAN EasyLi POP-UP CANOPIES
SECURING THE CANOPY TOP TO THE FRAME
SINGLE PERSON SETUP
SINGLE PERSON CANOPY SETUP
THANK YOU FOR PURCHASING A GUIDESMAN INSTANT CANOPY!
Please carefully review the following instructions and familiarize yourself with parts included
and how to operate your GUIDESMAN canopy. Reference parts list for names of each part
noted in instructions.
GUIDESMAN Easyli canopies can be set up and taken down with one person or two. Please see below.
Place the canopy frame in the desired location (Fig. 1A). Position one hand on any frame leg just
below the black fastening strip and place your other hand on the lower eaves bar as shown (Fig. 1B).
1
1
Li the frame leg slightly off the ground so all legs except the leg directly across bearing
the weight clears the ground. Take steps backwards to open the frame as much as possible (Fig. 2A).
2
2
Unfold the canopy top and place it over the open frame (Fig. 3A). Secure each corner by attaching
the corner of the canopy top to the black fastening strip (Fig. 3B). Pull all 4 corners down until
completely over black fastening strip. Attach fastening loops to the eaves of the frame as shown in (Fig. 3C)
Your canopy top is now secured to the frame.
3
3
Place the canopy in the desired location for shade. Position one hand on any frame leg just below the black
fastening strip and place your other hand on the lower eaves bar as shown (Fig. 1A). Li the frame leg slightly
off the ground so all legs except the leg directly across bearing the weight clears the ground. Take steps
backwards to open the frame as much as possible (Fig. 1B).
Before proceeding, make sure canopy top is over the eaves on all 4 sides as shown in (Fig. 2A). Stand in the
middle of the eaves between two legs and place your hands on the eaves and li to gain entrance to the
underside of the canopy (Fig. 2B). Once underneath, place your hand on the black center hub as shown
in (Fig. 2C) and push up twisting the hub a ¼ turn clockwise to lock in the frame.
Each leg has  height adjustments. Li outer leg up and slide out the inner leg to desired height (Fig. 3A).
Repeat for other 3 legs. Your canopy is now set up.
1AFig. 3AFig. 3BFig. 2AFig.
1BFig.
2C
Fig.
3AFig. 2AFig.
2BFig.
1BFig.
page 1
Use for the following Models: SKU # 2721935 GUIDESMAN 8’x8’ Easyli Pop-up Canopy
SKU # 796 GUIDESMAN ’x’ Easyli Pop-up Canopy
SKU # 797 GUIDESMAN ’x’ Easyli Pop-up Canopy
Parts Included: Fully Assembled Frame () Canopy Top () Wall () Wheeled Bag () Stakes ()
1AFig.
TM
3CFig.
Question and Answer IconNeed help?

Do you have a question about the GUIDESMAN EasyLift 2721935 and is the answer not in the manual?

Summary

Securing the Canopy Top to the Frame

Step 1: Position Frame and Lift

Place canopy frame, lift leg slightly, and step backward to open.

Step 2: Unfold and Secure Top

Unfold canopy top, attach corners to frame's black strips, pull down, and secure loops.

Single Person Canopy Setup

Step 1: Initial Frame Extension

Position frame, lift leg slightly, and step backward to extend.

Step 2: Engage Center Hub

Ensure canopy is over eaves, lift from below hub, push up and twist hub clockwise to lock.

Step 3: Adjust Leg Height

Lift outer leg, slide inner leg to desired height, and repeat for all four legs.

Single Person Take Down

Step 1: Retract Legs

Lift leg, depress button to unlock inner leg, telescope into outer leg.

Step 2: Unlock Center Hub

Go underneath high side, turn hub counter-clockwise to unlock frame.

Step 3: Fold Frame

Lift leg below strip, walk towards opposite corner to fold frame, store in bag.

Two Person Setup

Step 1: Initial Frame Extension with Partner

With partner, hold legs, lift, and step backward to extend frame.

Step 2: Engage Center Hub with Partner

Ensure top is over eaves, partner extends inner leg, push up and twist hub clockwise.

Step 3: Adjust Leg Height with Partner

With partner on low side, lift outer leg and slide inner leg to desired height.

Two Person Take Down

Step 1: Retract Legs with Partner

Stand together, lift leg, depress button to telescope inner leg into outer leg.

Step 2: Unlock Center Hub with Partner

One person goes underneath high side, turns hub counter-clockwise to unlock.

Step 3: Fold Frame with Partner

Hold eaves, walk towards each other to close frame, then hold outer legs and fully close.

Carry Bag Instructions

Step 1: Close Canopy

Ensure your instant canopy is completely closed before storing.

Step 2: Position Carry Bag

Unzip carry bag, place wheels up over the canopy.

Step 3: Store Canopy

Slide carry bag over canopy, flip bag onto wheels, and zip shut.

Overview

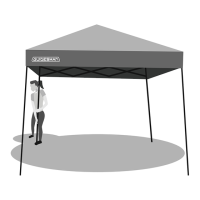
The GUIDESMAN EasyLift Pop-Up Canopy is a versatile and user-friendly shelter designed for quick and efficient setup, suitable for various outdoor activities. It comes with a fully assembled frame, a canopy top, a wall, a wheeled bag, and four stakes, providing a complete solution for instant shade and protection. The canopy is available in multiple sizes, including 8'x8', 10'x10', and 12'x12', catering to different space requirements.

Function Description:

The primary function of the GUIDESMAN EasyLift Pop-Up Canopy is to provide instant, portable shade and shelter from the elements. Its pop-up design allows for rapid deployment and takedown, making it ideal for events, markets, camping, backyard gatherings, and other outdoor uses. The canopy top is designed to be securely fastened to the frame, ensuring stability and protection. The included wall offers additional privacy and protection from wind or sun. The wheeled carry bag facilitates easy transport and storage, enhancing the canopy's portability.

Usage Features:

Securing the Canopy Top to the Frame (General Steps for Both Single and Two-Person Setup):

  1. Placement: Begin by placing the canopy frame in the desired location.
  2. Initial Opening: Position one hand on any frame leg just below the black fastening strip and the other hand on the lower eaves bar. Lift the frame leg slightly off the ground, ensuring all other legs clear the ground. Take steps backward to open the frame as much as possible.
  3. Canopy Top Placement: Unfold the canopy top and drape it over the open frame.
  4. Corner Attachment: Secure each corner of the canopy top by attaching it to the black fastening strip on the frame. Pull all four corners down until they are completely over the fastening strip.
  5. Loop Fastening: Attach the fastening loops to the eaves of the frame. This ensures the canopy top is securely attached to the frame.

Single Person Canopy Setup:

  1. Initial Frame Opening: Place the canopy in the desired location. Position one hand on a frame leg just below the black fastening strip and the other hand on the lower eaves bar. Lift the frame leg slightly off the ground, ensuring all legs except the one directly across (which bears the weight) clear the ground. Take steps backward to open the frame as much as possible.
  2. Canopy Top Check and Hub Locking: Before proceeding, ensure the canopy top is properly positioned over the eaves on all four sides. Stand in the middle of the eaves, between two legs, and place your hands on the eaves. Lift to gain access to the underside of the canopy. Once underneath, place your hand on the black center hub and push up, twisting the hub 1¼ turns clockwise to lock the frame into place.
  3. Height Adjustment: Each leg has three height adjustments. Lift the outer leg up and slide out the inner leg to the desired height. Repeat this process for the other three legs. Your canopy is now set up.

Single Person Take Down:

  1. Leg Lowering: Slightly lift a leg and depress the push button to unlock the inner leg, allowing it to telescope into the outer leg. Repeat this process on the leg on the same side, resulting in one low side and one high side.
  2. Hub Unlocking: Go underneath the high side of the canopy and turn the hub 1¼ turns counter-clockwise to unlock the frame. Walk back out and lower the other two legs as done in step 1.
  3. Frame Folding: Position one hand on any frame leg just below the black fastening strip and lift slightly off the ground. Walk towards the opposite leg corner to fold the canopy frame. Exercise caution to avoid pinching your fingers as the frame closes. Store the canopy in its wheeled carry bag.

Two Person Canopy Setup:

  1. Initial Frame Opening: Place the canopy in the desired location. With a partner standing on the opposite side of the canopy, hold the outer legs and lift slightly off the ground, stepping backward. With your partner, hold the top and bottom of the eaves, lifting slightly off the ground and walking backward to extend the frame.
  2. Canopy Top Check and Hub Locking: Before proceeding, ensure the canopy top is properly positioned over the eaves on all four sides. With your partner standing on the same side, extend an inner leg from an outer leg, creating one low side and one high side. One person then walks underneath the high side, places their hand on the black center hub, and pushes up, twisting the hub 1¼ turns clockwise to lock the frame.
  3. Height Adjustment: With your partner standing on the low side, slightly lift an outer leg up and slide out the inner leg to the desired height, ensuring all four inner legs are extended. Your canopy is now set up.

Two Person Take Down:

  1. Leg Lowering: Stand on the same side as your partner. Both individuals slightly lift a leg in tandem and depress the push button to unlock the inner leg, allowing it to telescope into the outer leg. This will create one low side and one high side.
  2. Hub Unlocking: One person goes underneath the high side of the canopy to turn the hub 1¼ turns counter-clockwise to unlock the frame. Walk back out and lower the other two legs with your partner, as done in step 1.
  3. Frame Folding: Standing opposite your partner, hold the top of the eaves and slightly lift, walking slowly towards each other until the frame is about halfway closed. Be careful not to pinch your fingers as the frame closes. With your partner, hold the outer legs and walk slowly towards each other until the frame is fully closed. Store the canopy in its carry bag.

Securing Your Canopy:

To anchor the canopy to the ground, insert the included metal stakes into each foot corner. For enhanced stability, anchor bags can be purchased separately from the Customer Support Center. These bags are custom-designed to quickly secure to each leg, providing additional weight on any surface.

Maintenance Features:

Carry Bag Instructions:

  1. Canopy Closure: Ensure your instant canopy is completely closed.
  2. Bag Placement: Unzip the carry bag from one end to the other. Position the carry bag with its wheels facing up over the canopy.
  3. Bagging and Storage: Slide the carry bag over the canopy. Once the canopy is inside, flip the bag onto its wheels. Close the bag and zip it shut. This makes the canopy easy to transport and protects it during storage.

Safety Warning:

It is crucial to keep all flame and heat sources away from the fabric top. The fabric top meets the flammability requirements of CPAI-84, but it will burn if left in continuous contact with any flame source. Applying any foreign substance to the fabric top may compromise its flame-resistant properties. This product contains TDCPP and/or TCEP, flame retardant chemicals known to the State of California to cause cancer.

The GUIDESMAN EasyLift Pop-Up Canopy is designed for convenience and durability, offering a reliable solution for temporary outdoor shelter with straightforward setup and takedown procedures for both single and two-person operations.

GUIDESMAN EasyLift 2721935 Specifications

General IconGeneral
BrandGUIDESMAN
ModelEasyLift 2721935
CategoryTent
MaterialPolyester
Season3-Season
Poles MaterialFiberglass

Related product manuals