This document describes the "Alder" model from GYBER Outdoors, an oven, grill, and accessory device designed for household use. It emphasizes safety precautions, proper usage, and maintenance procedures to ensure safe and efficient operation.
Function Description
The GYBER Outdoors "Alder" is a versatile high-temperature oven primarily used for heating and baking various foods, including meat and fish. It is not intended for commercial use or for baking dry foods like bread. The device is designed for personal home use in well-ventilated and sheltered indoor environments and cannot be embedded.
Important Technical Specifications
The product operates on a rated voltage of 220-240V ~ 50/60Hz and has a rated power of 2800W. It features a digital display for temperature and time settings, with a temperature range of 50-380°C, adjustable in 50°C increments. The default surface temperature of the rack is 380°C, and the default barbecue time is 30 minutes. The timer can be adjusted from 30 seconds to 60 minutes, with 30-second increments per rotation.
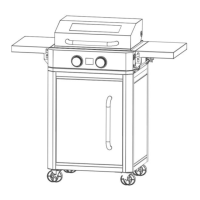
Key components include:
- Cover (1): Protects the grilling area.
- Glass window (2): Allows observation of food during cooking.
- Handle (3): For opening and closing the cover.
- Display (4): Shows temperature and time settings.
- Time knob (5): Adjusts the cooking time.
- Oil pan (6): Collects grease and oil during cooking.
- Frame post (7): Structural support.
- Casters (8): For mobility.
- Side table (9): Provides additional workspace.
- Temperature knob (10): Adjusts the cooking temperature.
- Plug (11): For connecting to power.
- Power cable (12): Supplies electricity to the device.
- Switch (13): Turns the device on/off.
- Power button (14): Initiates operation.
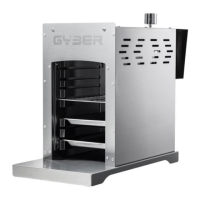
- Easy to clean plate (15): A removable plate for easy cleaning.
- Reflective plate (16): Helps distribute heat evenly.
- Heating pipe protection net (17): Protects the heating elements.
- Heating pipe protection net fixing frame (18): Secures the protection net.
- Grill (19): The primary cooking surface.
The device also includes a front door (16), door handle (17), backboard (18), curb plate (18), and various structural components like left (20) and right (21) columns, side table fixing brackets (4), and caster alignment plates (10).
Usage Features
First Use and Setup:
Before first use, users must unpack the product and accessories, keeping packaging for potential returns. All packaging should be carefully removed, and the heating tube and power cord inspected for damage. The device should be placed on a smooth, heat-resistant surface, away from other high-temperature sources and areas where heat is concentrated or not allowed. The bottom should not be obstructed. For the first time, it is normal for smoke and odor to be generated; users should install accessories in a ventilated environment and run the oven for 10 minutes without food. The device should not be placed in closets or corners, and a safe distance from carpets, tablecloths, and other flammable materials must be maintained. Floor mats are used to cushion the product and should not be removed.
Operation:
To start, press the digital "I" on the power switch. The display will show, and a "drop" sound indicates standby mode.
- Temperature Setting: Press the temperature knob; the display will flicker, and the oven will turn on. Rotate the temperature knob clockwise to increase temperature by 50°C per gear, up to 380°C. Rotate counter-clockwise to decrease temperature to a minimum of 50°C. Press the knob again to confirm the setting.
- Time Setting: Rotate the time knob clockwise to increase time by 30 seconds per rotation, up to 60 minutes. Rotate counter-clockwise to decrease time by 30 seconds. Press the knob to confirm the setting.
- Cooking Process: After setting temperature and time, the device automatically enters working state. The heating tube activates, temperature rises, and the timer counts down. The device automatically shuts down when the timer reaches "0".
- Preheating: The monitor displays the current temperature. An audio prompt sounds when the preset temperature is reached (with a ±20°C error). Preheating for 5-10 minutes is recommended for best results.
- Barbecue: Each side of food typically requires 4-8 minutes to bake. Frozen meat should be thawed at room temperature for 1-2 hours before grilling.
- Canceling Barbecue: Press the temperature knob once to stop the equipment during operation.
- Power Off: Turn off the power switch and unplug the power cord after use or when not in use for extended periods.
Safety Precautions:
- Electric Shock Risk: Do not immerse the device in water or liquid, and prevent splashing. Avoid using in moist environments. Ensure input electrical parameters match technical specifications. The socket must be easily accessible for quick removal. Do not use if the product, heating tube, power cord, or plug is damaged, or if it has fallen.
- Burns and Scalds Risk: The product's shell becomes hot during use; avoid touching it. Use thick cloth or heat-resistant gloves when handling food. Do not place rags or packaged food on or inside the product due to fire risk. Do not leave unattended during heating and cooling. Overheated food or hot oil can cause fire. Allow the product to cool completely before moving or cleaning. Ensure heat dissipation holes (sides and top) and air intake (bottom) are not blocked. The area above the heating tube is very hot. Food should not touch the heating tube to prevent overheating and fire.
- General Safety: Loosen the power cord completely before each use. Remove the plug after use, when not in use, before cleaning, during errors, or thunderstorms. Pull the plug, not the cord. Do not modify the equipment. Seek qualified maintenance for repairs. Do not force the power cord. If the power line is damaged, contact the manufacturer or qualified businesses for repair. Do not connect external timers or remote control devices. Use in a grid environment with a leak trip switch less than 30mA; consult an electrician if unsure. The appliance must be connected to an earthed socket. Regularly inspect the supply cord for damage.
- Power Interruption: If power is lost during use, remove food from the grill, ensure no one touches the hot product, and if power is lost for an extended period, unplug, ventilate the room, and monitor until completely cooled.
Maintenance Features
Cleaning:
- Clean the equipment only after it has completely cooled down, and the master switch is off and power is disconnected.
- Remove the baking net, oil pan, plate, and reflector. Clean the oven with a suitable cleaner.
- Choose cleaners compatible with metal. For very dirty accessories, spray cleaner multiple times and use a plastic brush. Do not use abrasive cleaners, wire brushes, or hard sponges.
- Wipe the inside and surface of the oven with a soft, damp cloth. Avoid mechanical load during cleaning.
- Thoroughly clean grease residue to prevent fire.
- Removable oven fittings are made of high-quality stainless steel and are dishwasher safe.
- All accessories should be cleaned with warm water and dried. Avoid corrosive cleaners, as they may damage stainless steel.
- Clean the surface and interior with a small amount of water and a flexible cleaner, then dry completely before plugging in.
Grill and Pan Installation/Removal:
- The grill can be removed for daily cleaning. When installing, be careful not to touch the heating tube. Ensure the grill is correctly positioned. Grills and nets are necessary during use. Remove the grill only when the product is fully cooled.
- To remove the grill, lift it gently. Pay attention to safety.
- The oil pan must be installed to collect gravy and prevent it from spilling into the product.
Heating Tube Protective Cotton Removal/Installation:
- To remove the heating tube protective cotton:
- Take out the grill, easy-to-clean plate, and reflector.
- Remove the two fixing bracket screws that secure the heating pipe protection net with a screwdriver.
- Remove the fixing bracket of the heating pipe protection net.
- Repeat for the other three heating pipe protection net fixing brackets.
- Remove the heating pipe protection net.
- To install the heating tube protective cotton:
- Install the heating pipe protection net.
- Install the heating pipe protection net fixing bracket and tighten the screws.