EasyManua.ls Logo

Häfele Slido Classic Series User Manual

Häfele Slido Classic Series
16 pages
To Next Page IconTo Next Page
Page #1 background imageLoading...
Page #1 background image
120 120
70
Variante A
Version A
Versión A
Variante E
Version E
Versión EClassic
40-F
Holz
940.67.008
940.67.004
18
± 10 mm
21,5
X
X mm A1 mm A2 mm
3 17,5 23
4 16,5 24
5 15,5 25
6 14,5 26
7 13,5 27
8 12,5 28
s = 40
58
65
TH = H-72
7
H
s≥38
3
A2
A1
x
+4
-3
H = Gesamthöhe
TH = Türhöhe
50-F
940.67.000
Holz
gilt für Artikel: siehe Tabelle
applies to Cat. No.: see table
valable pour référence : voir table
adecuado para N° de ref.: ver table
1/16
HDE 30.09.2016 733.XX.XXX
Slido
Question and Answer IconNeed help?

Do you have a question about the Häfele Slido Classic Series and is the answer not in the manual?

Häfele Slido Classic Series Specifications

General IconGeneral
BrandHäfele
ModelSlido Classic Series
CategoryIndustrial Electrical
LanguageEnglish

Summary

Slido Product Variants

Variante A and Article Numbers

Lists article numbers and specifications for Variante A.

Variante E and Article Numbers

Lists article numbers and specifications for Variante E.

Dimensional Data and Specifications

Presents key dimensions and a table for specific measurements.

Component Identification

Variante A Components

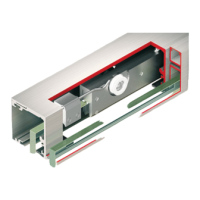
Identifies and illustrates components for Variante A.

Variante E Components

Identifies and illustrates components for Variante E.

Installation Steps

Step 1: Base Profile Mounting

Instructions for mounting the base profile.

Step 2: Attaching Runners

Instructions for attaching the runners.

Step 3: Door Height Adjustment

Procedure for adjusting the door height.

Step 4: Securing Components

Steps for securing various components during installation.

Step 5: Positioning Door (Variante A)

Sliding the door into the required end position for Variante A.

Step 5: Dampening Adjustment (Variante E)

Lightly tightening the damper to ensure mobility for Variante E.

Step 5: Optional Mounting (Variante E)

Optional steps for later mounting of the damper on Variante E.

Step 5: Final Fixing (Variante E)

Final fixing steps for the dampening system on Variante E.

Step 5: Final Positioning & Dampening

Sliding the door and dampening into the final required position.

Step 6: Cover Attachment

Instructions for attaching the cover.

Final Check and Retightening

Checking all screw connections for firm seating and retightening.

Step 7: Final Assembly

Final assembly step involving components L and M.

Related product manuals