EasyManua.ls Logo

HAISEN HD03R - User Manual

HAISEN HD03R
2 pages
Print Icon
To Next Page IconTo Next Page
Loading...
HD03R
Reset
Auto Mode
Detection area (Press to define detection area 100%/75%/50%/25%.)
Hold time (Press to define holdtime 5s/30s/1min/3min /5min/10min/20min/30min .)
Daylight threshold (Press to define daylight level 2Lux/10Lux/30Lux/50Lux/80Lux/120Lux/Disable.)
Stand-by period (Press to define stand-by period 0s/10s/30s/1min/5min/10min/30min/+.)
Stand-by dimming level (Press to define stand-by dimming level 10%/20%/30%/50%.)
1Press "Reset" button, change brightness to max level.
2Press “Reset” button, products with DIP switch will be controlled by DIP switches; otherwise all the setting will be just
initial, that is 100% detection range,hold time 5S, no stand-by time and daylight threshold disabled.
Press “Auto Mode” button, the sensor starts to work and all settings remain the same before the light gets switched on/off.
Note: Disable means light will be turned on once sensor detects movement, regardless of the ambient lux.
Note: “0s” means no standby period; “+” means unlimited standby period.
The button “Test (2s)” is for testing purpose after commissioning.Pressing this button, the sensor goes to test mode
( hold time is only 2s )
1. "ON/OFF" key only functions as a switch of the light.
2. If press this button to turn off the lamp before it's short-circuited, the lamp will remain off after power-on again.
ON/OFF
Flick after press any button
Start
+/-
Memory
Apply
Test (2s)
Flick only after press "Apply" button
Press "Start" to customize scene, users can change detection range, daylight threshold, holdtime, standby dimming level
and standby period.
1. Press "Memory" to save all the settings.
2. The settings remained as the last time if not get resetted values.
1. Press "Apply" to deliver the saved setting.
2. Press "Apply" without “memory”will make all the setting one-time operation.
3. Settings should be done within 30S, otherwise it exits memory mode.
1. To adjust brightness 10-100% in on/off mode.
2. To adjust highest brightenss 60-100% in sensor mode.
Remote for dimmable sensors
with memory function
Question and Answer IconNeed help?

Do you have a question about the HAISEN HD03R and is the answer not in the manual?

Summary

Remote Control Buttons

ON;OFF Button

Acts as a light switch and maintains off state after power cycle.

Auto Mode

Activates sensor function with existing settings.

Reset Function

Resets brightness to max or reverts to DIP switch control/factory defaults.

Brightness Adjustment

Adjusts brightness in ON/OFF mode (10-100%) or max in sensor mode (60-100%).

Scene Customization

Allows customization of detection range, hold time, and dimming levels.

Save and Apply Settings

Memorizes settings for future use or applies them for one-time operation.

Parameter Settings

Configure detection area, hold time, standby dimming, standby period, and daylight threshold.

Test Mode

Enters a 2-second hold time test mode for commissioning.

Memory & Apply Mode Operation

Saving Settings

Steps to set detection range, hold time, standby dimming, and period, then save.

Applying Settings to Other Lights

Procedure to program identical settings to multiple sensors.

Isolated Setting Mode

Activating Saved;Default Settings

Enables last saved settings or factory defaults.

Parameter Configuration

Steps to reset and adjust detection range, hold time, and dimming parameters.

Overview

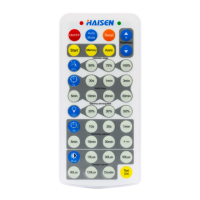
This document describes the HAISEN HD03R, a remote control designed for dimmable sensors with memory function. The remote allows users to customize various settings of compatible sensors, enhancing their functionality and adaptability to different environments.

Function Description:

The HD03R remote control serves as an interface for configuring dimmable sensors, enabling users to adjust parameters such as detection range, hold time, stand-by dimming level, stand-by period, and daylight threshold. It supports both individual sensor programming and the programming of multiple sensors in an array with similar settings. The remote features a memory function to save preferred settings and an "Auto Mode" for quick activation of previously saved or factory default configurations.

Key Features and Controls:

  • ON/OFF: This button acts as a simple switch for the light connected to the sensor. If the lamp is turned off via this button before a short-circuit, it will remain off after power-on.
  • Auto Mode: Pressing this button initiates the sensor's operation with all previously saved settings, or factory defaults if no settings were saved.
  • Reset: This function is crucial for re-initializing sensor settings.
    • A single press changes brightness to the maximum level.
    • If the product has DIP switches, they will control the settings. Otherwise, all settings revert to initial defaults: 100% detection range, 5-second hold time, no stand-by time, and disabled daylight threshold.
  • +/- Buttons: These buttons are used for brightness adjustment.
    • In ON/OFF mode, they adjust brightness from 10% to 100%.
    • In sensor mode, they adjust the highest brightness from 60% to 100%.
  • Start: This button is used to initiate the customization of a scene. Users can then adjust detection range, daylight threshold, hold time, stand-by dimming level, and stand-by period.
  • Memory: Pressing this button saves all the current settings. These settings will remain active until a reset is performed.
  • Apply: This button delivers the saved settings to the sensor.
    • If pressed after "Memory," it applies the memorized settings.
    • If pressed without first using "Memory," it performs a one-time operation of the current settings.
    • All settings must be applied within 30 seconds, otherwise, the remote exits memory mode.
  • Detection Area: Allows selection of detection range: 100%, 75%, 50%, or 25%.
  • Hold Time: Configurable hold times include 5s, 30s, 1min, 3min, 5min, 10min, 20min, and 30min.
  • Stand-by Dimming Level: Adjustable dimming levels for stand-by mode: 10%, 20%, 30%, or 50%.
  • Stand-by Period: Configurable stand-by periods: 0s, 10s, 30s, 1min, 5min, 10min, 30min, or +∞ (unlimited). "0s" means no stand-by period.
  • Daylight Threshold: Defines the ambient light level at which the sensor will activate. Options include 2Lux, 10Lux, 30Lux, 50Lux, 80Lux, 120Lux, or Disable. "Disable" means the light will turn on regardless of ambient lux when movement is detected.
  • Test (2s): This button is for testing purposes after commissioning. When pressed, the sensor enters a test mode with a hold time of only 2 seconds.

Usage Features:

The HD03R supports two primary modes for setting up sensors:

  1. Memory & Apply Mode:

    • To reset parameters:
      • Turn on the light (if off) using "ON."
      • Press "Start" on the sensor to be configured.
      • Sequentially press the buttons for Detection range, Hold time, Stand-by dimming level, Stand-by period, and Daylight threshold.
      • Press "Memory" to save the settings.
      • Note: The interval between setting each parameter must be within 30 seconds.
    • To program other lights in an array with similar sensors:
      • Turn on the second sensor using "ON."
      • Press "Apply."
  2. Isolated Setting Mode:

    • Turn on the light (if off) using "ON/OFF."
    • Press "Auto Mode" to activate previously saved or factory default settings.
    • To reset parameters:
      • Turn on the light (if off) using "ON."
      • Press any button among "Auto Mode," "Reset," "Test," and "Apply" to begin sensor detection mode.
      • Sequentially press the buttons for Detection range, Hold time, Stand-by dimming level, Stand-by period, and Daylight threshold.

Maintenance Features:

  • Settings Persistence: Settings are automatically saved and remain active until a reset is explicitly performed.
  • Visual Feedback: The light will flicker when setting each parameter, providing visual confirmation of the command reception.
  • Power-on Behavior: If the lamp is turned off via the ON/OFF button before a short-circuit, it will remain off after power-on, indicating a persistent state.

The HD03R remote control provides a comprehensive and user-friendly solution for managing and customizing dimmable sensors, offering flexibility and control over lighting environments.

HAISEN HD03R Specifications

General IconGeneral
BrandHAISEN
ModelHD03R
CategoryAccessories
LanguageEnglish

Related product manuals