3
Warning –Batteries
•Only use batteries (or rechargeable batteries) that match
the specied type.
•Beforeyou insert the batteries, clean the battery contacts
and the polar contacts.
•Donot allow children to change batteries without
supervision.
•Donot mix old and new batteries or batteries of a
different type or make.
•Remove the batteries from products that arenot being
used for an extended period (unless these arebeing kept
ready for an emergency).
•Donot short-circuit batteries.
•Donot charge batteries.
•Donot throw batteries in a re.
•Keep batteries out of the reach of children.
•Never open, damage or swallow batteries or allow
them to enter the environment. They can contain toxic,
environmentally harmful heavy metals.
•I
mmediately remove and dispose of dead batteries from
the product.
•Avoid storing, charging or using the device in extreme
temperatures and extremely low atmospheric pressure(for
example, at high altitudes).
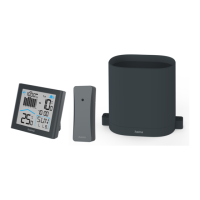
4. Getting Started
Note
Beforeuse, make surethat you insert the batteries into the
measuring station and the wireless rain gauge rst, and then
into the base station.
4.1 Insert batteries
Measuring station
•Open the battery compartment (29) and remove the contact
breaker.
•Then close the battery compartment cover.
Wireless rain gauge
•Remove the rain gauge cover (30) by simultaneously pressing
both locks (32), on either side, inwards.
•Open the battery compartment (35) next to the rocker (34),
and insert two AAA Microbatteries with the correct polarity.
•Then close the battery compartment cover.
•Now replace the rain gauge cover (30), and press it down
until the two locks (32) snap into place on either side.
Base station
•Remove the screen protector from the display.
•Open the battery compartment (23) and insert two AAA
Microbatteries with the correct polarity.
•Then close the battery compartment cover.
4.2 Replacing the batteries
Note –Replacing the batteries
•Note that the stations have to be resynchronised each
time you change the batteries in the measuring or base
station or in the wireless rain gauge.
•Todothis, remove the batteries from the other station and
then reinsert them, or change them as required.
Measuring station
•Open the battery compartment (29), remove and properly
dispose of the depleted batteries, and insert two new AA
Mignon batteries with the correct polarity.Then close the
battery compartment cover.
Wireless rain gauge
•Remove the rain gauge cover (30) by simultaneously pressing
both locks (32), on either side, inwards.
•Open the battery compartment (35) next to the rocker (34),
remove and properly dispose of the depleted batteries, and
insert two new AAA Microbatteries with the correct polarity.
Then close the battery compartment cover.
•Now replace the rain gauge cover (30), and press it down
until the two locks (32) snap into place on either side.
Base station
•Open the battery compartment (23), remove and properly
dispose of the depleted batteries, and insert two new AAA
Microbatteries with the correct polarity.Then close the
battery compartment cover.
5. Installation
Warning
•Buy special or suitable installation material from a
specialised dealer for wall-mounting.
•Ensurethat no faulty or damaged parts areinstalled.
•Never apply force during installation. This could damage
the product.
•Beforeinstallation, ensurethat the chosen wall is suitable
for the weight to be mounted, and make surethat there
arenoelectrical wires, water,gas or other lines at the
installation site on the wall.
•Donot mount the product above locations wherepersons
might linger.
Note –Installation
•Werecommend initially placing the base station,
measuring station and wireless rain gauge in the intended
locations without installing them, and making all the
settings described in 6. Operation.
•Only install the stations once the appropriate settings
have been made and astable wireless connection is
established.