Polarisation (Bias)
Es besteht die Möglichkeit, dem Messsignal eine
Gleichspannung (Bias) zu überlagern. Elektrolyt-
und Tantalkondensatoren benötigen eine positive
Biasspannung für eine korrekte Messung, auch
wenn das Messsignal nicht groß genug ist, um
die Bauteile zerstören. Die interne Vorspannung
(1 V
DC
) erlaubt die Messungen möglichst reali-
tätsnah durchzuführen. Die interne Biasspannung
ermöglicht außerdem Messungen an Halbleitern.
Um die BIAS-Funktion zu aktivieren ist die BIAS-
Taste zu drücken. Die darüber bendliche ON-
LED leuchtet auf. Wird die Taste ein weiteres Mal
gedrückt, wird die Bias-Spannung deaktiviert und
die LED erlischt.
Der zu testende Kondensator muss mit der
richtigen Polarität angeschlossen werden, d.h.
der positive Pol des Kondesators wird an die rote
Buchse angeschlossen. Die Biasspannung funk-
tioniert nur bei der Kapazitätsmessung
Auswahl der Messfunktion
Die gewünschte Messfunktion wird durch Drücken
der Tasten
und ausgewählt. Mit der Taste
werden die Hauptmessfunktionen (R,L,C) aus-
gewählt, mit der Taste
die Sekundärmessfunk-
tionen (Q, D, Impedanz und Phase).
Um den Verlustfaktor zu messen. muss zuerst die
Kapazitätsmessung ausgewählt werden, sonst
wird der Gütefaktor angezeigt.
Die Auto-Messfunktion
Das HM8018 kann in den meisten Fällen den
Bauteiltyp bestimmen. Es gibt 3 verschiedene
Automatismen: die automatische Impedanzbe-
reichswahl (siehe Kapitel Messbereichsauto-
matik), die automatische Wahl der Schaltunsgart
(seriell/parallel) und die Auto-Messfunktion.
Diese drei Automatismen sind aktiv, sobald sich
das HM8081 im Auto-Modus (AUTO-LED leuch-
tet) bendet. Die einzelnen Automatismen kön-
nen durch Tastendruck deaktiviert werden. Die
manuelle Messbereichswahl schaltet alle drei
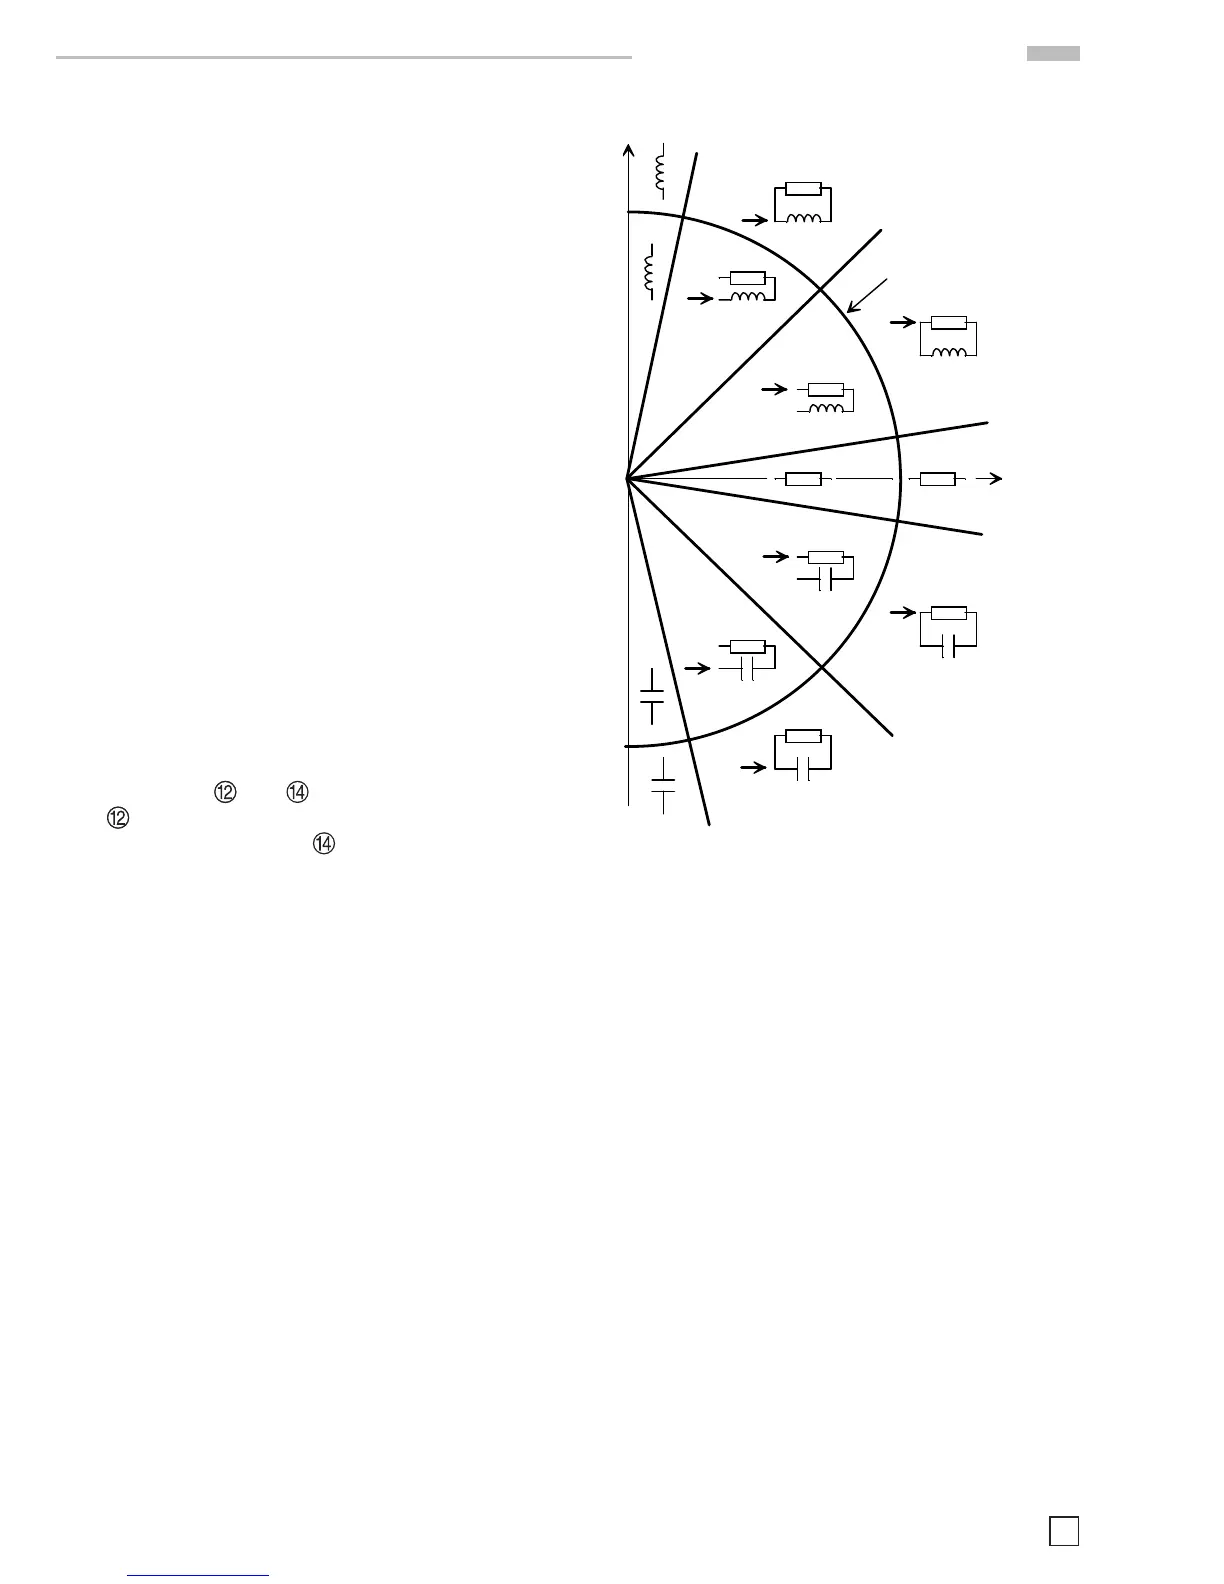
Automatismen aus. Bendet sich das HM8018
im Auto-Modus, ist die Messfunktion abhängig
von der Impedanz des Bauteils. Die folgende
Skizze zeigt, wie das LCR-Meter die Messfunktion
auswählt.
applied on the red terminal. The bias voltage works only
when the instrument on capacitance measurement
mode.
Measuring function selection
The desired test function is selected by push buttons (12)
and (14). The push button (12) gives access to the main
parameter (R, L or C), The push button (14) allows a
secondary parameter measurement (Q/D, impedance or
phase).
In order to measure D parameter the instrument needs at
first to be set to capacitance measurement mode, on the
other way, Q parameter will be displayed.
Auto-measurement function
The HM8018-2 is able to automatically determine the
component type in most cases. 3 different automatisms
exists: the automatic impedance range selection (see the
section « Auto-ranging»), the automatic mode
(series/parallel) selection (see the section « passive
components »), and the automatic function selection. These
three automatisms are simultaneously activated when the
instrument is set in automatic mode with the RANGE
AUTO key (7). Then the user can change function or mode
that disables their respective automatism. The manual range
selection disables the three automatisms.
When the instrument is on automatic mode the function
choice depends on the impedance module, phase angle as
well as the quality factor .The diagram below shows the
choice made by the instrument.
|Z| = 1000
Ω
Q = 500
D = 0,002
Q = 500
D = 0,002
D = 500
Q = 0,002
D = Q = 1
D = Q = 1
R
Calculation functions
Apart from displaying normal values as resistance, inductance or
capacitance, the HM8018-2 can display relative deviations and
percentages. It is not possible to use these calculation modes for
other functions than the three previous values. The deviations
and percentages are displayed in relation to the two stored values
A and B.
The procedure to obtain relative measurement is as follows:
1) Connect the component corresponding to the reference
value.
2) Store the value (memory A) by pressing on the STORE key,
then press the A key.
3) Press on the A key. The indicator -A lights up and the
display shows the value (Measure – A).
A direct percentage measurement is possible, it is only to use the
÷B key instead of the –A key in the previous procedure. Then the
instrument displays the value 100*Measure/B in %.
To obtain a deviation in % proceed as follows:
1) Connect the component corresponding to the reference
value.
Mathematische Funktionen
Neben der Anzeige von Standardparametern wie
Widerstand, Induktivität oder Kapazität kann das
HM8018 den Offset und das Verhältnis anzeigen.
Diese Funktionen können nur mit den Standard-
messfunktionen benutzt werden. Offset und Ver-
hältnis beziehen sich auf den im entsprechenden
Speicher A bzw. B hinterlegten Messwert.
Vorgehensweise bei der Offset-Messung:
1. Das Referenz-Bauteil an das HM8018 an-
schließen.
2. Durch Drücken der STORE-Taste und an-
schließend der Taste A wird der momentane
Messwert im Speicher A abgelegt. Im Display
erscheint kurz Sto.A.
3. Durch Drücken der Taste A leuchtet die LED –A
auf. Der im Display angezeigte Wert ist dann
die Differenz
Messwert - Speicher A
.
Eine Messung des Verhältnisses ist möglich, in-
dem man die Taste –A bei der oben beschriebenen
Vorgehensweise durch die Taste ÷B ersetzt.
Bedienung des HM8018
 Loading...


