36
37
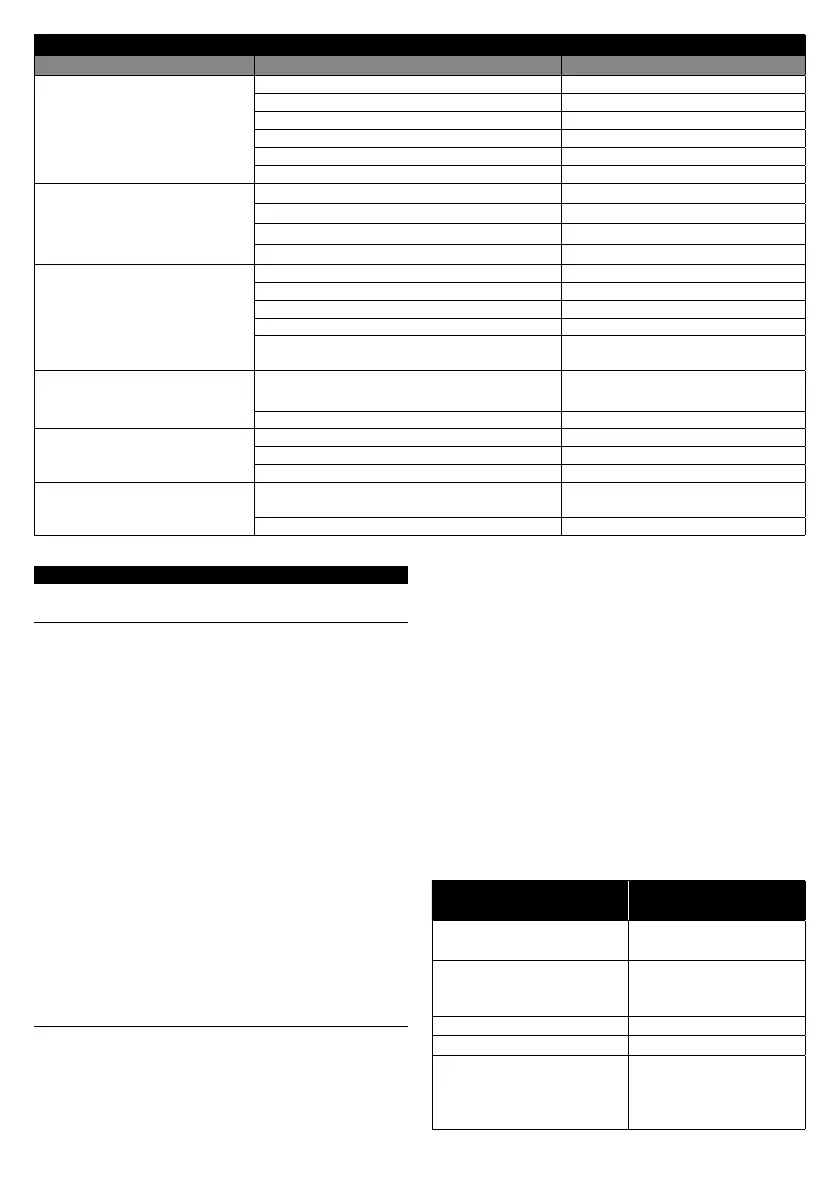
FEHLERBEHEBUNG
Problem Ursache Lösung
Kein oder wenig Material des
Materials wird versprüht
Die Düse ist verstopft Reinigen Sie sie
Das Saugrohr ist verstopft Erhöhen Sie die Intensität (+)
Die Intensität ist zu gering (-) Erhöhen Sie die Intensität (+)
Der Saugschlauch ist locker Schlauch wieder einsetzen
Es gibt keinen Druck im Behälter Ziehen Sie den Behälter fest
Der Luftfilter ist verstopft Wechseln Sie ihn
Lack oder die Farbe
laufen aus
Die Düse ist locker Ziehen Sie sie fest
Die Düse ist verschlissen Ersetzen Sie sie
Der Multipositions-Regler ist verschlissen Ersetzen Sie ihn
Materialaufbau in der Luft-Kappe und Düse Entfernen und reinigen Sie diese
Das Sprühnebel ist
sehr dick
Die Viskosität des Materials ist zu dick Verdünnen Sie das Material um 10%
Die Intensität ist zu gering (-) Erhöhen Sie die Intensität (+)
Die Düse ist verstopft Reinigen Sie die Düse
Der Luftfilter wurde verstopft Reinigen oder tauschen Sie diesen
Es gibt sehr wenig Druck im Behälter Ziehen Sie den Behälter fest/
Überprüfen Sie den Dichungsring
Intervallsprühen Das Material im Behälter ist fast vollständig
aufgebraucht
Füllen Sie den Behälter erneut
Der Luftfilter wurde verstopft Reinigen/ersetzen Sie diesen
Ungleichmäßiges Sprühen Die Intensität ist zu gering (-) Erhöhen Sie die Intensität (+)
Die Sprühgeschwindigkeit ist zu schnell Verringern Sie die Bewegung
Das versprühte Material ist Fügen Sie mehr Farbe hinzu
Zu viel Farbüberschuss Das Gerät ist zu weit weg Verringern Sie die Entfernung
des Objekts
Die Intensität ist zu hoch (-) Verringern Sie die Intensität (+)
EN
PRODUCT ASSEMBLY
The device is delivered pre-assembled; make sure
that all parts are within reach so you can use them:
1. Place the multi-position regulator onto the
nozzle and secure by turning the union nut over
it. There is a small rubber washer in the air hose.
Before assembling, make sure it is correctly
positioned. (see Figure #2)
2. Screw the container to the bottom of the base.
(see Figure #3)
NOTE: Make sure the seal is in the correct position
before attaching the container to the spray gun. The
seal is located on the neck of the device and is used
to hermetically seal the paint container and paint
sprayer.
A: Union nut (6)
B: Multi-position regulator (7)
C: Nozzle (8)
PAINT PREPARATION
Before preparation
This device cannot be operated with textured paints.
The use of these materials will lead to premature
wearing of the device. To get the best results from
the device, read the instructions for use thoroughly
before using, and retain for future reference. Do not
spray materials for which you are uncertain of the
associated risks.
To test viscosity (see Figure #4)
A. Fill the supplied funnel with the material.
B. Measure the time it takes for the material to flow
out, and make a note of it.
C. Please refer to the manufacturer‘s instructions to
determine if the paint needs to be thinned.
Paint types
The device can be used with any type of paint (except
textured paints), provided it is correctly diluted and
in a liquid state that can easily pass through the
suction tube.
Material
Outflow velocity
in seconds
Water-based paints
and emulsions
25-50
Glossy varnishes, coloured
varnishes with solvents or
soluble in water
45-50
Varnishes Undiluted
Primers 45-50
Impregnating agents for
wood without dilution
dyes, oils, disinfectant or
phytosanitary products
Undiluted