Model No.: 191-707
Vendor No.: 11289
UPC# 792145354369
REMOTE CONTROL INSTALLATION
GENERAL INFORMATION
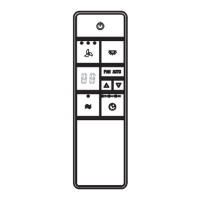
This remote control is designed to separately control your ceiling fan speed and light brightness. There are four
buttons (Hi, Med, Low, off) to control the fan speed and off. Select “D” or “ON” in the frequency switches to
control the light dimmer or ON/OFF function based on your light bulbs.
The red indicator on the transmitter will light when the button is pressed.
1. SETTING THE CODE
Remove cover by snapping off from top or bottom.
This unit has 16 different code combinations. To set the code, perform these steps:
a. Setting the code on the transmitter.
Slide frequency switches to your choice of up or down position. (Factory setting is all up. Do not use this position. Use a small screwdriver or
ball point pen to slide firmly up or down (Fig. 1)
b. For use with incandescent bulbs, use the “D” setting for full range dimming. For fans that use Fluorescent or LED bulbs, use the “ON” setting
for the light to have ON/OFF functions only.
c. Setting the code on the receiver
Caution! The frequency switches on the receiver unit are covered with a rubber cover, remove the rubber cover and then place it back after
making any changes to the frequency switches.
Slide frequency switches to the same positions as set on your transmitter. (Fig. 1)
Place the cover back to the transmitter by placing over buttons and snapping into place. (Fig. 1)
2. INSTALLING RECEIVER IN CEILING FAN
A: Safety precautions:
WARNING: HIGH VOLTAGE! Disconnect source of electrical power by removing fuse or switching off circuit breaker.
Do not use with solid state fans.
Electrical wiring must meet all local and national electrical code requirements.
Electrical source and fan must be 115/120 volt, 60Hz. Maximum fan motor amps: 1.0 Maximum light watts: 300-incandescent only.
Household electrical power can cause serious injury or death!
B: Installing receiver in fan (Fig. 2):
a. Remove electrical power from the circuit.
b. Remove ceiling fan canopy from the mounting bracket.
c. Disconnect existing wiring between ceiling fan and supply at electrical junction box.
d. Make connections as follows, using the wire nuts supplied (Fig. 3):
CONNECT TO
Green fan wire…………………….Bare supply wire
Black receiver wire (AC IN L)……Black supply wire
White receiver wire (AC IN N)…...White supply wire
White receiver wire (TO MOTOR N)..White fan wire
Black receiver wire (TO MOTOR L)…Black fan wire
Blue receiver wire (FOR LIGHT)……..Blue light wire
NOTE:
When installing the remote control, be sure your fan is set on "HIGH SPEED" and light is ON.
Fig. 1
TRANSMITTER
FREQUENCY SWITCHES
RECEIVER
ON ECE
1 2 3 4
ON
D
ON
HI
MED
LOW
FAN OFF
LIGHT
ON ECE
1 2 3 4
ON
D