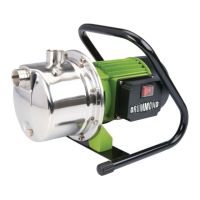
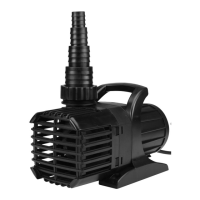
The Drummond 1 HP Submersible Sprinkler Pump is designed for efficient water transfer, primarily for irrigation systems, lawn sprinkling, and general clear water transfer. This pump is not a submersible unit and must be installed in a stationary position on a solid surface, connected either to a fixed pipeline or a flexible hose. It is crucial to ensure the pump is not suspended by its delivery pipe or power cord, as this can lead to damage and void the warranty.
Safety and Installation:
Before operation, several critical safety and installation checks must be performed by an expert to ensure safe and effective use. The pump requires connection to a GFCI-protected plug, installed according to regulations, with a supply voltage of 120VAC at 60Hz. It is imperative that the electrical connections are protected from moisture, and if there is a risk of flooding, these connections should be elevated to higher ground. The pump is designed exclusively for use with water and should not be used with other fluids, especially fuels, cleaning fluids, or other chemical products. The maximum water temperature for operation is 77°F (25°C).
To prevent electric shock, the pump must only be connected to a GFCI-protected outlet, and extension cords should not be used with this item. Access by children should be prevented, and the pump must be protected from frost and from running dry. Operating the pump without an adequate water supply will cause it to pump air, overheat, and sustain damage, voiding the warranty. Individuals with pacemakers should consult their physician before use, as electromagnetic fields in close proximity to the pump could interfere with or cause pacemaker failure.
Installation involves positioning the pump on a solid surface and connecting it to 1" NPT piping (sold separately). The pump should be mounted as close to the water source as possible, within the range of its rated suction lift. All threaded connections must be airtight, and PTFE tape should be used to ensure a secure seal. Before operation, the Inlet and Outlet Covers must be removed. The water source is attached to the Inlet, ensuring the inlet hose or pipe is collapse-proof to withstand suction force. A foot valve and filter (sold separately) should be installed at the bottom of the inlet to prevent the pump from losing prime and to keep sand, dirt, and debris out of the system.
A Y-fitting with dual valves (sold separately) is recommended for priming the pump. A bucket filled with at least 3 gallons of clean water should be connected to one side of the Y-fitting using a hose, with the bucket positioned higher than the pump's outlet. Alternatively, a continuous water supply like a spigot can be used. During priming, the valve on the outlet side of the Y-fitting should be closed, and the valve on the priming side opened. The Priming Plug is then removed, and once water starts flowing out, it should be replaced and tightened securely.
Operation:
Before starting the pump, verify that the discharge pipe is properly connected, the electrical connection is 120VAC, 60Hz, and the GFCI-protected socket is in good condition. The GFCI-protected outlet should be tested before use. Ensure that water and moisture cannot reach the power supply socket and that the pump is installed to prevent dry running.
To start the pump, open the valve on the outlet side of the Y-fitting. With dry hands, plug the power cord into the GFCI-protected outlet and turn on the Power Switch (I). Then, close the valve on the priming side of the Y-fitting. It is critical not to run the pump dry; if water stops coming out of the outlet, the pump must be turned off immediately. If the pump operates without water, check the pipes for air-tightness, ensure the inlet pipe is submerged, and confirm the foot valve is properly installed. Once the pump is running properly, the priming hose and bucket can be disconnected. After use, turn off the Power Switch (O), dry your hands, and unplug the power cord.
Maintenance:
Regular maintenance is essential for the longevity and safe operation of the pump. Before each use, inspect the pump for loose hardware, misalignment or binding of moving parts, cracked or broken components, damaged electrical wiring, and loose or leaking pipes/hoses. Any condition that may affect safe operation should be addressed. After each use, wipe the pump clean with a soft, damp cloth and soapy water, avoiding contact with electrical components. If the pump is idle for 5 days or more, it should be unplugged and rotated several revolutions using a screwdriver through the middle hole of the Fan Cover to prevent it from seizing. For occasional use, after pumping is complete, disconnect both suction and outlet lines, tip the pump to drain water from its cavity, and replace the Inlet and Outlet Covers to protect the unit.
Quarterly maintenance, or more frequently for heavy use or dirty environments, includes cleaning sludge and debris from the inlet screen/filter, ensuring the discharge pipe is free from leaks, verifying the foot valve functions properly, and checking that the water source and piping are clear of sand, dirt, and debris.
Long-Term Storage:
For long-term storage, the pump body should be drained by disconnecting both suction and outlet lines and tipping the pump to remove all water from its cavity. Replace the Inlet and Outlet Covers and apply light machine oil to metal parts to prevent corrosion. Store the pump in a dry, indoor area, out of reach of children. After storage, check the Impeller to ensure it turns easily and is not oxidized before resuming operation.
The pump is designed for specific applications and should not be used for continuous run, fountain/pond water features, water with dirt and debris, or for removing water from swimming pools, spas, septic, or sewage systems. However, it can be used for general water transfer in household, farming, or plumbing applications. Always follow safety precautions and disconnect the power supply before performing any service or troubleshooting.