Page 10
;&(%$*4.8"4,7%<'*#$"&8#=%/7*,#*%4,77%>?@@@?@AA?BCDC1
ITEM 63584
GH;6EI JK6LHEMJN OHMNE6NHNF6G6EPK
J/*(,$"&8%
L*,9%$.*%6NEML6%MOKJLEHNE%GH;6EI%MN;JLOHEMJN%#*4$"&8%,$%$.*%+*3"88"83%&2%$."#%5,8',7%
"847'9"83%,77%$*e$%'89*(%#'+.*,9"83#%$.*(*"8%+*2&(*%#*$%'/%&(%'#*%&2%$."#%/(&9'4$1
K(*?G$,($%F.*4d#
Inspect Engine and Generator looking for damaged, loose, and missing parts before set up and starting.
If any problems are found, do not use equipment until fixed properly.
F.*4d"83%,89%;"77"83%683"8*%J"7
NJEMF6-%%R*8*(,$&(%"#%#."//*9%)"$.&'$%*83"8*%
&"71%%683"8*h#%4(,8d4,#*%OPGE%+*%2"77*9%)"$.%
&"7%+*2&(*%2"(#$%'#*1%%I&'(%Q,((,8$V%"#%!JMU%"2%
$.*%683"8*h#%4(,8d4,#*%"#%8&$%/(&/*(7V%2"77*9%
)"$.%&"7%+*2&(*%2"(#$%'#*%,89%+*2&(*%*,4.%'#*%
$.*(*,2$*(1%%S*2&(*%*,4.%'#*=%4.*4d%$.*%&"7%7*]*71%%
683"8*%)"77%8&$%#$,($%)"$.%7&)%&(%8&%*83"8*%&"71
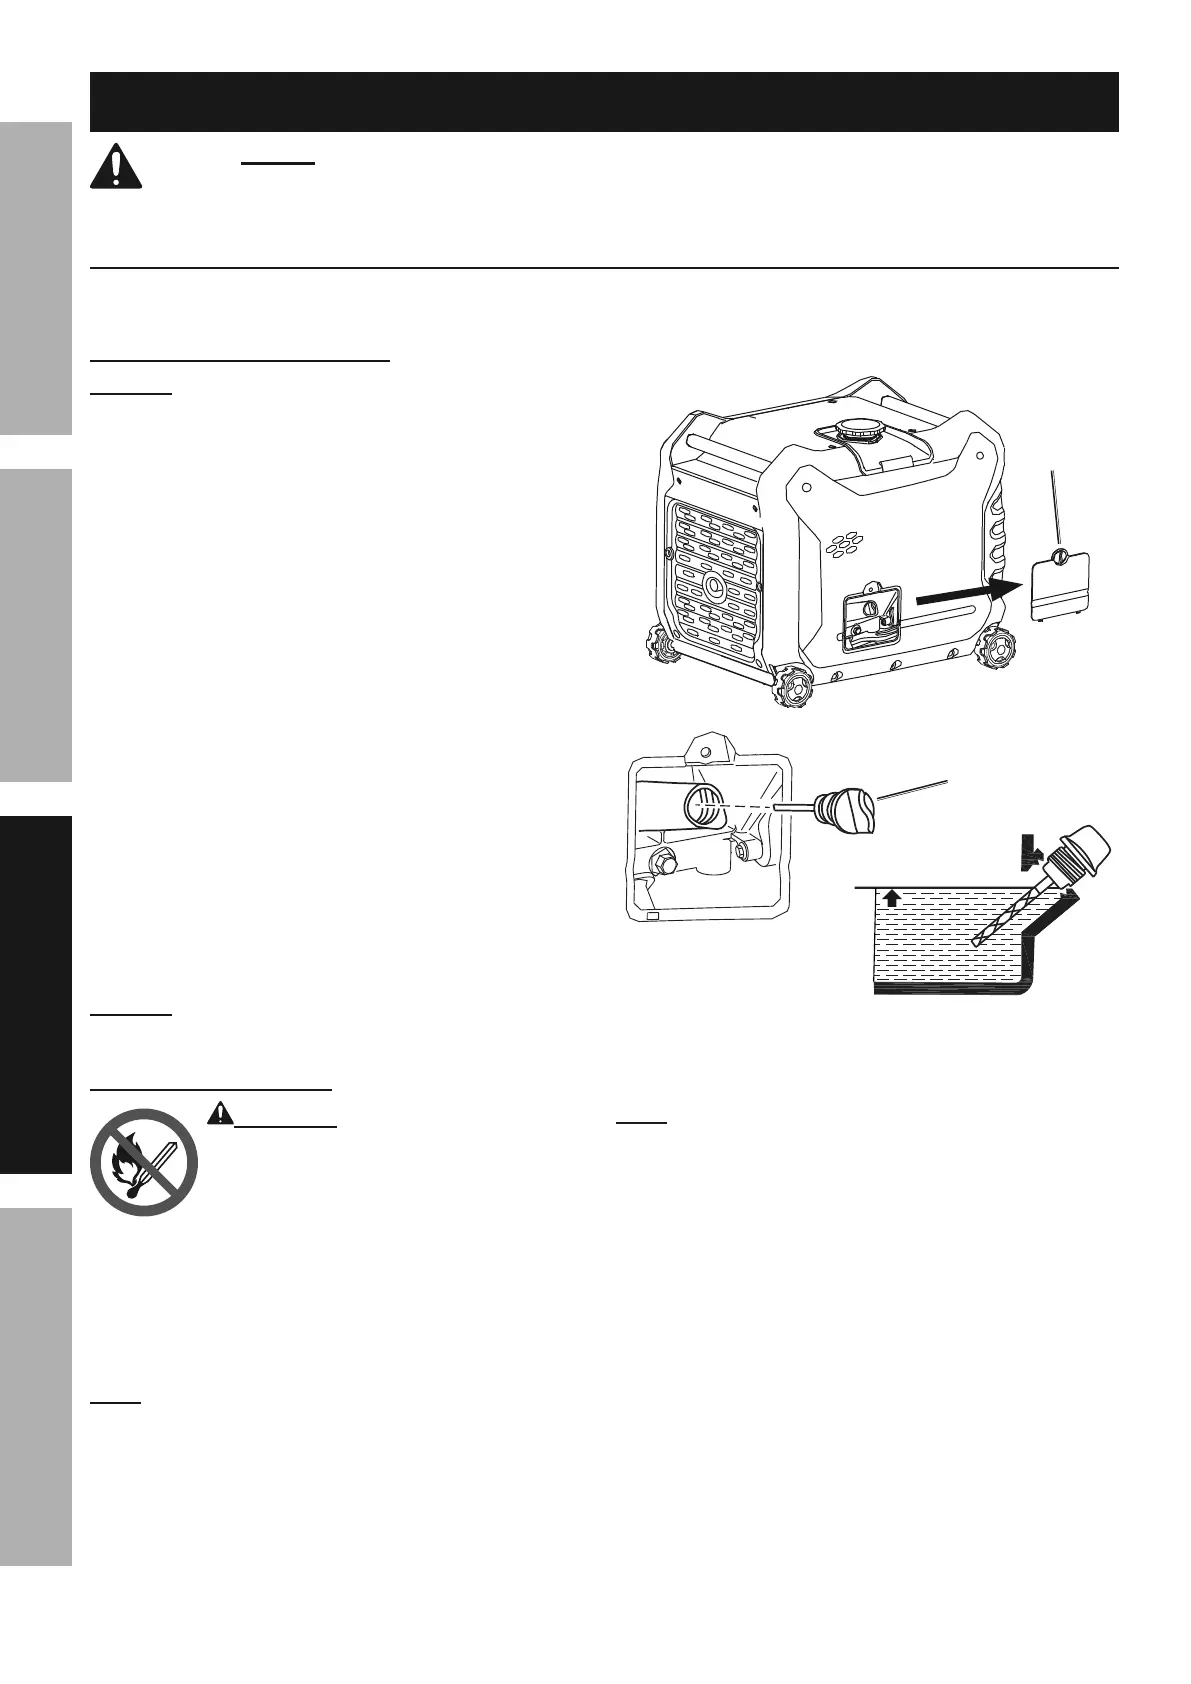
1. Make sure the Engine is stopped and is level.
2. On the left side of the Generator, loosen
the Screw and remove the Oil Fill
Access Door, as shown to the right.
3. Clean the top of the Oil Fill Cap / Dipstick
and the area around it. Remove the
Cap / Dipstick, turning it counterclockwise.
4. Check the oil level. The oil level should be
up to the edge of the hole as shown.
5. As needed, add the appropriate type of
oil until the oil level is at the proper level.
SAE 10W-30 oil is recommended for general use.
6. Thread the Oil Fill Cap / Dipstick back in clockwise
and replace the Oil Fill Access Door.
NJEMF6-%%U&%8&$%('8%$.*%*83"8*%)"$.%$&&%7"$$7*%&"71%%
683"8*%)"77%#.'$%&22%"2%*83"8*%&"7%7*]*7%"#%$&&%7&)1
J"7%;"77%
H44*##%
U&&(
Full Level
x
x
x x
x x
x
J"7%;"77%
Cap / Dipstick
F.*4d"83%,89%;"77"83%;'*7
QHLNMNRX EJ%KL6!6NE%G6LMJPG%
MN`PLI%;LJO%;ML6-
Fill the fuel tank in a well-ventilated area
away from ignition sources. If the Engine
is hot from use, shut the Engine off and
wait for it to cool before adding fuel. Do not smoke.
1. Clean the Fuel Cap and the area around it.
2. Unscrew and remove the Fuel Cap.
3. Remove the Strainer and remove any dirt
and debris. Then replace the Strainer.
N&$*-%%U&%8&$%'#*%3,#&7"8*%4&8$,"8"83%5&(*%$.,8%
>ij%*$.,8&7%^6>i_1%%U&%8&$%'#*%6@B%*$.,8&71%%H99%2'*7%
#$,+"7"k*(%$&%$.*%3,#&7"8*%&(%$.*%Q,((,8$V%"#%!JMU1
N&$*-%%U&%8&$%'#*%3,#&7"8*%$.,$%.,#%+**8%#$&(*9%"8%,%
5*$,7%2'*7%4&8$,"8*(%&(%,%9"($V%2'*7%4&8$,"8*(1%%M$%4,8%
4,'#*%/,($"47*#%$&%*8$*(%$.*%4,(+'(*$&(=%,22*4$"83%
683"8*%/*(2&(5,84*%,890&(%4,'#"83%9,5,3*1
4. If needed, fill the Fuel Tank to about 1 inch under
the fill neck of the Fuel Tank with 87 octane or
higher unleaded gasoline that has been treated
with a fuel stabilizer additive. Follow fuel stabilizer
manufacturer’s recommendations for use.
5. Replace the Fuel Cap.
6. Wipe up any spilled fuel and allow excess
to evaporate before starting engine.
To prevent FIRE, do not start the engine
while the smell of fuel hangs in the air.
 Loading...