Do you have a question about the Harbor Freight Tools PVC WELDING KIT 41592 and is the answer not in the manual?
Basic safety precautions to reduce risk of personal injury and equipment damage.
Key steps for safe operation including handling hot parts, flammables, and air flow management.
Safely changing tips, avoiding damage, and ensuring proper tool handling.
Guidelines for avoiding electrical shock, working alone, and maintaining a safe work area.
Proper storage of idle equipment and care to prevent damage.
Recommendations for protective clothing, footwear, hair covering, and eye protection.
Staying alert, maintaining balance, and checking for damaged parts before use.
Using only identical replacement parts and approved accessories for servicing.
Do not operate the tool under the influence of alcohol or drugs.
Check for included parts and contact support if any are missing or broken.
Inspect components for damage and observe safety warnings before use.
Connect the Air Regulator to a clean, dry, filtered, and regulated compressed air supply.
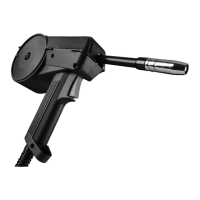
Set air flow to 3-1/2 to 4 PSI, place heating element on safety rack, and plug in.
Use correct welding rod for material and hold rod near tip, not inside it.
Grasp the handle and hold the welding rod to begin the welding operation.
Place welder on safety rack when pausing or finished, disconnect cord, and allow to cool.
Allow welder to cool, then close air supply, remembering air flow first and last.
Inspect welding kit components for wear or damage and replace as needed.
| Brand | Harbor Freight Tools |
|---|---|
| Model | PVC WELDING KIT 41592 |
| Category | Welding System |
| Language | English |