If the CD is not removed within approx. 10 seconds,
it is drawn in again for security reasons without the
CD being played again.
CD not readable or defect
If the data on an inserted CD cannot be read or the
CD is defect, a corresponding note is displayed on
the screen.
On bad roads and when there are severe
v
ibrations, playback jumps can occur.
If the internal temperature of the device is too high, no CDs are
acceptedor played anymore.
If
ERROR is displayed after insertion of different
CDs, consult a specialist company.
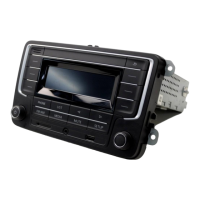
Insert or withdraw SD card
First read and observe the safety
notes on page 3 and the
introductory information on page 14.
The SD card slot is on the front of the device.
⇒F
ig. 1
10 .
Only audio files, which can be played, are
displayed and played. Other files are ignored.
An inserted SD card is shown by a
in the
bottom screen line.
Insert SC card
● Insert compatible SD card with the cut-off
corner first and with the imprinting face up
(contact area face down) carefully into the SD
card slot until it catches.
If you cannot insert an SD card, check the insertion
p
osition and SD card.
Playback starts automatically if audio files are saved
a
nd readable on the SD card.
Withdraw SC card
● Press the inserted SD card. The SD card
"jumps" into the output position.
● Withdraw SC card.
SD card cannot be read
When an SD card is inserted, the data of which cannot
be read, there is no switch to playing the SD card after
the loading process.
A corresponding message appears.
External audio source on multimedia jack AUXIN
First read and observe the safety notes
on page 3 and the introductory
information on page 14.
The multimedia jack AUXIN is on the front of the
d
evice
⇒Fig. 1
9 and can only be connected using a
3.
5 mm jack plug.
The connected external audio source is played
over the vehicle loudspeakers and cannot be
controlled via the radio system.
A connected external audio source is
displayed by
AUX on the screen.
External audio source on multimedia jack Connect AUXIN
● Connect external audio source on multimedia
jack AUXIN.
● Reduce basic volume of radio system.
● Start playback of the external audio source.
The p
layback volume of the external audio source
should be adjusted to the volume of the other audio
sources ⇒Page 31.
20 Function description
 Loading...