4 – English
OPERATION
WARNING:
Donotallowfamiliaritywiththisproducttomakeyou
careless.Rememberthatacarelessfractionofasecond
issufficienttoinflictseriousinjury.
WARNING:
Alwaysweareyeprotectionwithsideshieldsmarkedto
complywithANSIZ87.1.Failuretodosocouldresultin
objectsbeingthrownintoyoureyesandotherpossible
seriousinjuries.
APPLICATIONS
Youmayusethisproductforthepurposelistedbelow:
ChargingHART
™
20VoltLithium-ionbatteries
NOTICE:
Chargeinawell-ventilatedarea.Donotblockcharger
vents.Keepthemcleartoallowproperventilation.
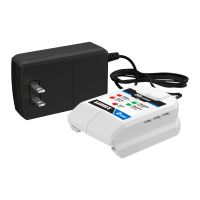
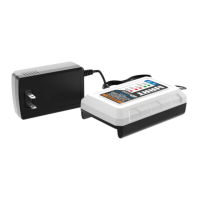
CHARGING
See Figure 1, page 7.
Battery packs are shipped in a low charge condition.
Therefore,youshouldchargethembeforefirstuse.Ifthe
chargerdoesnotchargeyourbatterypackundernormal
circumstances,returnboththebatterypackandchargerto
yournearestrepaircenterforelectricalcheck.
Chargetimevariesandisdependentupontheamphour
capacityofbatterypack.
Makesurethepowersupplyisnormalhouseholdvoltage,
120 volts, AC only, 60 Hz.
Connectthechargertoapowersupply.
Setthebatterypackdownwiththelatchfacingup.The
chargerwillslideovertheoppositeendofthebattery
pack.
Attachthechargertothebatterypackbyaligningthe
raisedribsonthebatterypackwiththegroovesinthe
charger,thenslidethechargerontothebatterypack.
Thelatchshouldsnapintoplacetoensurethecharger
iscorrectlyconnected.
Donotplacethechargerinanareaofextremeheator
cold.Itwillworkbestatnormalroomtemperature.
Thebatterypackwillbecomeslightlywarmtothetouch
whilecharging.Thisisnormalanddoesnotindicatea
problem.
TheredLEDwillbeONcontinuouslywhenthecharger
isconnectedtoapowersource.
TheLEDwillflashgreenon/offwhilethebatterypackis
charging.
NOTE: A continuous pattern of two quick red blinks
indicatesthechargerhasdetectedanerror.SeeLED
Functions for Battery Charging fordetails.
Afterchargingiscomplete,thechargerLEDwillremain
solidgreenuntilthebatterypackisremoved.
Toremovethebatterypackfromthecharger,depress
thebatterypacklatchandpullthechargeroffthebattery
pack.
Disconnectthechargerfromthepowersupplyandstore
chargerinadrylocation.
CHARGING A HOT BATTERY PACK
When using a tool continuously, the battery pack may
become hot. The charger may be placed directly onto a
hotbatterypackbutchargingwillnotbeginuntilthebattery
temperature cools to within an acceptable temperature
range.Whenthechargerisplacedonahotbatterypackthe
LEDwillindicate“Testing”.Whenthebatterypackcools,
thechargerwillautomaticallybegincharging.
CHARGING A COLD BATTERY PACK
Thechargermaybeplaceddirectlyontoacoldbatterypack
but charging will not begin until the battery temperature
warmstowithinanacceptabletemperaturerange.When
thechargerisplacedonacoldbatterypacktheLEDwill
indicate“Testing”.Whenthebatterypackwarmsthechar-
gerwillautomaticallybegincharging.
 Loading...