EasyManua.ls Logo

Hartman Vienna - User Manual

Hartman Vienna
3 pages
Print Icon
To Next Page IconTo Next Page
Loading...
PLEASE KEEP ME WITH YOUR PROOF OF PURCHASE FOR FUTURE REFERENCE
For replacement or lost spare parts please go to http://faq.hartmanuk.co.uk/spares/
Should you have any queries about your furniture your first point of contact should be the retailer from whom
you purchased your product
ASSEMBLY INSTRUCTIONS
Vienna Reclining Companion Set / Somerton Reclining Companion Set
(69471002 / 69612129)
ATTENTION:
1. Please read these instructions carefully before assembly
2. Aluminium is soft metal and over tightening may strip thread or break the part
3. DO NOT use power tools
4. Please allow 30 minutes for assembly.
5. Although assembly only requires 1 person it is advised that a second person be present to help turn the table over and into position when
fully assembled
LOUNGE CHAIR ASSEMBLY STEPS:
1. Place part A, B and C on a soft clean surface and ready for assembly.
2. LOOSELY attach Left armrest (B) and Right armrest (C) to the seating panel (A) with bolts (F), bolts (G) as illustrated on the diagram
and small flat washers(H) using Allen key(N) DO NOT TIGHTEN THE BOLTS AT THIS STAGE
3. LOOSELY attach front crossing bar (D) to assembled legs with bolts (F) and small flat washers (H) using Allen key (N) DO NOT
TIGHTEN THE BOLTS AT THIS STAGE
4. LOOSELY attach backrest (E) to assembled seating part with bolts (I), locknut (K) and big flat washers (L) using spanner (M)
5. Fix both ends of the gas spring to the seating part and backrest with bolts (J) ), locknut (K) and big flat washers (L) using spanner (M)
6. Tighten all bolts using spanner (M) and Allen key (N) one by one being careful not to over tighten any as this will cause the thread to
become damaged
7. Turn assembled sofa over and place in desired position, then put all cushions on the seat.
For more information regarding maintenance of your furniture please visit
http://www.hartmanuk.co.uk/after_care_videos.html
Component’s
Fixings
Parts List
Parts Picture
Description
Q’ty
Part no
Parts list
Parts Picture
Description
Part no.
A
Seating
Panel
1
69471002A
69612129A
H
Small Flat
washers
1221162
B
LH armrest
1
69471002B
69612129B
I
M8*30 bolts
2100062
C
RH armrest
1
69471002C
69612129C
J
M8*50 bolts
2100063
D
Front
crossing
bar
1
69471002D
69612129D
K
Locknut
2002178
E
Backrest
1
69471002E
69612129E
L
Big Flat
washers
1061162
F
M6*20 bolts
6
1017162
M
Spanner
1020162
G
M6*35 bolts
4
2002172
N
Allen key
2002191
Question and Answer IconNeed help?

Do you have a question about the Hartman Vienna and is the answer not in the manual?

Summary

Assembly Preparation and Safety

Read Instructions Before Assembly

Instructions should be read carefully before commencing assembly to ensure correct procedure.

Handle Materials With Care

Aluminium is a soft metal; avoid over-tightening bolts to prevent thread damage or breakage.

Tool Usage and Time Estimate

Do not use power tools for assembly. Allow approximately 30 minutes for the assembly process.

Assistance During Assembly

While assembly can be done by one person, a second person is recommended for turning the table.

Lounge Chair Assembly Steps

Step 1: Prepare Parts

Place parts A, B, and C on a soft, clean surface, ready for assembly.

Step 2: Attach Armrests

Loosely attach Left (B) and Right (C) armrests to seating panel (A) with specified bolts and washers.

Step 3: Attach Front Crossing Bar

Loosely attach front crossing bar (D) to assembled legs using specified bolts and washers.

Step 4: Attach Backrest

Loosely attach backrest (E) to the seating part with specified bolts, locknut, and washers.

Step 5: Install Gas Spring

Fix both ends of the gas spring to the seating part and backrest using specified hardware.

Step 6: Tighten All Bolts

Tighten all bolts sequentially, being careful not to over-tighten to avoid damaging threads.

Step 7: Final Placement

Turn the assembled sofa over, place it in the desired position, and then put all cushions on the seat.

Overview

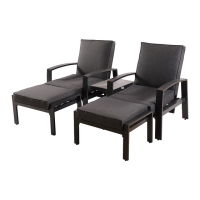
This document provides assembly instructions and product information for the Hartman Vienna Reclining Companion Set / Somerton Reclining Companion Set, identified by part numbers 69471002 and 69612129.

Function Description

The product is a reclining companion set, likely consisting of two reclining chairs designed for outdoor or patio use. The instructions detail the assembly process for a single lounge chair, which is a key component of the set. The reclining feature is facilitated by gas springs, allowing users to adjust the backrest position for comfort.

Important Technical Specifications

The assembly involves various components and fasteners made of specific materials and dimensions:

Components:

  • A: Seating Panel (Part no: 69471002A / 69612129A) - Quantity: 1
  • B: LH armrest (Part no: 69471002B / 69612129B) - Quantity: 1
  • C: RH armrest (Part no: 69471002C / 69612129C) - Quantity: 1
  • D: Front crossing bar (Part no: 69471002D / 69612129D) - Quantity: 1
  • E: Backrest (Part no: 69471002E / 69612129E) - Quantity: 1

Fixings:

  • F: M6*20 bolts (Part no: 1017162) - Quantity: 6
  • G: M6*35 bolts (Part no: 2002172) - Quantity: 4
  • H: Small Flat washers (Part no: 1221162) - Quantity: 10
  • I: M8*30 bolts (Part no: 2100062) - Quantity: 2
  • J: M8*50 bolts (Part no: 2100063) - Quantity: 2
  • K: Locknut (Part no: 2002178) - Quantity: 4
  • L: Big Flat washers (Part no: 1061162) - Quantity: 8
  • M: Spanner (Part no: 1020162) - Quantity: 2 (likely one for M6 bolts and one for M8 bolts, or two of the same size for convenience)
  • N: Allen key (Part no: 2002191) - Quantity: 1

The primary material for the furniture frame is aluminum, which is noted as a soft metal. This characteristic influences assembly precautions.

Usage Features

The product is designed for comfortable outdoor lounging with a reclining function.

Assembly Process (Lounge Chair):

  1. Preparation: Place parts A, B, and C on a soft, clean surface.
  2. Armrest Attachment: Loosely attach the Left armrest (B) and Right armrest (C) to the Seating Panel (A) using M620 bolts (F), M635 bolts (G), and Small Flat washers (H). Crucially, do not tighten bolts at this stage. The diagram shows M620 bolts (F) used for the front attachment of the armrests to the seating panel, and M635 bolts (G) for the rear attachment.
  3. Front Crossing Bar Attachment: Loosely attach the Front crossing bar (D) to the assembled legs (which are part of the armrests) using M6*20 bolts (F) and Small Flat washers (H). Again, do not tighten bolts at this stage.
  4. Backrest Attachment: Loosely attach the Backrest (E) to the assembled seating part using M8*30 bolts (I), Locknuts (K), and Big Flat washers (L).
  5. Gas Spring Installation: Fix both ends of the gas spring (not explicitly listed as a component but implied by the instructions) to the seating part and backrest using M8*50 bolts (J), Locknuts (K), and Big Flat washers (L).
  6. Final Tightening: Systematically tighten all bolts using the spanner (M) and Allen key (N) one by one. Exercise caution not to overtighten, as this can damage the threads.
  7. Finishing: Turn the assembled chair over, place it in the desired position, and add cushions (not included in the component list but implied for comfort).

Important Assembly Notes:

  • Read instructions carefully before assembly.
  • Aluminium is a soft metal; overtightening can strip threads or break parts.
  • DO NOT use power tools for assembly to prevent damage.
  • Allow 30 minutes for assembly.
  • While one person can assemble, two are advised to help turn the table (likely a typo, should be chair) over and position it.
  • "LOOSELY" attachment is critical in initial steps to allow for alignment before final tightening.

Maintenance Features

The document directs users to an online resource for maintenance information:

  • http://www.hartmanuk.co.uk/after_care_videos.html

This suggests that specific care instructions for the aluminum frame and any fabric components (cushions) are available online, likely including cleaning recommendations and tips to prolong the product's lifespan.

Support and Spares:

  • For replacement or lost spare parts, users are directed to: http://faq.hartmanuk.co.uk/spares/
  • For any queries about the furniture, the first point of contact should be the retailer from whom the product was purchased.
  • The document emphasizes keeping the proof of purchase for future reference, which is essential for warranty claims or obtaining support.

Hartman Vienna Specifications

General IconGeneral
BrandHartman
ModelVienna
CategoryPatio Furniture
LanguageEnglish

Related product manuals