EasyManua.ls Logo

Hasbro Disney PRINCESS Play-Doh Prettiest Princess Castle User Manual

Hasbro Disney PRINCESS Play-Doh Prettiest Princess Castle
2 pages
To Next Page IconTo Next Page
Page #1 background imageLoading...
Page #1 background image
38133
AGES
3
+
Prettiest Princess Castle
CONTENTS: Castle, base, 3 princess door
molds, tower presser, 3 princesses, and
4 two-ounce cans of PLAY-DOH Brand
Modeling Compound (Net
wt. 8 oz., 226 g).
ADULT ASSEMBLY REQUIRED.
Attach the
castle to the
base.
Attach the
princess door
molds. They’re
interchangeable.
Assembly
1
2
3
Attach the
remaining
princess door
mold.
®
B
R
A
N
D
MODELING COMPOUND
12k0223-1_381330000_PD_PrettiestPrincessCastle_ROW_INST_FAR.indd 1 2/23/12 7:35 PM
Question and Answer IconNeed help?

Do you have a question about the Hasbro Disney PRINCESS Play-Doh Prettiest Princess Castle and is the answer not in the manual?

Hasbro Disney PRINCESS Play-Doh Prettiest Princess Castle Specifications

General IconGeneral
BrandHasbro
Product LineDisney Princess
Product NamePlay-Doh Prettiest Princess Castle
CategoryToy
Age Range3 years and up
Recommended Age Range3 years and up
Batteries RequiredNo
Character FamilyDisney Princess
MaterialPlastic

Summary

Castle Assembly

Attach Castle to Base

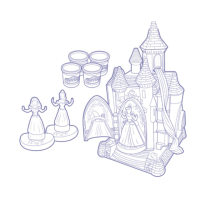
Connect the main castle structure to its base platform.

Attach Princess Door Molds

Secure the interchangeable princess door molds onto the castle.

Add Remaining Door Mold

Affix the final princess door mold to complete the castle exterior.

Princess Mold Usage

Dressing the Princesses

Fill molds with compound, place princess inside, and close to reveal gown.

Creative Play Features

Rapunzel's Hair Creation

Use the tower presser to extrude Rapunzel's hair from compound.

Stained Glass Shapes

Create decorative elements resembling stained glass using molds.

Companion Figure Molds

Make companion figures using the base molds for the castle.

Clean Up Instructions

Compound Drying and Removal

Remove excess compound; allow remaining material to dry for removal.

Related product manuals