EasyManua.ls Logo

Hasbro ZOIDS BERSERK FURY User Manual

Hasbro ZOIDS BERSERK FURY
32 pages
To Next Page IconTo Next Page
Page #1 background imageLoading...
Page #1 background image
Question and Answer IconNeed help?

Do you have a question about the Hasbro ZOIDS BERSERK FURY and is the answer not in the manual?

Hasbro ZOIDS BERSERK FURY Specifications

General IconGeneral
BrandHasbro
ModelZOIDS BERSERK FURY
CategoryToy
LanguageEnglish

Summary

Safety and Setup

Battery Safety Warnings

Instructions for safe handling and use of batteries.

Power Unit Setup

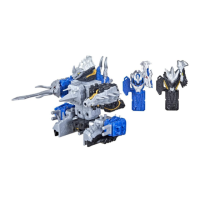
Steps to insert batteries and verify power unit functionality.

Neck Assembly

Step 1: Assemble Neck

Attaching neck, power unit, and related components.

Head Assembly

Step 2: Assemble Head

Attaching head parts and clear components.

Weapon Mounts Assembly

Step 3: Attach Weapon Mounts

Attaching parts P1, N1, P6, N2, and 06.

Body Connection

Step 4: Connect Body Parts

Assembling joint unit and connecting body parts.

Hatch Features Assembly

Step 5: Attach Hatch Features

Installing the hatch features N4, N3, and 12.

Body Armor Attachment

Step 6: Attach Body Armor

Installing the main body armor parts T1, T3, P4, T2, T4.

Tail Assembly

Step 7: Assemble Tail (1)

Initial assembly of the tail section.

Assemble Tail (2)

Steps for assembling the tail section part 2.

Assemble Tail (3)

Steps for assembling the tail section part 3.

Assemble Tail (4)

Steps for assembling the tail section part 4.

Tail Armor and Attachment

Step 8: Attach Tail Armor

Installing armor pieces onto the tail.

Step 9: Attach Tail

Final attachment of the assembled tail.

Arm Assembly

Step 10: Assemble Left Arm

Steps for assembling the left arm components.

Step 11: Assemble Right Arm

Steps for assembling the right arm components.

Left Leg Assembly

Step 12: Assemble Left Leg (1)

Initial assembly of the left leg.

Left Leg Assembly

Step 13: Assemble Left Leg (2)

Continued assembly of the left leg.

Assemble Left Leg (3)

Further assembly of the left leg.

Assemble Left Leg (4)

Continued assembly of the left leg.

Left Leg Assembly

Step 14: Assemble Left Leg (5)

Final assembly steps for the left leg.

Right Leg Assembly

Step 15: Assemble Right Leg (1)

Initial assembly of the right leg.

Right Leg Assembly

Step 16: Assemble Right Leg (2)

Continued assembly of the right leg.

Assemble Right Leg (3)

Further assembly of the right leg.

Assemble Right Leg (4)

Continued assembly of the right leg.

Left Leg Assembly

Step 17: Assemble Left Leg (5)

Final assembly steps for the left leg.

Arm Attachment

Step 18: Attach Left Arm

Connecting the assembled left arm to the body.

Step 19: Attach Right Arm

Connecting the assembled right arm to the body.

Left Leg Attachment

Step 20: Attach Left Leg

Connecting the assembled left leg to the body.

Right Leg Attachment

Step 21: Attach Right Leg

Connecting the assembled right leg to the body.

Weapon Assembly

Step 22: Assemble Left Weapon Arm

Assembling the left weapon arm.

Step 23: Assemble Left Slasher Blade

Assembling the left slasher blade.

Weapon Assembly

Step 24: Assemble Right Weapon Arm

Assembling the right weapon arm.

Step 25: Assemble Right Slasher Blade

Assembling the right slasher blade.

Blaster Assembly

Step 26: Assemble Left Blaster

Assembling the left blaster unit.

Step 27: Assemble Right Blaster

Assembling the right blaster unit.

Weapon and Blaster Attachment

Step 28: Attach Weapon Arm and Blaster

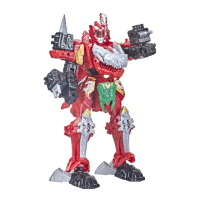
Connecting weapon arms and blasters to the body.

Backpack and Walking Function

Step 29: Assemble Backpack

Installing the dorsal module (backpack).

Step 30: Walking Function

Notes on optimal walking results on a flat surface.

Activate Walking Functions

Step 31: Activate Walking Functions

Instructions on folding claws and activating the power switch.

Handling Precautions

General Handling Notes

Notes on proper handling to avoid part breakage.

Product Information

Manufacturer and Copyright Details

Manufacturer, copyright, and distribution information.

Related product manuals