PREPARATION BEFORE
USE
1.
Tofixahook
Screw the
hook
tight
:y
onto
the
c~lling
or
another suitable place.
(Selo=:t
secure place for
fixing
the
hook
so
as
not
to
be
fallen out) .
2.
To
fix
a metal hanger
Connect
thr
metallic hanger to hol
es
of
the tank
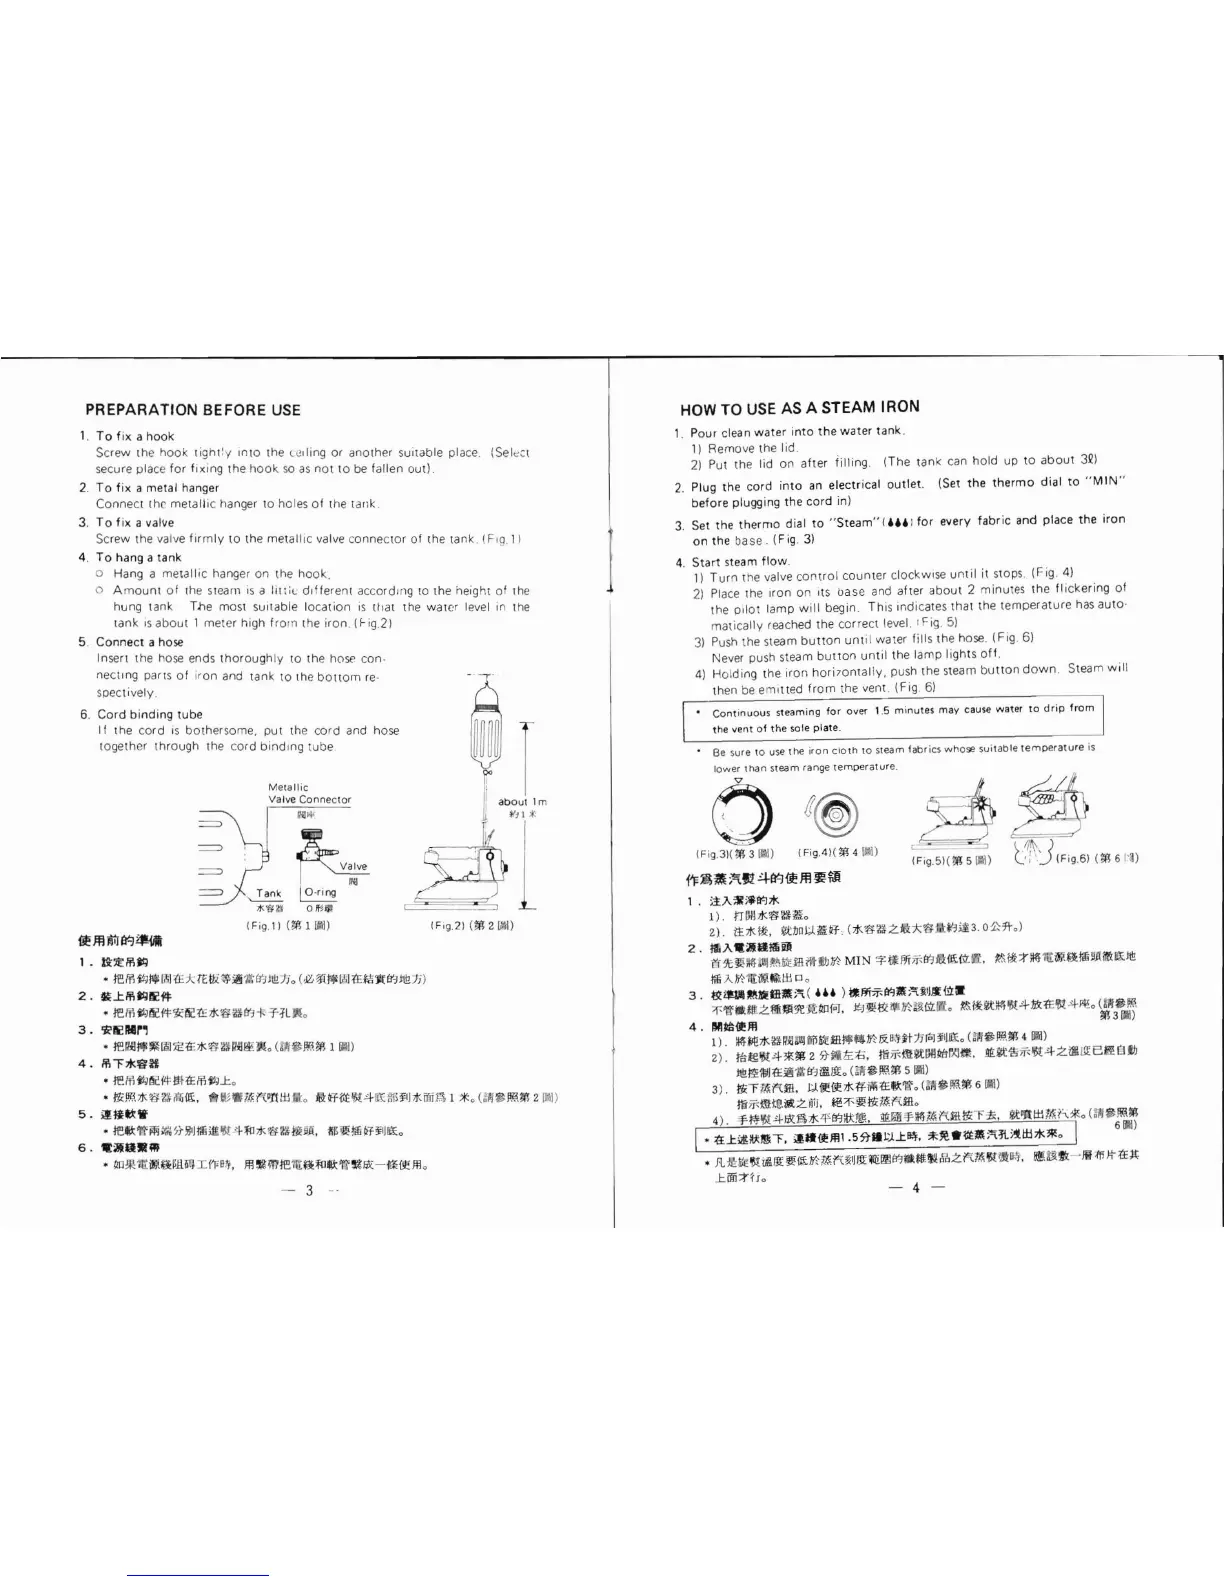
3.
To
f ix a valve
Screw the valve
firmly
to
the metal
loc
va
l
ve
c
on
nec
tor
of the tank .
(Fog.
1)
4.
To
hang a tank
o Hang a
metallic
hanger on the hook.
o
Amount
ot
the steam
is
a
lit
:ic
different
accordong to the height of the
hung tank
T.he
most suitable l
ocatio
n
is
that the water l
eve
l in t
he
tank •s
about
1 meter high
fro
rn
the
iron
. (f-ig 2)
5. Connect a
hose
Insert the hose ends
thorough
ly
to
the hose con-
nect
rng
parts
ot
ir on and tank
to
the
bottom
re-
spec
tively
.
6. Cord
binding
tube
It the
cord
IS
bot
hersome. pu t the
cord
and hose
together through the c
ord
bind
ong tube
Me
1a
lli
c
Val
ve
Co
nn
ec
tor
II;]
>I<
~JlUiJIY-.J~
1 .
!i:iE/1\~
•ffi/1\~~~~
k
rr••~
•~•~<~•~~~-
~~•
m
2.
g:L/1\~Ii!ilf
*
ffili-\~i!Cilf~!l"::(E;oj(!€¥~1'1'1-F-'f.fl
.o
3 .
!ti:'!i!llllr~
•
re~H~~~~
~~*~~">Jl?i!
, <
~$
~m 1
1J1JJ
4.
/j\""f;oj(~ft
•
ffli-l~~cf4:1#~1iHI;I..1
::,
I
Fog
.
21
(til
2[lo\1)
•
l1i~
.#.~~i11i
([,
ff
~Wl
lfi"W
t
i±l
o
J\il:ff~l!li4
llHll
f
i
JJ!(iiDA
1 *"
(,
'$fl:li!.M 2
11!)
5 .
iftJij:W
·ff~-~-
~~M-~4~*-~~~a
fi••ff•E,
6.
-~ll·ll
•
lm*"
ilitm.!Hfii('f&!f,
m~rore
r
¥t~~'f!~S::
-u ~
m,
- 3
HOW
TO
USE
AS A STEAM IRON
1. Pour clean water
into
the
water tank .
1)
Remove the
lid
.
2)
Put the lid on after
iilling
(The tank can hold up to
abou
t 3Q)
2. Plug the cord
into
an
electrical
outlet
. (Set the
thermo
di
al
to
"
MIN
"
before pluggi
ng
the cord in)
3.
Set the
thermo
dial
to
"
Steam"
I
U61
for
every
fabric
and place the
iron
on the
base.
(Fig.
3)
4.
Start
st
eam
flow
.
1)
Turn
t
he
valve
control
counter
clockwose
unti
l
it
stops. (Fig.
4)
2)
Pla
ce
the
oron
on
•ts
base and a
ft
er
about
2 minutes
th
e
fli
ckeri
ng
ol
the pd
ot
l
amp
will
begin .
Thi
s
ondi
cates that the
temperature
has
au
to·
matica
lly
reached the correct level. ' Fig.
5)
3)
Push
the steam
button
unt
il water fills the hose. (Fig. 6)
Never push steam
button
until
the lamp lights o
ff
.
4)
Holding the
iron
hori 7ontall
y,
push the steam
button
down
. Steam
wil
l
then
be
emi tted
from
the vent . (Fig.
6)
Continuous
steaming
for
over
1.5
minutes
may
cause
water
to
drip
from
the
vent
of
the
sole
plate
.
Be sure
to
use
the
iron
cloth
to
s
team
fabrics
whose
sui
table
temperature
is
lower
than
steam
range
temperature
.
0
(Fig.
3l<m
3llll
I
Fig
.4
)(
1:f!
4 Ill)
f'F~11?(Jl41Y-.l~m~~
1 . aJ.-ll:i*IY-l*
1Fig.
5l(til
5
!11
)
1
).
tJlJI.I;oj(
!€¥~Yo
2).
11#.~.
~boJ;J.i',;:~
, (
#.!€¥~.ZQ:k
'€!<
·¥3.\i3. 00-7\-, )
2.
lliA-~lii!UJl
i"i7\':J
H
141.1\l
~li:O
!!*II;~
MIN
~!lffiif-B''J~{.[
uz
Jlt
.
~~:;tlltl
'l\!
ilit¥1M9JU!&El1!!
M
A~
iJi\~J±lP
,
3 .
~~~1JU!IIl:"i.
(
4U
)
fl!fur.IY-JJI
;
"Ui
'
l!t:ili:W
>r-'tfl!iH!tzfftlJII:?e
lmfol.
~l!!!~
lfl~~
til
•
~1HtW&:t41ill::tE15t4~,
(!'11$JII,l
,
4 .
IIIIR!llfm
~
3
1111l
1)
.
:14*'1!#.~1HliillliYilBU!I~Q~&IhHt
nloJfi
JE,
(;lJI$~
;!1
4
~)
2J.
tstgl!t4*m
2 5Hitr::ti.
m;r-mitoo~r;(ltlt
tt.it'i!i;f;
ttt4zlf.
L[
e5!E!ll;
l1!!~11i!J:(£;!§"#;B'Jl!ll.[,
(
~1i
$JII,l
.
;!l
5
Ill)
3).
J1ir~i"\m.
J;J.fl!~#.ff-fllli~~'tf.(,
$~~6111)
ffi
if-
!3Hf!
.
i!l.Zlill,
~>r-J!l1i
7t.Am,
4).
-'ff;\'l!t41Jli:Jl\;oj(
lji
B'J:l*!~
.
tt.l'i11-'f-JI41.«/'{J!!J1(T1;:;,
:it
"!tt±l
Mih*o
(
!~
$~!'fl
I·
:t!Liltlttti!.\""F.
ifll{!f!l1
.5
5tii1::.LL~.
*~·~-;<\~~ttl**"
I
61111
)
•
fl:!Eii:EI!tii&J!~Ii'(/;~i"\~I
JI.[*lll!'ll
B':lllllil
!I
~.Zi'G~I!tl.ftJI;'j
,
l«UU'x:
- M1!i
lt1£~
LiiD:;j'~fo
-4-
 Loading...