Problem: Error message when running WinTV2000
If you receive any of the following error messages, your VGA card does not support Overlay
Mode. Run Primary.EXE from the WinTV directory, selecting Primary surface mode:
Black screen (no video image)
Excessively slow and/or pixelated TV image
Error message: “Connecting Preview Pin Direct to Overlay Mixer”
Note that if Overlay mode is selected, no live video is displayed during video capture or
video streaming (video streaming is used by some Videoconferencing and Video Mail appli-
cations).
If you receive any of the following error messages, your WinTV-USB2 driver was not loaded
correctly:
“Error: Cannot Locate Capture Filter (Hauppauge WinTV capture)”
“Cannot build filter graph”
“Error: connecting VCap and HCWcapt filters”
“Error: preview pin direct to overlay mixer”
To fix this problem, run HCWCLEAR.EXE which can be found on your WinTV-USB2
Installation CD-ROM. Then unplug the WinTV-USB2 device and reboot your PC.
After reboot, plug in the WinTV-USB2 device. The WinTV-USB2 driver and applications can
be reinstalled. See Step 2: Install the WinTV-USB2 driver for WindowsXP.
The latest version of the WinTV-USB2 driver can be found on our Web site at
http://www.hauppauge.com/pages/support_usb2.html
Tip: Checking to see if your driver installa-
tion was successful
To check if your installation was successful, click on
Start/Settings/ControlPanel then click on the System icon
(can also be found in the “Performance and Maintenance”
section). In the Hardware tab under Device Manger, go to
Sound, Video and Game Controllers and check that it has
the line: WinTV-USB2 Video.
By default, the WinTV-USB2 Audio device will be shown
as disabled unless you enable the audio over USB option by
running the USB2AUD.BAT file.
Notes on operation of WinTV
-usb2
- WinTV-USB2 will not run under Windows95,
Windows98, Windows2000 or WindowsNT 4.0
- When video is running, Windows will not enter suspend
mode.
- If the live video display freezes when you open other applications, you should reduce
the Hardware acceleration of the PC Display Adapter (this may happen only on several
specific display adapter cards). Go to Control Panel and click on Display. Select
'Setting', then click on Advanced Properties, select the Performance tab and you will
see the Hardware acceleration bar. Reduce the performance to None.
- Turn off the PC power management to achieve better performance in Control Panel.
Page 5 Page 6 Page 7
Page 8
Quick Troubleshooting Guide
© 2005 Hauppauge Computer Works, Inc. QI-USB2-v1.2-ENG 10/05/05
Note: FM radio is found only on some WinTV-USB2 models.
To launch the WinTV radio application, click the Radio button on the WinTV2000 applica-
tion. You can also launch the WinTV radio application by running it from the
ProgramFiles/WinTV directory.
Using the WinTV-radio Buttons
Volume: The audio volume is adjusted by
setting the Windows volume LineIn.
Tune: Fine tune the current radio channel.
Seek: Search for the next active FM radio channel.
Mem: Sets an FM radio channel preset. To assign the current station to a preset, click on
Mem and then on one of the Preset buttons (1-10).
Mute: Turn off the sound
Mono: Force mono reception. Default is stereo audio.
Scan: Searches for new stations until you click on Stop. Click the RIGHT mouse button
anywhere on the WinTV-radio window to set the Scan mode.
Min: Minimizes the WinTV-radio window.
CD: Starts your systems Audio CD-Player for playing back Audio-CD´s.
TV: Closes the radio application and starts the WinTV application.
OFF: Closes the radio application.
1-10: Preset 1 - 10
Recording MPEG video with SoftPVR™
Note: The following functions are not currently enabled with SoftPVR: the OTP and Pause
buttons, plus the Fast Forward and Rewind functions.
Note: a Pentium III 800MHz minimum system is recommended for best SoftPVR operation.
To start recording, either click the OTR (One Touch Record) or the red Record button on
WinTV2000. You can also start a recording by using WinTV Scheduler.
To stop recording, click Stop. To close the recording controls, click the TV mode button.
If you click OTR more than once, a record timer will be set and the record timer will be set
15 minutes for each time the OTR button is clicked. For example, if you click the OTR but-
ton 3 times, the WinTV will record for 30 minutes.
The recorded video file is saved in the DVCR Recorded File Path directory. To set this
directory, click the PREF button (Preferences menu), then the Movies tab. In DVCR Record
Path set the directory for your recordings.
Record Button: Clicking the Record button will automatically generate a file name
and start recording your program. When you record a file, a new file is automatically
created and the file name is displayed in the record window. The first file name will be
_dvcr001.mpg, the second will be _dvcr002.mpg and so on. While recording:
- Live video continues to play in the WinTV window
- The Counter will display the length of your recording in hours:minutes:seconds
- If you had started recording with the OTR button, and had clicked it more than once,
the total time for the recording will also be displayed. You can also click
WinTV-Scheduler allows you to schedule the recording of TV shows. WinTV-Scheduler,
once it is set, can be closed, and the WinTV application will “wake up” at the desired time
and tuned to the desired channel. It will also start recording using SoftPVR.
After installation, WinTV-Scheduler can be found on your desktop. WinTV-Scheduler can
also be run by clicking Start/Programs/Hauppauge WinTV/Scheduler.
WinTV-Scheduler works by using the Windows Task Scheduler to launch WinTV at the
chosen time. WinTV-Scheduler sets up a command line in Task Scheduler to run
WinTV2000, specifying a TV channel and a length of time to record. At the scheduled time,
WinTV2000 will open, and the record menu will roll down and start recording.
To set up a scheduled recording, run WinTV-Scheduler and click on the Add Program.
The items that need to be set for each event are:
- Time to Begin Program
- Time to End Program
- Program Period: one time, daily, weekly
- Date to Begin Program: todays date is the default. Change this if you want to
schedule on another date.
- Source selection: leave set at WinTV2000 to bring up the WinTV at the requested
time and on the requested channel.
- Channel selection: chose one of your scanned channels.
- Recording options: click on Record to File to record your show. You can also
name your file to record, in the dialog box below.
Once these are set, click Set Program. You can add more Events, clicking Set Program after
each event is set. When you are finished click Close. The WinTV program does not have to
be running for the Schedular to work. If WinTV is not running, it takes about 10 seconds to
start WinTV and to start the recording of TV.
WinTV-Scheduler also works with the following on-line Electronic Program Guides: TitanTV in
North America, TVTV in Europe and iEPG in Japan.
WinTV-Scheduler
WinTV Radio (on some models)
Color: adjust the color of your TV picture here.
To hide the WinTV toolbar:
Simply click your right mouse button in the WinTV’s video window for the no-title mode. To
restore the toolbars (the title mode), once again click your right mouse button in the
WinTV’s video window. You can set the size of the window differently in each mode.
Enabling WinTV-USB2 audio over USB2
After you complete the WinTV-USB2 driver and software installation, the default Audio set-
ting is: Analog audio input to the PC while watching live TV. This mode
requires the use of the audio cable to connect your PC to the WinTV-USB2, and a LineIn
jack on your PC.
If your PC or laptop does not have a Line-in jack, or if you would like to simplify the installa-
tion of the WinTV-USB2, you can enable Digital audio over the USB bus. To do this:
1. Run USB2AUD.BAT from the USB directory on
your WinTV-USB2 Installation CD.
During the installation, you will get a Hardware
Installation message regarding WinTV-USB2
Aux Device. Click Continue anyway.
2. In WinTV2000, click on the Menu button and go to
Audio Type and select Digital Rec+Live.
3. Close and reopen the WinTV application to have
the changes take effect.
N
ote: if you do not see Audio Type in Menu, then try rerunning USB2AUD.BAT
from the USB directory on the WinTV-USB2 Installation CD.
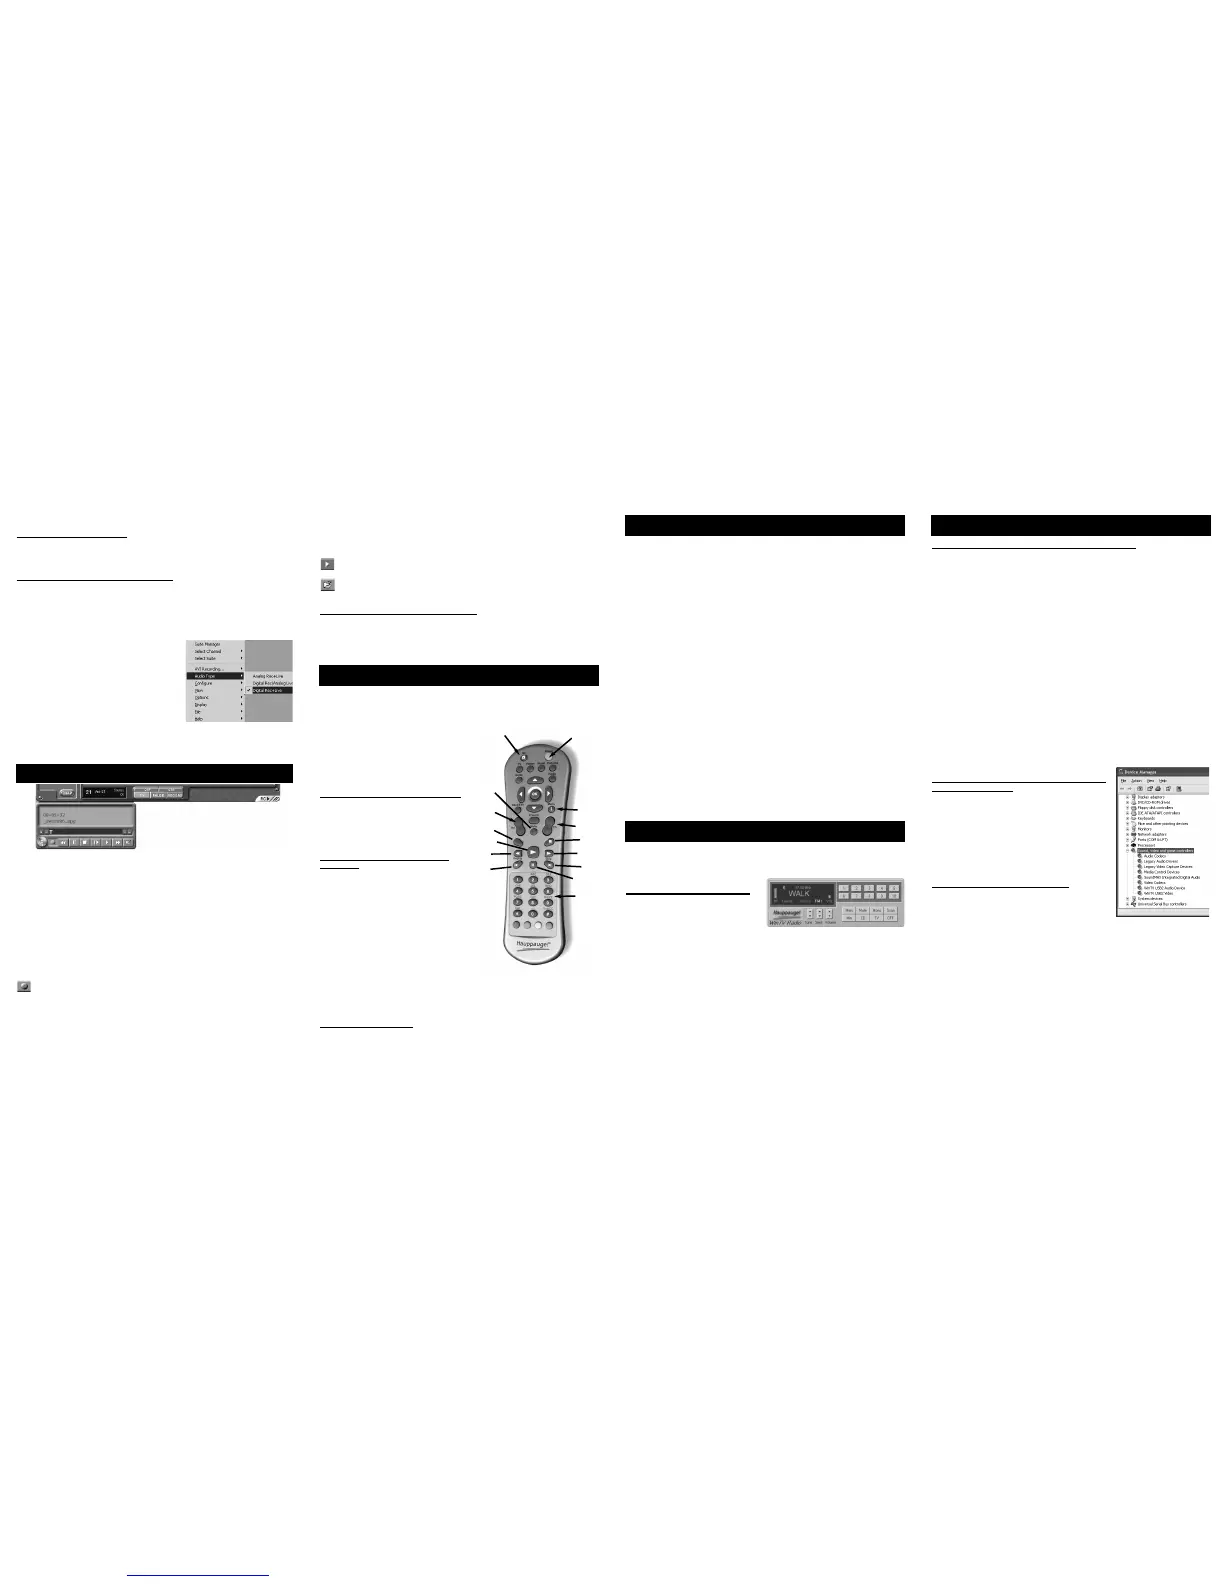
Note: Before installing the IR Remote for WinTV, make sure that the WinTV application
works properly when using your mouse or keyboard.
The WinTV-USB2 remote control receiver is mounted on the back of the WinTV-USB2 device,
next to the USB cable, behind a small hole in the plastic case.
The WinTV’s remote control software is installed
automatically during the installation of the WinTV
applications. You will see the WinTV Remote
icon in the Windows Device Tray. The instal-
lation will add a shortcut to IR.EXE to the Startup
group, so that IR.EXE is loaded every time after
Windows has booted.
Remote control when watching live TV
0 - 9 buttons: channel numbers.
Full button: makes WinTV go full screen.
Clicking the Full button again brings WinTV into a
window.
Record button: opens the SoftPVR tray.
Remote control when playing video
recordings
Skip ahead button: skips ahead in the video
30 seconds per click. Holding the skip ahead but-
ton will autorepeat, and advances the video about
5 minutes per 10 seconds the button is
depressed.
Skip back button: skips back 30 seconds per
click. pressing and holding the Skip back button
makes the video go back about 5 minutes for 10
seconds the button is depressed.
Go button: brings up the WinTV task list. Allows
you to start WinTV2000, WinTV32 or WinTV-radio.
Menu button: brings up the Windows Task list.
Use the left and right arrows to change to other Windows tasks.
Green power button: will turn off the WinTV application
0 - 9 buttons (quick skip): When playing back a recording, the “1” button will skip to
10%, the “2” button 20%, etc. of the length of the recording.
Restarting the IR Remote
WinTV’s Remote application, IR.EXE, is loaded every time Windows is booted. If you need
to restart the remote control, run IR32.EXE from the C:\Program Files\WinTV directory.
The IR Remote Control (on some models)
OTR after a record has been started, and the record timer will be set.
Click the Stop button to stop your recording. The recorded audio/video file is then saved to
disk using the automatically assigned file name. The Time counter is reset to 00:00:00 after
the recording is saved.
Play Button: Clicking the Play button will playback from disk the last video file creat-
ed. With SoftPVR, you can only Play and Pause your videos.
File Button: Clicking the File button opens the File menu. The last file recorded is
listed in the File name box. In the File menu you can: Rename your recorded video file,
Play a video file previously recorded, Delete recorded video files.
If you have problems recording audio:
When using the LineOut jack on WinTV-USB2, if you find that there is no audio
while playing back your AVI files, it is because the sound card has not been setup to record
audio from its 'Line-in' socket. To enable audio recording, open the Recording Control
panel by clicking Start / Run and then “SNDVOL32 /REC” This will open the Recording
Control panel. Make sure that 'Line-in' is enabled (this is sometimes called 'Line' or 'Aux').
Application
on/off
0 - 9
buttons
for
channel
changing
and
quick
skip
Audio mute
Menu
Channel
up/dn
Volume
up/dn
Fast
forward
Fast
rewind
Stop
Pause
Play
Skip
ahead
Skip
back
Go button
Record
 Loading...