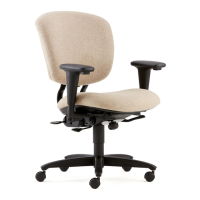
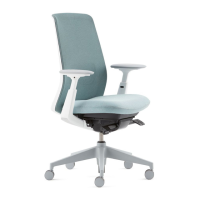
This document provides an overview of the features and adjustments for the Haworth Improv H.E. office chair, along with ergonomic tips for proper use.
Function Description:
The Haworth Improv H.E. is an office chair designed with various adjustable features to promote ergonomic comfort and support for users. It includes standard adjustments for seat height, seat depth, tilt tension, and back height, as well as optional features like forward tilt, back lock, and lumbar depth. The chair also offers different arm types with varying levels of adjustability.
Usage Features:
Standard Features:
-
Seat Height:
- Adjustment: To raise the seat, pull the lever up and lift your weight out of the chair. To lower the seat, pull the lever up and sit in the chair.
- Mechanism: A lever located on the underside of the seat, typically on the right side, controls the pneumatic cylinder for height adjustment.
-
Seat Depth:
- Adjustment: Pull the lever up and slide the seat pan forward or backward to adjust the depth.
- Mechanism: A lever, usually on the left side of the seat, engages the sliding mechanism for seat pan movement.
- Note: This feature is not available on stool models. For XL versions, users are advised to consult their facilities manager.
-
Tilt Tension:
- Adjustment: Rotate the knob clockwise for more tension (making it harder to recline) and counter-clockwise for less tension (making it easier to recline).
- Mechanism: A large knob located underneath the seat, at the front, controls the resistance of the chair's recline mechanism.
-
Back Height:
- Adjustment: Pull the lever located at the back of the seat toward the seat to unlock the backrest, then raise or lower the back to the desired position. Release the lever to lock it in place.
- Mechanism: A lever at the base of the backrest allows for vertical adjustment of the back support.
Optional Features:
-
Forward Tilt:
- Activation: Pull the lever up and lean forward to engage the forward tilt.
- Release: To release the forward tilt, pull the lever up and recline back.
- Mechanism: A lever, typically on the left side of the seat, controls the forward tilt mechanism, allowing the seat and back to tilt slightly forward for tasks requiring a forward-leaning posture.
-
Back Lock:
- Locking: Push the lever down to lock the backrest in a specific reclined position.
- Unlocking: Pull the lever up to unlock the backrest, allowing it to recline freely.
- Mechanism: A lever, usually on the right side of the seat, controls the back lock mechanism, enabling users to fix the backrest at various angles.
-
Lumbar Depth:
- Increase: Pump the lever upward to increase the lumbar support depth.
- Release: Hold the lever down to release or decrease the lumbar support depth.
- Mechanism: A pump lever, often located on the right side of the seat, activates an internal bladder or mechanism to adjust the prominence of the lumbar support.
Arm Types:
-
Height Adjustable Arm:
- Adjustment: Pull up on the button located on the armrest stem. Move the armrest up and down to adjust its height. Release the button to lock it in position.
- Mechanism: A button-activated locking mechanism allows for vertical adjustment of the armrest.
-
Fixed Arm:
- Adjustment: No adjustments are available for fixed arms. They remain at a constant height and position.
-
Flipper Arm:
- Height Adjustment: Similar to the height-adjustable arm, pull up on the button on the armrest stem, move up and down, and release the button to lock.
- Rotation Adjustment: Rotate the arm cap to reposition it. This allows for inward or outward rotation of the armrest pad.
- Ergonomic Tip: During keying and mouse-related tasks, no more than 1/3 of the arm, near the elbow, should be supported to maintain proper ergonomics.
-
3-D Arm:
- Height Adjustment: Pull the button on the armrest stem, move up/down, and release the button.
- Rotation Adjustment: Rotate the arm cap to reposition it.
- Width Adjustment: Pull the lever located on the underside of the armrest, swing the arm in or out, and then release the lever to lock it in position. This allows for lateral adjustment of the armrests.
- Ergonomic Tip: During keying and mouse-related tasks, no more than 1/3 of the arm, near the elbow, should be supported.
Ergonomic Tips and Hints:
- Change Posture: Change your posture every hour to prevent static loading and promote circulation.
- Back Support: Sit back in your chair to ensure continuous contact with the back support, utilizing the chair's ergonomic design.
- Align to Task: Align your chair to your task, ensuring that your body is properly positioned relative to your workstation.
- Neutral Wrist Posture: Adjust arm height to maintain a neutral wrist posture, preventing strain during typing or mousing.
- Foot Placement: Feet should be placed flatly on the floor or on a footrest to ensure proper leg and back alignment.
- Avoid Pressure: Avoid pressure at the back of the knee, which can restrict blood flow. Ensure there is a gap between the front edge of the seat and the back of your knees.
Maintenance Features:
The manual does not explicitly detail maintenance features but implies that for specific issues, especially with XL models, users should consult their facilities manager, suggesting professional maintenance may be required for certain components. Regular cleaning and inspection of moving parts would be standard for office chairs to ensure longevity and proper function.
For more information, visit www.haworth.com.