34 Undo and remove the screw securing the
other distributor cap retaining clip and take off
the clip.
35 The distributor baseplate can now be
removed, taking care not to allow the nylon
pressure pad and spring to fly off as the
baseplate is withdrawn.
36 This is the limit of dismantling that can be
carried out on these units. If the driveshaft,
centrifugal advance weights or springs are
thought to be worn, it will be necessary to
obtain a complete new distributor assembly.
Inspection
37 Thoroughly clean all the mechanical parts
in paraffin or a suitable solvent and wipe dry.
38 Examine the contact breaker points as
described in Section 5 and renew them if
necessary.
39 Check the distributor cap, HT leads and
rotor arm as described in Chapter 1.
40 Check the vacuum unit for leaks of the
internal diaphragm, by sucking on the
advance pipe union connection and observing
the movement of the operating spring or arm.
If, when suction is applied, a firm resistance
builds up and the spring or arm moves in
toward the diaphragm then the unit is
satisfactory. If no resistance to suction is felt,
and the operating spring or arm does not
move, then it is likely that the diaphragm is
punctured and the vacuum unit should be
renewed.
41 If working on a Lucas distributor, inspect
the two halves of the baseplate. If the spring
between the plates is damaged or if the two
halves do not move freely, renew the
baseplate.
42 On all distributors, check for excessive
side movement of the distributor shaft in the
bushes. Any excess side play here can greatly
affect the accuracy of the ignition timing and
the overall performance of the car. If wear is
apparent it will be necessary to renew the
complete distributor.
43 Examine the centrifugal advance weights
and pivots for wear, and also check that the
advance mechanism operates smoothly
without binding. If these components are
worn it will be necessary to renew the
complete distributor in the case of the
Ducellier unit, or the shaft assembly in the
case of the Lucas 45D4. Advance weights and
springs should be available separately for the
Lucas 23D4 and 25D4 distributors.
Reassembly
Lucas 23D4 and 25D4
44 If the distributor shaft has been removed,
lubricate the bearings in the distributor body
with engine oil and refit the shaft. Position the
thrustwasher and driving dog on the end of
the shaft and tap in the retaining pin.
45 Slide the vacuum advance unit into its
location on the side of the distributor body.
Place the spring plate in position, slide the
adjustment wheel tension spring over the
threaded vacuum unit shaft, and then screw
on the adjustment wheel.
46 Set the position of the vacuum unit by
rotating the adjustment wheel until
approximately half the marks on the vacuum
unit vernier scale are visible. Now refit the
small circlip to the end of the shaft.
47 Lay the centrifugal advance weights on the
action plate of the distributor shaft. Lightly
lubricate the shaft and the driving pins of the
distributor spindle. Slide the spindle over the
shaft and engage the driving pins with the
advance weights. Check that when viewed
from the base of the distributor, the large offset
on the driving dog is to the left, with the rotor
arm driving slot on the cam spindle uppermost.
If this is correct, refit the spindle retaining
screw. If not, reposition the spindle by 180º.
48 Refit the two centrifugal advance weight
tension springs to the posts on the action
plate and spindle. Check the action of the
weights by spinning the distributor shaft and
ensure that they are not binding.
49 Refit the baseplate and the two retaining
screws, making sure that the earth lead is
fitted under the head of the nearest screw.
Reconnect the vacuum unit operating spring
to the post on the baseplate.
50 Refit the condenser and secure with the
single retaining screw.
51 Refit the contact breaker points as
described in Section 6, and then place the
rotor arm on the spindle.
52 The distributor can now be refitted to the
car as described in Section 8.
Lucas 45D4 and 59D4
53 Begin reassembly by lubricating the
distributor shaft assembly and sliding it into
the distributor body.
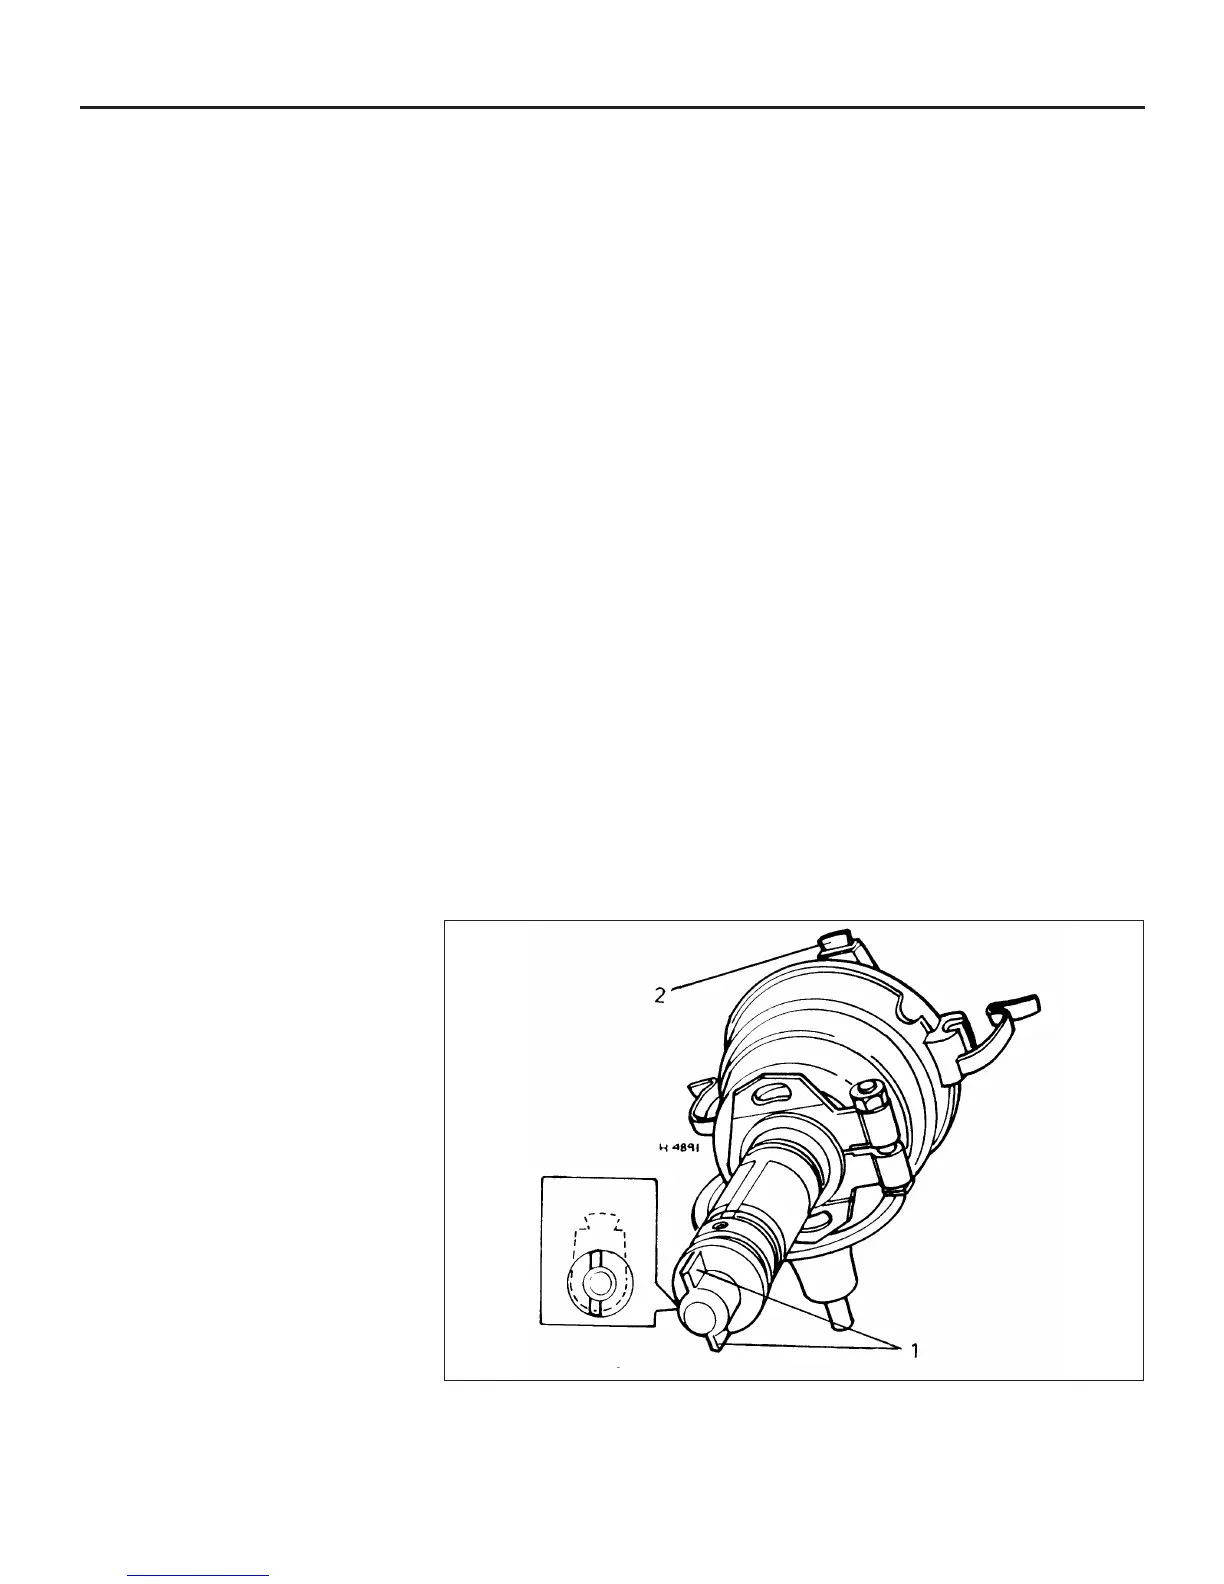
54 Place the thrustwasher and driving dog on
the shaft, with the raised pips of the
thrustwasher toward the driving dog. Position
the driving dog so that the tongues are
parallel with the rotor arm electrode, and the
offset is to the left of its centre line with the
rotor arm pointing upward (see illustration).
55 Secure the driving dog with the retaining
pin. If a new shaft is being fitted, it must be
drilled through the hole in the driving dog to
accept the retaining pin. The drill size will be
either 3.175 mm or 4.762 mm, depending on
the type of driving dog fitted. When drilling,
keep the shaft pressed down into the distributor
body, and the driving dog tight against the body
shank. After fitting the retaining pin, peen over
the edges of the hole in the driving dog slightly
to secure the pin. Make sure that there is a trace
of endfloat of the shaft when the driving dog is
fitted. If necessary, tap the end of the driving
dog to flatten the thrustwasher pips slightly and
increase the endfloat.
56 Position the baseplate on the distributor
body so that the two downward pointing
prongs straddle the screw hole below the
distributor cap clip. Now press the baseplate
into the body until it engages the undercut.
57 Refit the baseplate retaining screws and
the earth lead.
58 Make sure that the baseplate prongs still
straddle the screw hole and refit the vacuum
unit. Engage the pullrod with the baseplate
peg and secure the unit with the two screws.
59 Slide the low tension lead assembly
through the hole in the distributor body and
fully engage the grommet. Position the
condenser on the baseplate and secure it with
the retaining screw. Make sure that the other
end of the earth lead is positioned under the
screw head.
5B•14 Ignition system
9.54 Correct positioning of the distributor driving dog in relation to the rotor arm -
Lucas 45D4 distributor
1 Driving dog tongues 2 Rotor arm
 Loading...