14 Undo and remove the screws securing the
cable guide plate to the floor. Have an
assistant hold the two nuts from under the car
as the screws are undone.
15 Lift off the guide plate and pass the cable
through the hole in the floor.
16 Pull the cable rearwards and remove it
from the compensator on the rear cable.
Refitting
17 Refitting is the reverse sequence to
removal. Adjust the handbrake as described
in Chapter 1 on completion.
Later models - rear cable
Removal
18 Remove the front cable as described
previously.
19 Extract the split pins and withdraw the
clevis pins securing the cable ends to the
handbrake operating arms at the rear of each
brake backplate. Release the cable and
tension springs from the abutment brackets
on the backplate.
20 Bend back the tags slightly on the guide
channels located on the forward
crossmember of the rear subframe.
21 Similarly bend up the pinched ends of the
moving sectors located at the front of each
rear suspension arm. Lift the cable and
locating pegs out of the sectors, pull the
disconnected ends of the cable through the
openings in the side of the subframe, and lift
away the cable complete with compensator.
Refitting
22 Refitting the rear cable is the reverse
sequence to removal bearing in mind the
following points.
a) With the cable in position pinch the ends
of the moving sectors and subframe guide
channels slightly to retain the cable.
b) Ensure that the guide channels in the
subframe are well lubricated.
11 Handbrake lever - removal
and refitting
2
Removal
1 On early models lift up the front seats,
unscrew the two handbrake cable adjusting
nuts and pull the cables out of the trunnion on
the lever. On later models slacken the locknut,
unscrew the cable adjusting nut and withdraw
the cable.
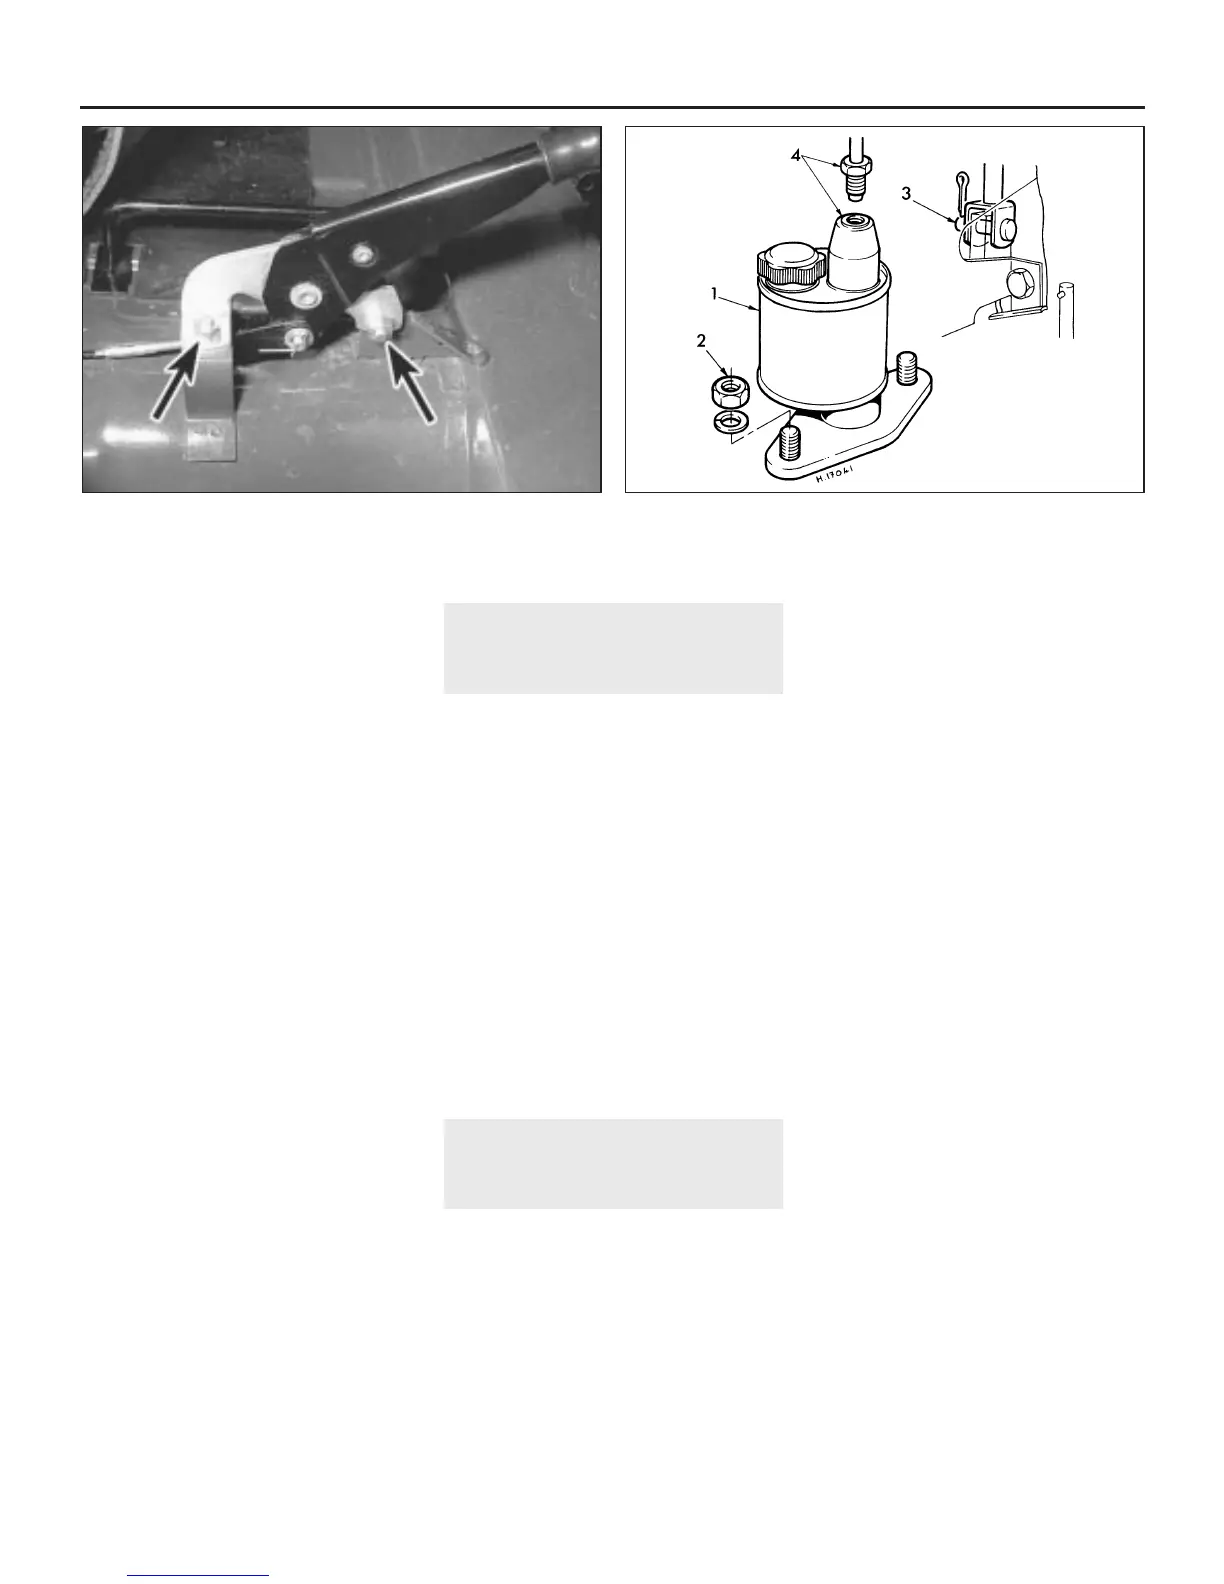
2 Undo and remove the two nuts, bolts and
spring washers securing the handbrake lever
to the bracket on the floor (see illustration).
Lift off the lever and withdraw it from the car.
3 The handbrake lever cannot be dismantled,
and if worn or faulty must be renewed as a
complete assembly.
Refitting
4 Refitting is the reverse sequence to
removal. Adjust the handbrake as described
in Chapter 1 on completion.
12 Master cylinder (single
circuit system) - removal,
overhaul and refitting
3
Note: Before starting work, refer to the
warning at the beginning of Section 2
concerning the dangers of hydraulic fluid.
Removal
1 From inside the car release the heater air
inlet ducting from the side of the heater unit
and wheel arch. Remove the ducting from
under the parcel shelf.
2 Extract the split pin and withdraw the clevis
pin securing the master cylinder pushrod to
the brake pedal (see illustration).
3 Working in the engine compartment,
unscrew the brake pipe union from the top of
the master cylinder and carefully pull the pipe
clear.
4 Undo and remove the two nuts and spring
washers securing the master cylinder to the
bulkhead and lift off the cylinder.
Overhaul
5 Remove the filler cap from the master
cylinder then drain and discard the hydraulic
fluid from the reservoir.
6 With the cylinder on the bench, withdraw
the rubber dust cover and slide it off over the
end of the pushrod (see illustration).
7 Using circlip pliers, extract the circlip and
lift off the pushrod and dished washer.
8 Tap the master cylinder body on a block of
wood until the piston emerges from the end of
the cylinder bore.
9 Withdraw the piston from the cylinder,
followed by the piston washer, main cup seal,
spring retainer, spring and non-return valve.
10 Lay the parts out in the order of removal,
and then very carefully remove the secondary
cup seal from the piston by stretching it over
the end of the piston.
11 Wash the components in clean hydraulic
fluid or methylated spirit and dry with a lint-
free rag.
12 Examine the cylinder bore and piston
carefully for signs of scoring, or wear ridges. If
these are apparent, renew the complete
master cylinder. If the condition of the
components appears satisfactory, a new set
of rubber seals must be obtained. Never re-
use old seals as they will have deteriorated
with age even though this may not be evident
during visual inspection.
13 Begin reassembly by thoroughly
lubricating the internal components and the
cylinder bore in clean hydraulic fluid.
9•10 Braking system
11.2 Handbrake lever retaining nuts and bolts 12.2 Removal of the single circuit master cylinder
1 Master cylinder
2 Retaining nuts
3 Pushrod-to-brake pedal
attachment
4 Hydraulic pipe union
 Loading...