10 Release the pushrod rubber boot from the
end of the cylinder, push the pushrod in and
extract the retaining circlip. Now lift away the
pushrod assembly.
11 Remove the master cylinder from the vice,
tap it on a block of wood and withdraw the
primary and secondary piston assemblies
from the cylinder bore.
12 Unscrew the brake failure switch from the
cylinder body.
13 Unscrew the end plug and washer, then
remove the distance piece and pressure
differential piston assembly.
14 Note the position and direction of fitting of
the rubber seals on the piston assemblies,
and then carefully remove them.
15 Wash all the parts in clean hydraulic fluid
or methylated spirit and dry with a lint-free
cloth.
16 Examine the bore of the master cylinder
carefully for any signs of scores or ridges. If
this is found to be smooth all over, new seals
can be fitted. If, however, there is any doubt
about the condition of the bore, then a new
cylinder must be obtained and fitted. Never
re-use old seals, as they will have deteriorated
with age even though this may not be evident
during visual inspection.
17 Reassembly of the master cylinder is the
reverse sequence to removal, but the
following additional points should be noted:
a) Thoroughly lubricate all components in
clean hydraulic fluid and assemble them wet
b) Refit the seals onto the pistons using
fingers only, and ensure that they are
fitted the correct way round
c) When refitting the secondary piston
assembly, push the piston down the bore
using a soft metal rod and insert the stop
pin. The primary piston and remaining
components can then be fitted
Refitting
18 Refitting is the reverse sequence to
removal. On completion, bleed the complete
hydraulic system as described in Section 2.
16 Tandem master cylinder
(type 3) - removal, overhaul
and refitting
3
Removal, refitting and overhaul of the type
3 master cylinder is essentially the same as
for the type 2 unit and reference should be
made to the procedures contained in Section
15. Bear in mind also the differences between
the two types outlined in Section 13.
17 Tandem master cylinder
(type 4) - removal, overhaul
and refitting
3
Note: Before starting work, refer to the
warning at the beginning of Section 2
concerning the dangers of hydraulic fluid.
Removal
1 If necessary, for improved access to the
front and rear bleed screws, jack up the front
and rear of the car and support it on axle
stands (see “Jacking and vehicle support”).
2 Connect a bleed tube to both the front
caliper and rear wheel cylinder bleed screws
on the right-hand side, and place the ends of
the tubes in suitable containers.
3 Open both bleed screws and depress the
brake pedal until the master cylinder is
completely empty, then tighten the screws.
4 Disconnect the low fluid level warning light
wiring from the fluid reservoir filler cap.
5 Place a cloth around the master cylinder to
catch any spilled fluid then unscrew the
hydraulic pipe unions from the master cylinder
and carefully pull the pipes clear. Plug or tape
over the disconnected unions to prevent dirt
entry.
6 Unscrew the mounting nuts securing the
master cylinder to the vacuum servo unit, then
withdraw it from the engine compartment,
taking care not to spill any brake fluid on the
bodywork.
7 Remove the O-ring from the recess in the
master cylinder.
Overhaul
8 Remove the filler cap from the master
cylinder, and drain and discard the hydraulic
fluid from the reservoir.
9 Mount the cylinder in a vice with protected
jaws, so that the reservoir is uppermost.
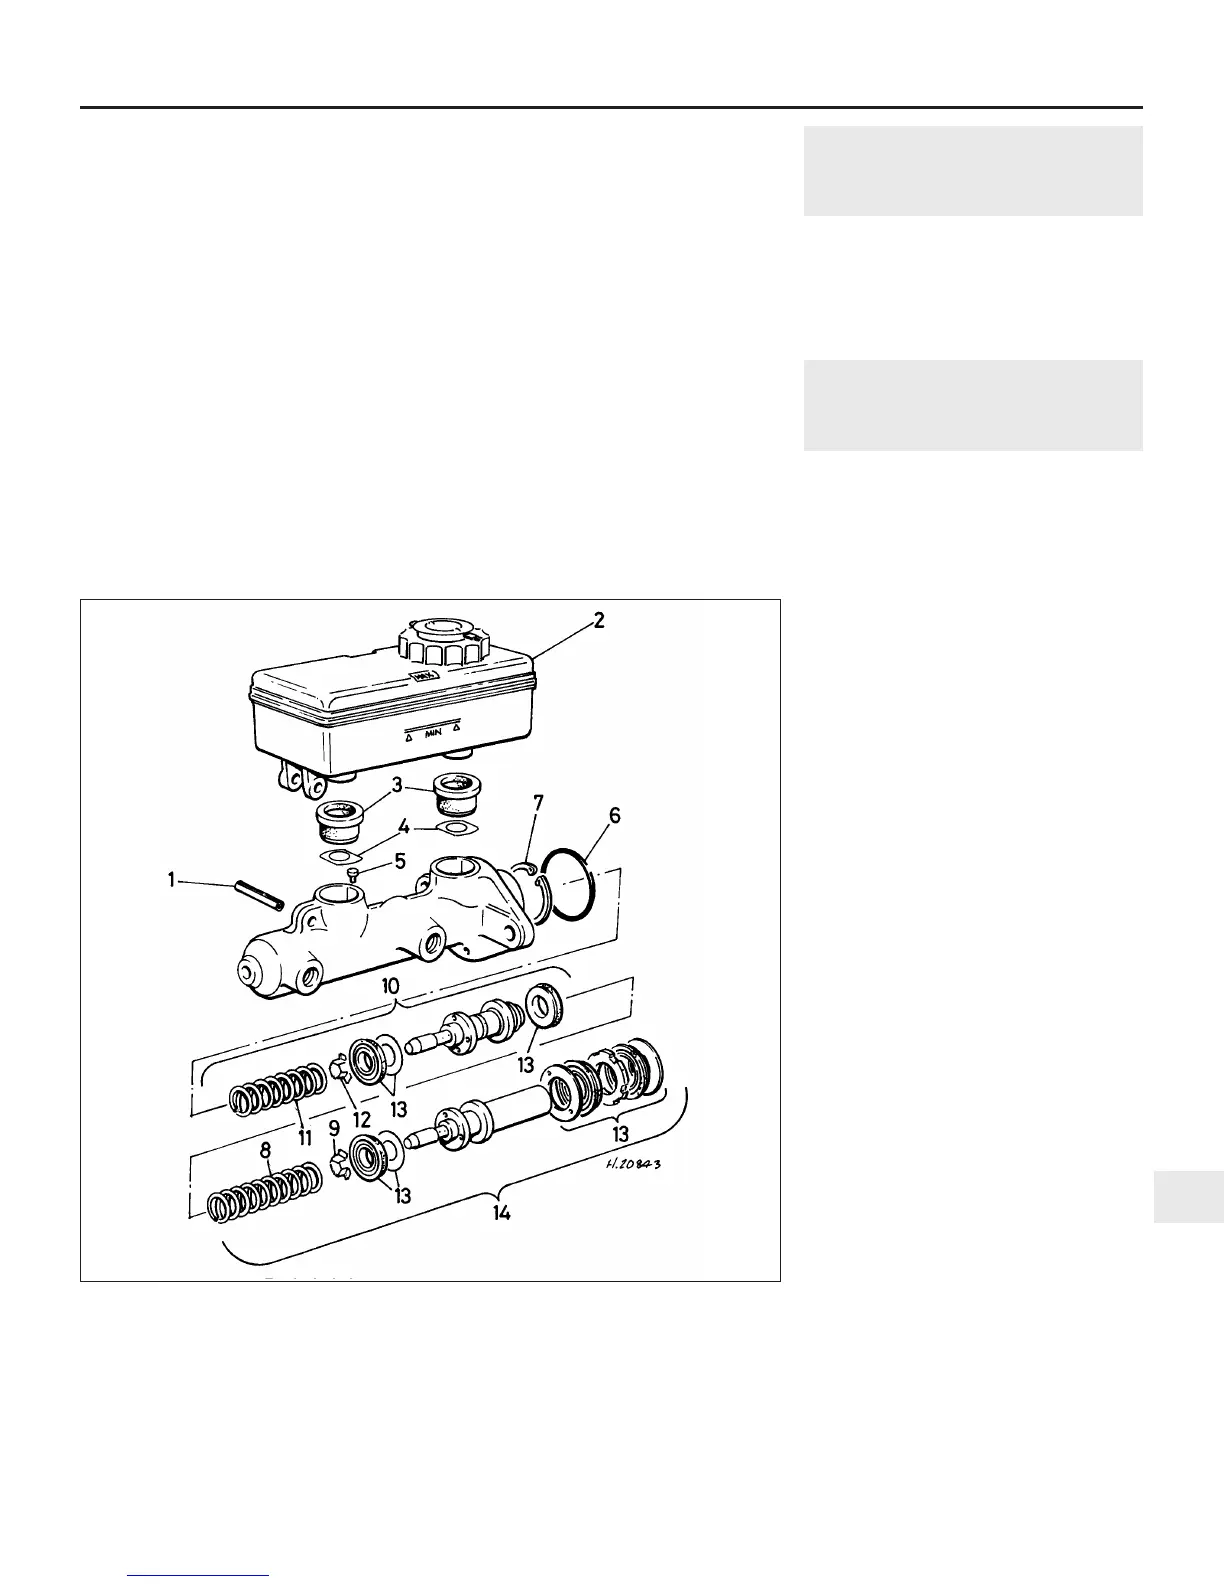
10 Tap out the retaining roll pin and lift the
reservoir off the master cylinder body (see
illustration). Carefully withdraw the two
reservoir sealing washers from the outlets
followed by the metal seating washers.
11 Push in the primary piston and, using
pliers, extract the secondary piston stop pin
from its recess.
12 Extract the retaining circlip from the end
of the master cylinder bore.
13 Remove the master cylinder from the vice,
tap it on a block of wood and withdraw the
primary and secondary piston assemblies
from the cylinder bore.
Braking system 9•15
9
17.10 Exploded view of the type 4 tandem master cylinder
1 Roll pin
2 Brake fluid reservoir
3 Sealing washers
4 Metal seating washers
5 Secondary piston stop-pin
6 O-ring
7 Circlip
8 Primary spring
9 Spring retainer
10 Secondary piston components
11 Secondary spring
12 Spring retainer
13 Seal and washer
14 Primary piston components
 Loading...