metal underlay is showing through, then they
must be renewed (where applicable). This
operation must be entrusted to a Rover dealer
or engine reconditioning specialist as it
demands the use of specialised equipment.
The bearings are removed with a special drift,
after which new bearings are pressed in, care
being taken to ensure that the oil holes in the
bearings line up with those in the block. With
a special tool the bearings are then reamed in
position.
8 The camshaft itself should show no signs of
wear, but if very slight scoring on the cam
lobes is noticed, the score marks can be
removed by very gentle rubbing down with
very fine emery cloth. The greatest care
should be taken to keep the cam profiles
smooth.
Tappets
9 Examine the bearing surface of the tappets
which contact the camshaft lobes. Any
indentation in this surface or any cracks
indicate serious wear and the tappets should
be renewed. Thoroughly clean them out,
removing all traces of sludge. It is most
unlikely that the sides of the tappets will prove
worn, but, if they are a very loose fit in their
bores and can readily be rocked, they should
be renewed. It is very unusual to find any wear
in the tappets, and any wear present is likely
to occur only at very high mileage.
Refitting
10 On 1275 cc engines, generously lubricate
the tappets internally and externally, and
insert them in the bores from which they were
removed.
11 Wipe the camshaft bearing journals clean
and lubricate them generously with engine oil.
12 Insert the camshaft into the cylinder
block, taking care not to damage the
camshaft bearings with the sharp edges of the
cam lobes.
13 Push the camshaft back as far as it will go
and, if the oil pump is in position, ensure that
the camshaft flange has mated with the pump
drive.
14 Place a new gasket in position and refit
the front plate (if previously removed).
15 Now refit the camshaft locating plate and
tighten the three retaining bolts. Temporarily
refit the camshaft sprocket, then check the
camshaft endfloat, referring to the figures
given in the Specifications.
16 Refit the remaining front plate bolts
located inside the timing cover profile.
17 On 848, 998 and 1098 cc engines, refit
the tappet block side covers using new
gaskets and secure with the retaining bolts.
10 Oil pump - removal,
inspection and refitting
3
Removal
Note: Prior to removing the pump, it will be
necessary to remove the flywheel and flywheel
housing, or torque converter and housing. The
oil pump engages directly via a lip and slot or
splined drive with the rear of the camshaft.
1 Bend back the locking tabs on the securing
bolts which hold the pump to the block.
2 Unscrew and remove the bolts and lock
tabs, then lift off the oil pump assembly.
Inspection
Note: Three types of oil pump have been
fitted during the course of production; these
are the Burman, Hobourn Eaton, and the
Concentric (Engineering) pumps. The Burman
and Hobourn Eaton pumps may be
dismantled for inspection as described below;
however the Concentric (Engineering) pump is
a sealed unit which cannot be dismantled, and
if suspect should be exchanged for a new unit.
It is quite likely that after high mileage the
rotor, (or vanes), shaft, and internal body of
the pump will be quite badly scored, requiring
renewal of the pump. This is mainly due to the
engine and transmission sharing the same
lubricating oil, making thorough filtration of
minute metallic particles impossible. It is
therefore recommended that a very careful
inspection of the pump be carried out and, if
at all suspect, the pump renewed.
3 To dismantle either the Burman or Hobourn
Eaton type of pump, undo and remove the
securing screw on the rear face and lift off the
cover, rotor and shaft.
4 Examine the rotor and shaft lobes (or vanes
on the Burman pump) for scoring or wear
ridges. Also check the inner circumference of
the pump body. Renew the complete pump if
wear is apparent.
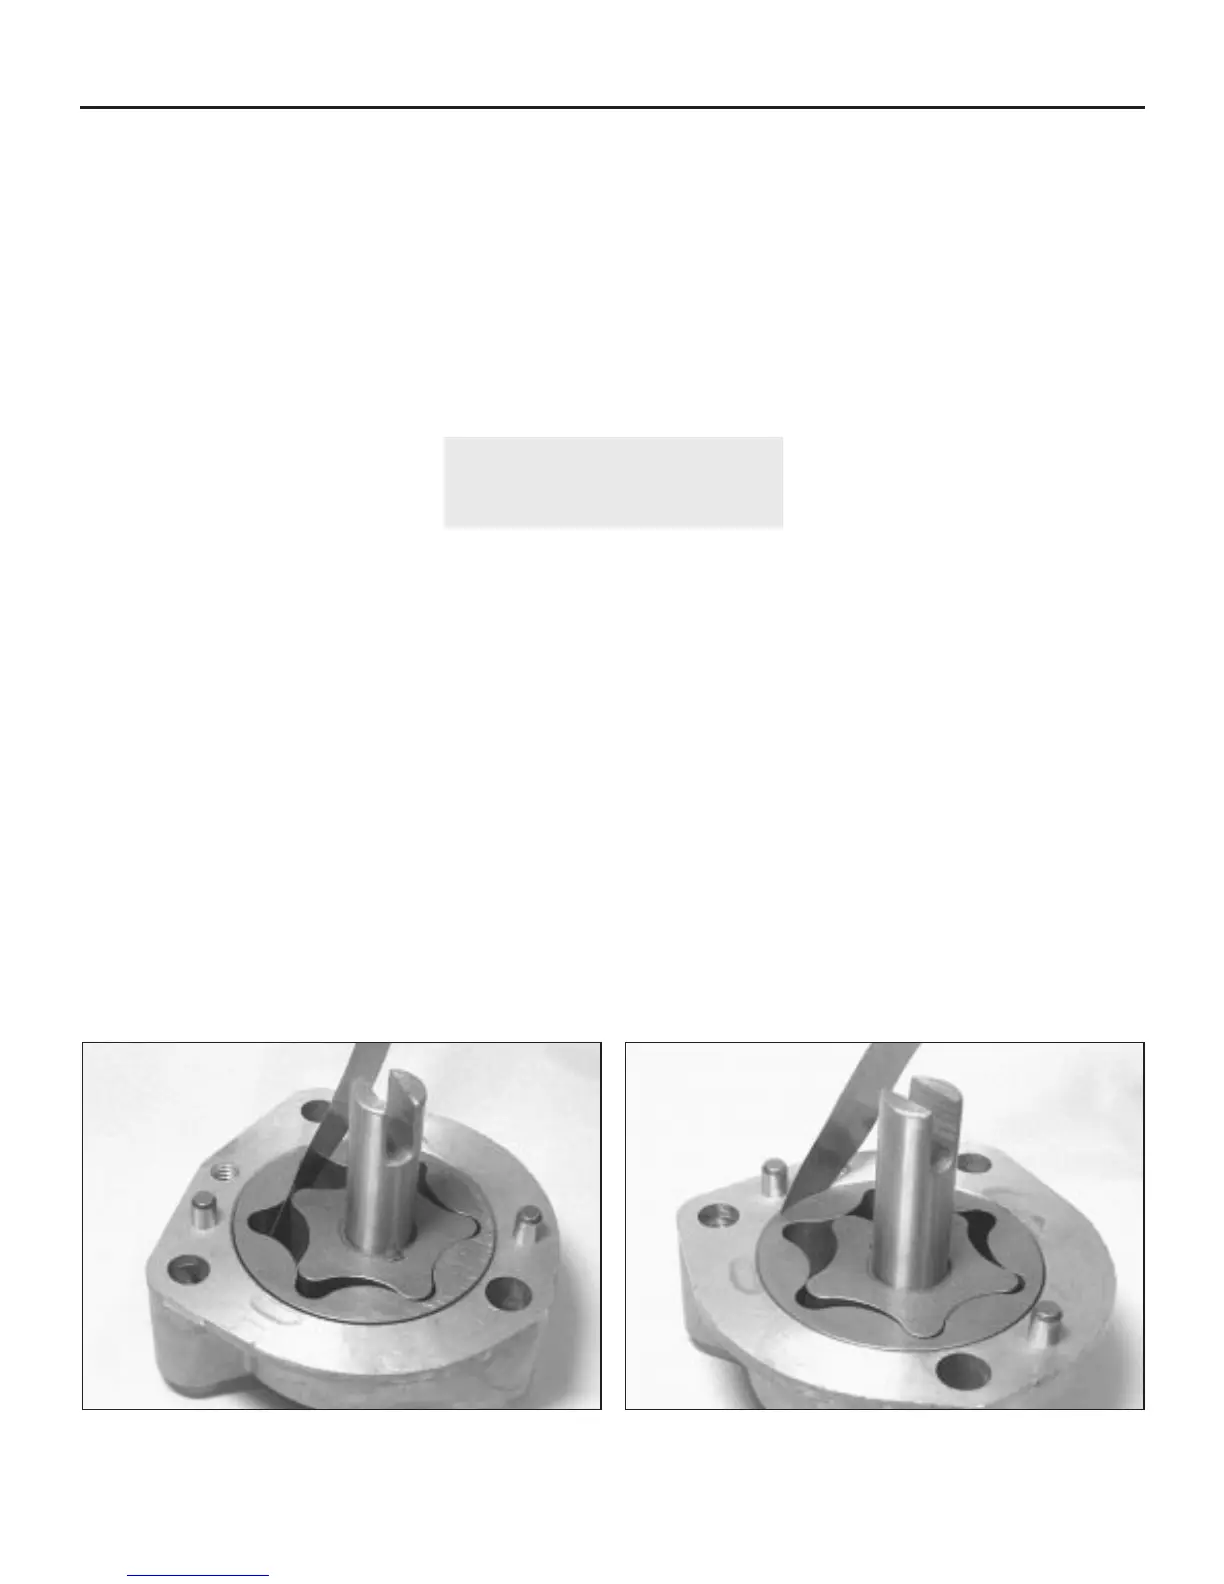
5 If the pump is in a satisfactory condition,
measure the clearances between the shaft
lobes and the side of the pump body (see
illustrations). If the clearances are outside the
limits given in the Specifications the pump
must be renewed.
6 Reassembly of the pump is the reverse
sequence to dismantling. Fill the assembled
pump with clean engine oil before refitting to
the engine.
Refitting
7 Ensure that the pump and cylinder block
mating faces are clean then place a new
gasket in position on the rear face of the
block.
8 Check that the pump is filled with clean
engine oil and then position it over the gasket,
engaging the drive slot or coupling with the
rear of the camshaft.
9 Rotate the pump body until the offset holes
in the pump, gasket and cylinder block are all
in line, then refit the retaining bolts and new
locktabs.
10 Tighten the bolts to the specified torque
and bend over the locktabs.
2B•14 Engine removal and overhaul procedures
10.5a Measuring the oil pump rotor lobe clearance . . . 10.5b . . . and rotor-to-body clearance
 Loading...